
- Last Updated

Login (User Flow)
Understanding
Stove Login is the standard procedure for users to access games or web services using their Stove account. It supports various authentication methods, including email, guest, and 3rd party (Google, Facebook, Apple, etc.). Depending on the launch platform (Mobile/PC/Web), you can integrate it by using the SDK integrated UI or by configuring the UI directly within the game.
Login Flow
The login flow and tools used vary depending on the platform where the game is launched. You only need to integrate the necessary areas according to your game's launch format.
| Platform | Integration Tool | Login UI Configuration Method | Typical Entry Scenario |
|---|---|---|---|
| Mobile | Mobile SDK | Integrated UI (AuthUI) / Custom Configuration (Auth DATA API) |
App Launch → Account Login → Enter Game |
| PC | PC SDK + Stove PC Client | SDK automatically receives launcher login information | Game launch after launcher login → Auto-login |
| Web | Stove Web Authentication (GNB / Login URL) | Responsive GNB UI or Stove login page | Account login on official website/event page |
Note on Platform Integration
ㆍ Multi-platform games integrate necessary platforms together, such as Mobile + PC + Web.
ㆍ Even if platforms differ, the Stove member identifier remains the same, ensuring a seamless account experience.
Login Process
Existing members log in, while new users sign up or enter the game as guests.
Regardless of the platform (Mobile/PC/Web), the login process can be summarized in the following 3 steps.
| Step | Task | Description |
|---|---|---|
| 1 | Initialize SDK or web module | Acquire initial information for using STOVE services |
| 2 | Perform login | Log in with an account and issue a User Access Token. Handle terms of service agreement if necessary |
| 3 | Prepare to enter the game | Save character information after selecting a server/world. Used for identification in coupons, pop-ups, billing, push notifications, etc. |
Login Methods
The STOVE SDK supports two login methods. Although expressed based on the Mobile SDK, the same concepts are applied to each platform.
| Method | Description |
|---|---|
| Integrated Login UI (Auth.UI) | Easily implement authentication with an integrated UI. Adding or excluding authentication methods is flexible. |
| Direct Login Implementation (DATA API) | Implement desired authentication directly using the DATA API. Acquire tokens via login for each Provider. |
Criteria for choosing a method
ㆍ If fast release and using a standard UI are priorities, we recommend the Integrated Login UI.
ㆍ If a unique game UI/UX is required, choose the direct login (DATA API) method.
Provider Types
A Provider is an authentication channel. Select and register the channels the game will expose. (Based on Mobile SDK)
| Provider | Android | iOS | Unity | Unreal |
|---|---|---|---|---|
| Email (STOVE) | O | O | O | O |
| Guest | O | O | O | O |
| O | O | O | O | |
| O | O | O | O | |
| Apple | O | O | O | O |
| Steam | O | O | – | – |
| LINE | O | O | O | O |
| Naver | O | O | O | O |
| O | O | O | O |
PC/Web Channel Reference
ㆍ PC uses the login channel of the Stove PC client, and Web uses the channel of the Stove login page.
ㆍ PC/Web channels may vary depending on platform policies, so please check with the technical PM in charge.
Provider Display Order
On the mobile SDK login screen, providers are displayed in the order you have configured.
- Email is mandatory and must be displayed first in the list.
- Multi-platform (PC-supported) games must display all providers offered by Stove, and individual selection is not possible.
- The recommended display order by region can be found in 이용 시나리오 > 로그인하기.
Additional Login Features
These are additional features provided by Stove Login in addition to the basic login.
| Function | Platform | Description |
|---|---|---|
| GPG Login (Google Play Games) |
Mobile SDK (Android) | 1:1 linking between Google Play Games account and STOVE account |
| Auto-login | Mobile SDK, PC SDK | Automatically logs in without input if a valid token exists |
Precautions
Please check before linking login
ㆍ Token validation on the server is mandatory after login. Please refer to 인증 가이드 for the validation flow.
ㆍ Character setup is mandatory. If not set, back-office integration features (coupons, pop-ups, billing, push, etc.) will not work.
Integration Guide
Prerequisites by Platform
You only need to proceed with the prerequisites for the platforms required based on your game's release format.
| Platform | Required Items |
|---|---|
| Mobile | ㆍ Apply Mobile SDK ㆍ Set App ID/Client ID ㆍ Register Package/Bundle ID ㆍ Pre-configuration by 3rd party Provider |
| PC | ㆍ Apply PC SDK (PCSDK3) ㆍ Set App ID/Client ID ㆍ Login is handled by STOVE PC client (no separate Provider setup required) |
| Web | ㆍ Available if the domain is xxx.game.onstove.comㆍ Domain connection and referral path codes are handled by the Technical PM ㆍ External infrastructure requires an SSL certificate |
| Server | ㆍ Issue API Access Token for token validation (refer to Authentication Guide ) ㆍ Firewall settings required when using SSO |
3rd party Provider pre-configuration must be completed before release
ㆍ Console settings, key issuance, and app settings for all Providers to be used must be completed to be displayed on the login screen.
ㆍ Failure to do so may delay the verification schedule.
Below is a summary of console settings, key issuance, and app settings for each 3rd party Provider. Please expand only the Provider items you intend to use. Follow Development Environment Setup for STOVE Maven repository registration and SDK module versions; this section only covers keys and settings for each Provider. Console key values (Client ID, Secret, Channel ID, etc.) are issued and provided by the publishing technical manager (Technical PM).
Overall Login Flow
The login sequence remains the same regardless of the platform (Mobile/PC/Web). Only the specific methods for implementing each step (SDK functions, UI configuration, etc.) vary by platform.
Development
Integrated Login (Recommended Flow)
This is the method for implementing authentication using the STOVE SDK's integrated login UI. The core flow of integrated login is Auth.initialize → setProvider → AuthUI.login → User.setGameProfile It proceeds in a 4-step sequence.
This is the step to acquire the initial information required to use the service. Initialization must be completed before you can use subsequent SDK features such as login, payment, and coupons.
- Acquire service configuration values(
service_id,market_game_id) - Check if an app update is required
- Check if the game is under maintenance
!infoApp updates and game maintenance are handled automatically
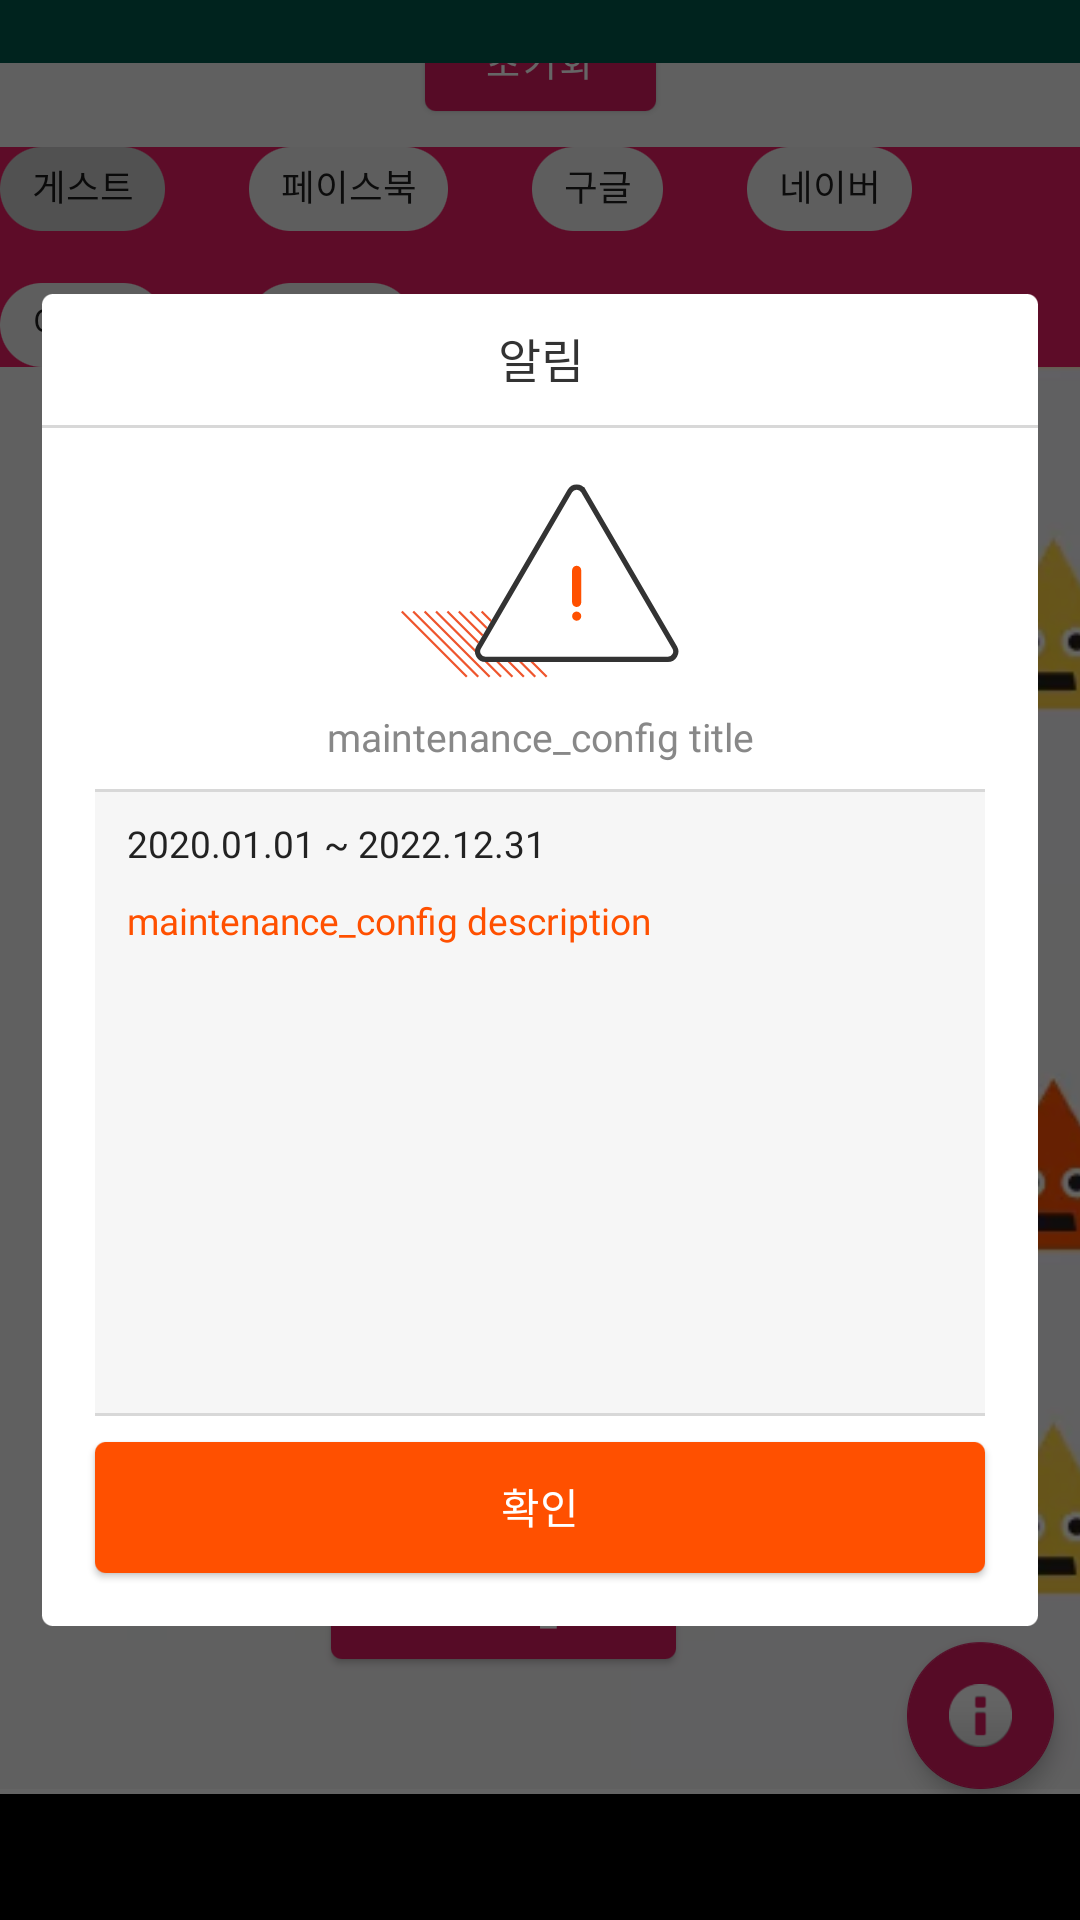
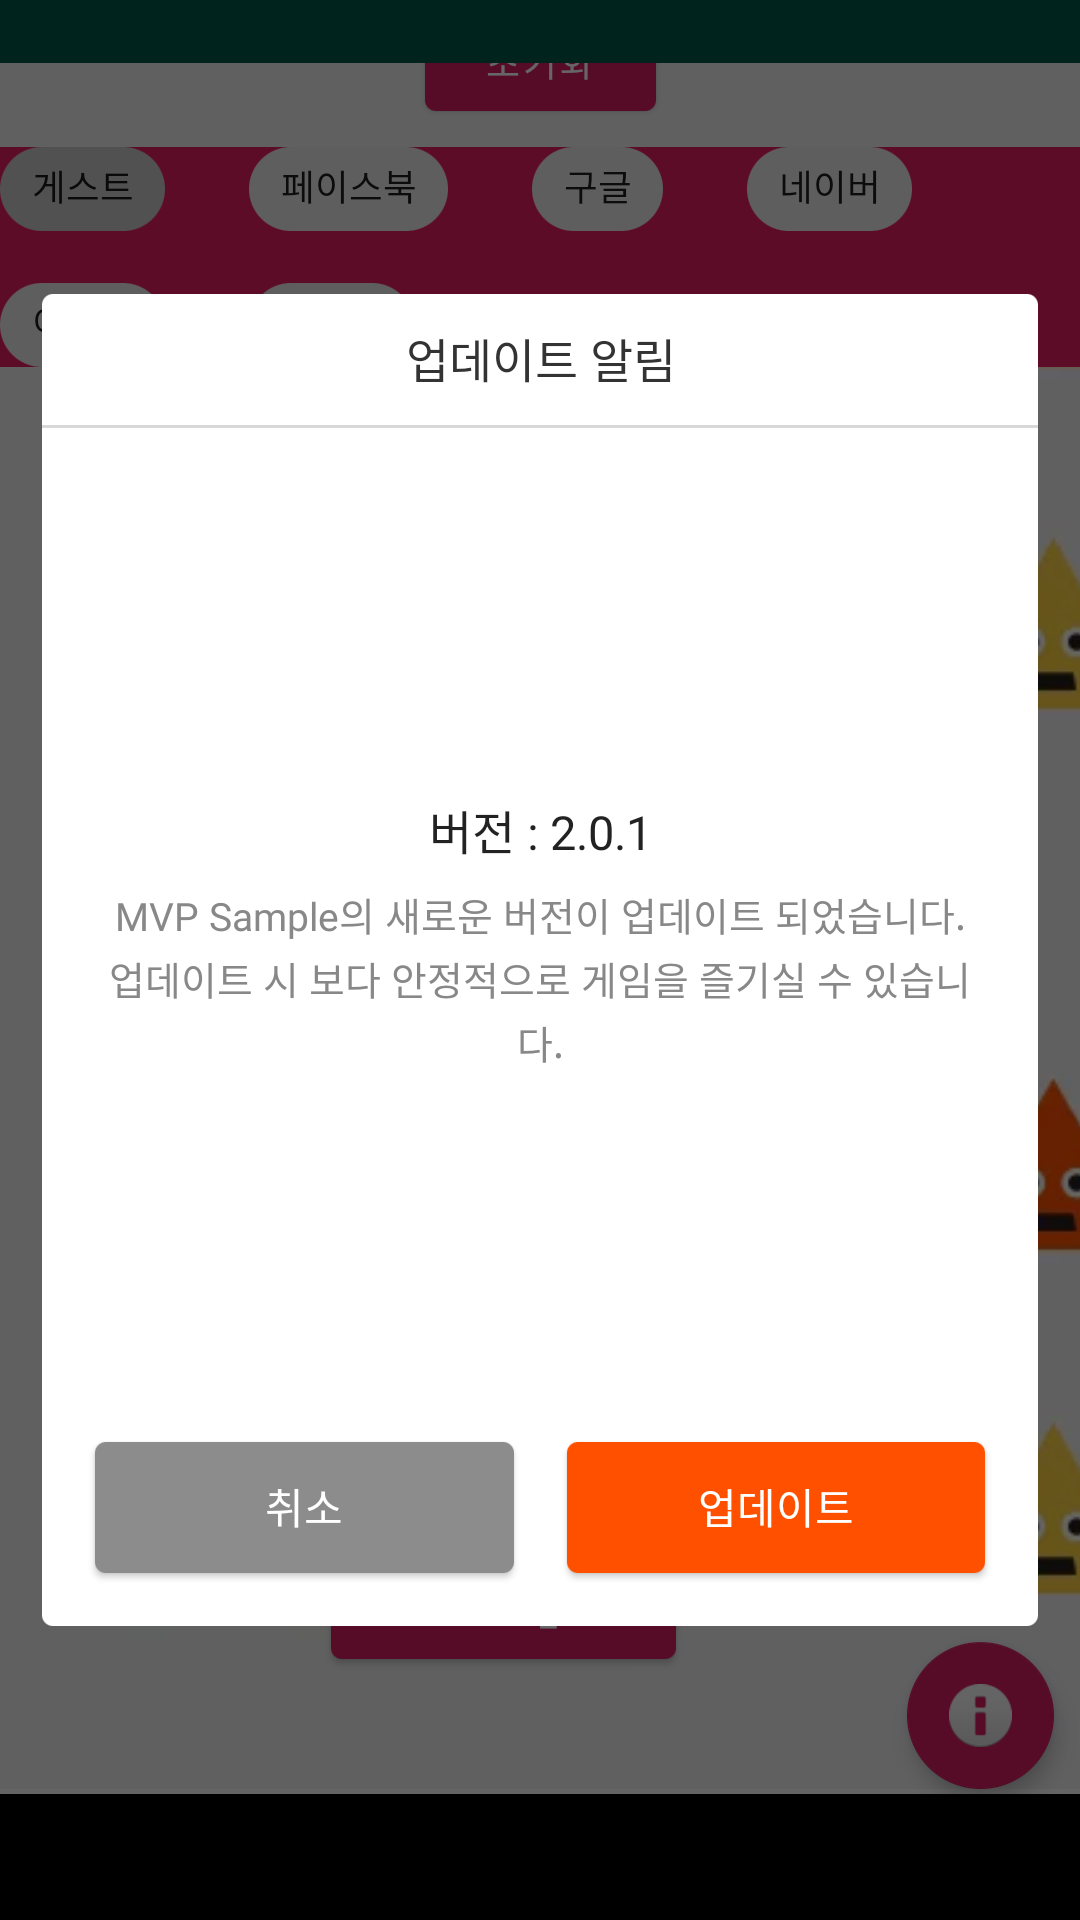
Auth.initializeIf you pass theResultreceived in the response toOperationUI.handleResult(activity, result, listener)as is, the SDK will automatically display the maintenance(MaintenanceError30003) / app update(AppUpdateError30004) screen. Continue the game entry flow within the callback. Refer to the code example in the 앱 업데이트 및 게임 점검 처리 section below.
=== "Unity"
public void AuthInitialize()
{
    Auth.Initialize(result =>
    {
        if (result.IsSuccessful)
        {
            //초기화 성공
            /** 초기화 성공 및 앱 선택 업데이트 처리 **/
            OperationUI.HandleResult(result, (Result operationResult) =>
            {
                //IAP 초기화 | GameConfig 조회 | ...(중략)...
                /** ex) Touch To Screen 화면 노출 (=게임 시작이 준비되어 로그인 가능한 상태) **/
                //사용자가 화면을 터치
                if (Auth.AccessToken != null)
                {
                    /** AccessToken 있음 → 게스트 & 정회원 관계 없이 자동로그인으로 처리 **/
                    Login();
                }
                else
                {
                    /** AccessToken 없음 → 사용자 로그인 방식을 선택할 수 있도록 화면 제공 (`게스트 시작 & 로그인`) **/
                    //사용자가 `게스트 시작`을 선택한 경우 → `StartNewGuest()` 호출
                    //`로그인`을 선택한 경우 → `Login()` 호출
                }
            });

        }
        else if (result.Domain.Equals(Auth.Domain))
        {
            if (result.ErrorCode == AuthConfigurationError)
            {
                //설정 오류
                //set meta-data 'com.stove.environment' in AndroidManifest.xml
                //"check constants server :client_id and service_id are null or empty"
            }
            else
            {
                //ErrorCode == 30003 점검
                //ErrorCode == 30004 강제 업데이트
                /** 점검 및 앱 강제 업데이트 팝업 처리 **/
                OperationUI.HandleResult(result, (Result operationResult) =>
                {
                });
            }
        }
        else
        {
            //네트워크 또는 기타 서버 에러
            OperationUI.HandleResult(result, (Result operationResult) =>
            {
            });
        }
    });
}
=== "Unreal"
#include "Auth.h"
#include "OperationUI.h"
#include "Result.h"

Auth::Initialize([] (Result result) {
    string resultString = result.ToJSONString();

    if (result.IsSuccessful()) {
        OperationUI::HandleResult(result, [] (Result operationResult) {
            //IAP 초기화 | GameConfig 조회 | ...(중략)...
            /** ex) Touch To Screen 화면 노출 (=게임 시작이 준비되어 로그인 가능한 상태) **/
            //사용자가 화면을 터치
            AccessToken accessToken = Auth::GetAccessToken();

            if (!accessToken.IsNull()) {
            {
                /** AccessToken 있음 → 게스트 & 정회원 관계 없이 자동로그인으로 처리 **/
                Login();
            }
            else
            {
                /** AccessToken 없음 → 사용자 로그인 방식을 선택할 수 있도록 화면 제공 (`게스트 시작 & 로그인`) **/
                //사용자가 `게스트 시작`을 선택한 경우 → `StartNewGuest()` 호출
                //`로그인`을 선택한 경우 → `Login()` 호출
            }
        });
    } else if (result.domain.Equals(Auth::Domain, ESearchCase::CaseSensitive)) {
        if (result.errorCode == Auth::AuthConfigurationError) {

        } else {
            // 강제 업데이트, 점검
            OperationUI::HandleResult(result, [] (Result operationResult){

            });
        }
    } else {
        // 네트워크 또는 기타 서버 에러
        OperationUI::HandleResult(result, [] (Result operationResult){

        });
    }
});
=== "Android (Kotlin)"
fun initialize(activity: Activity) {
    Auth.initialize(activity.applicationContext) { result ->
        when {
            result.isSuccessful() -> {
                //Init succeed. Handle optional app update
                OperationUI.handleResult(activity, result) {
                    //Do login.
                }
            }
            result.domain == Auth.Domain -> {
                when (result.errorCode) {
                    Auth.AuthConfigurationError -> {
                        //set meta-data 'com.stove.environment' in AndroidManifest.xml
                        //"check constants server :client_id and service_id are null or empty"
                    }
                    else -> {
                        //Handle required app update & maintenance
                        OperationUI.handleResult(activity, result) {

                        }
                    }
                }
            }
            else -> {
                //NetworkError
                //User notify & retry initialize
                OperationUI.handleResult(activity, result) {
                    initialize(activity)
                }
            }
        }
    }
}
=== "Android (Java)"
public void initialize(@NotNull final Activity activity) {
    Auth.initialize(this, (@NotNull Result result) -> {
        if (result.isSuccessful()) {
            //Init succeed. Handle optional app update
            OperationUI.handleResult(activity, result, (@NotNull Result handleResult) -> {
                //Do login.
                return null;
            });
        } else if (result.getDomain().equals(Auth.Domain)) {
            switch (result.getErrorCode()) {
                case Auth.AuthConfigurationError:
                    //set meta-data 'com.stove.environment' in AndroidManifest.xml
                    //"check constants server :client_id and service_id are null or empty"
                    break;
                default:
                    //Handle required app update & maintenance
                    OperationUI.handleResult(activity, result, (@NotNull Result handleResult) -> null);
            }
        } else {
            //NetworkError
            //User notify & retry initialize
            OperationUI.handleResult(activity, result, (@NotNull Result handleResult) -> {
                initialize(activity);
                return null;
            });
        }
        return null;
    });
}
=== "iOS"
[SGSAuth initializeWithCompletionHandler:^(SGSResult * _Nonnull result) {
    if ([result isSuccessful]) {
        // 선택 업데이트 또는 성공
        [SGSOperationUI handleResult:result fromViewController:self completionHandler:^(SGSResult * _Nonnull result) {

        }];
    } else if ([[result domain] isEqualToString:SGSAuthErrorDomain]) {
        if ([result errorCode] == SGSAuthErrorAuthConfig) {
            // check constants server : client_id and service_id are null or empty
        } else {
            // 강제 업데이트, 점검
            [SGSOperationUI handleResult:result fromViewController:self completionHandler:^(SGSResult * _Nonnull result) {

            }];
        }
    } else {
        // 네트워크 또는 기타 서버 에러
        [SGSOperationUI handleResult:result fromViewController:self completionHandler:^(SGSResult * _Nonnull result) {

        }];
    }
}];
ErrorCodes
!infoCases with clear actions
30001AuthConfigurationError: The partner key (client_id·service_id) is missing. Please ensure the partner-issued key is correctly applied before calling initialization.30003MaintenanceError /30004AppUpdateError: This is a normal response for maintenance or app updates.OperationUI.handleResultPass the result as-is to the SDK to display the automatic guidance UI. (Do not handle it manually)
| Domain | ErrorCode | Description |
|---|---|---|
| com.stove.success | 0 | Success |
| com.stove.auth | 30001 | AuthConfigurationError : Check constants server : client_id and service_id are null or empty |
| com.stove.auth | 30003 | MaintenanceError |
| com.stove.auth | 30004 | AppUpdateError |
| com.stove.base.network | 10001 | NoConnectionError |
| com.stove.base.network | 10002 | TimeoutError |
App Update and Game Maintenance Handling
If the initialization result is 'App Update' or 'Game Maintenance', the UI is displayed to guide the user.
=== "Unity"
public void HandleResult(Result result)
{
    OperationUI.HandleResult(result, (Result handleResult) =>
    {

    });
}
=== "Unreal"
#include "OperationUI.h"
#include "Result.h"

OperationUI::HandleResult(result, [] (Result operationResult) {

});
=== "Android (Kotlin)"
fun handleResult(activity: Activity, result : Result){
    OperationUI.handleResult(activity, result) {
    }
}
=== "Android (Java)"
OperationUI.handleResult(activity, result, (@NotNull Result it) -> {
    return null;
});
=== "iOS"
[SGSOperationUI handleResult:result fromViewController:fromViewController completionHandler:^(SGSResult * _Nonnull result) {

}];
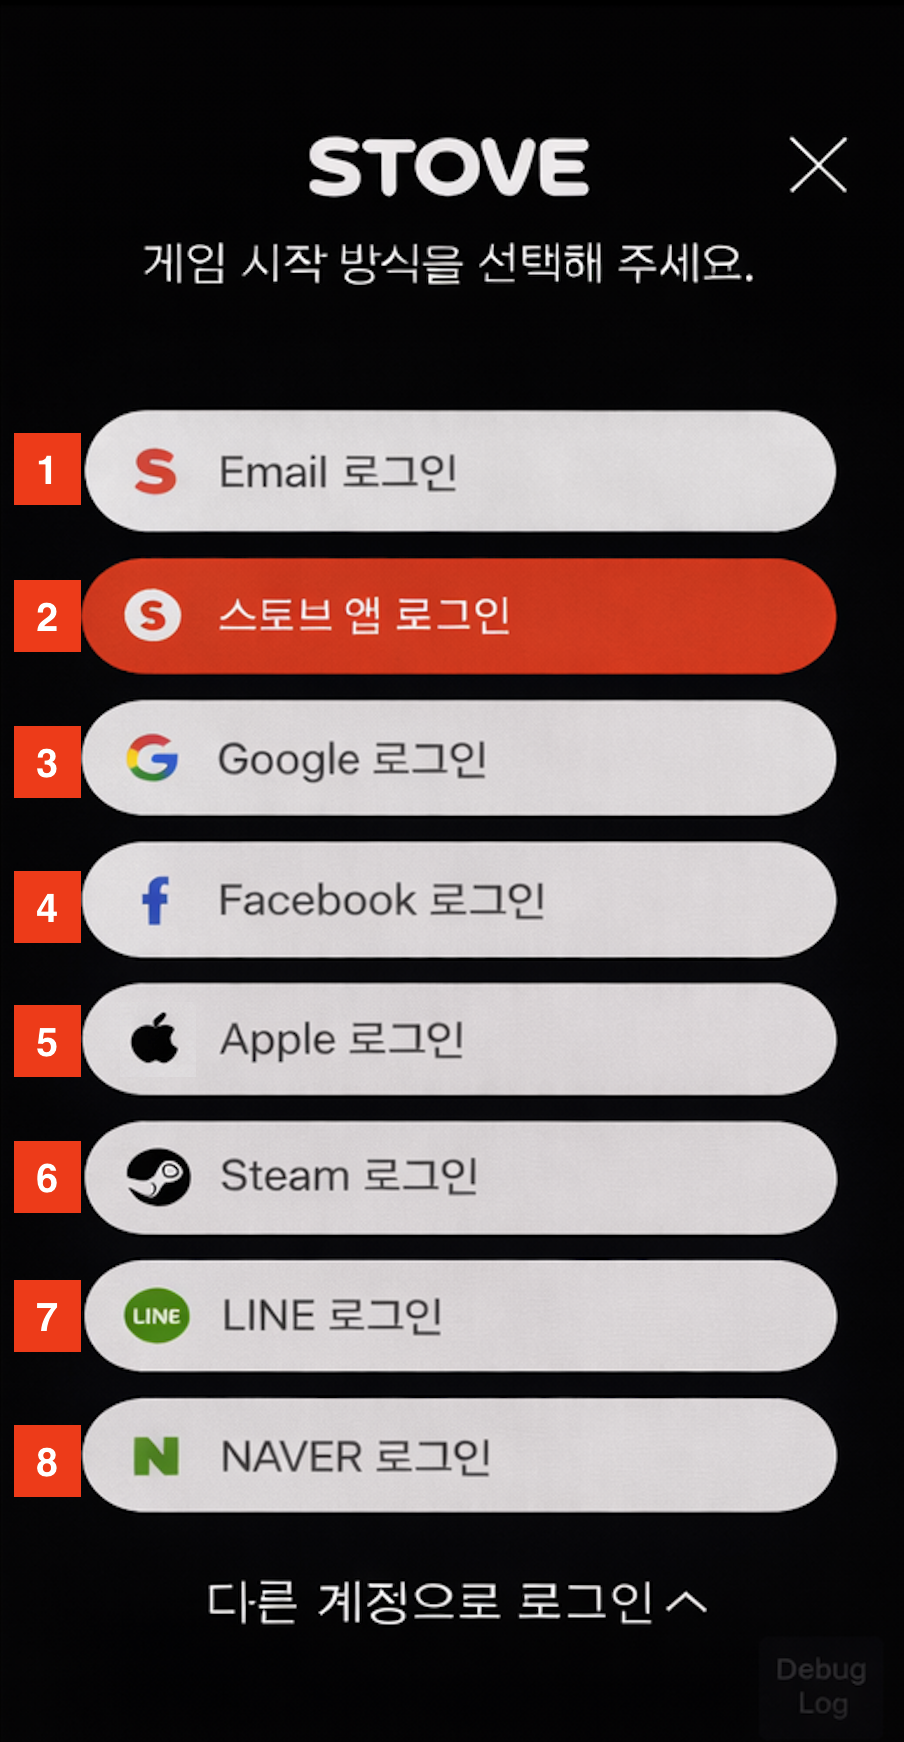
AuthUI.loginRegister the authentication channels (Providers) that the game will support before calling. They are displayed on the login screen in the order they were registered.
Adding Authentication Channels (Partner Pre-configuration)
Register authentication information in advance in the Partners Console for each Provider to be displayed on the login screen. Refer to the links below for each channel's configuration guide.
- The Provider list is displayed on the login screen in the order they were added.
- Email is a default setting on the login screen even if you do not add a Provider (however, the Email Provider is mandatory for login screen type B).
- If the 'Email Provider' is not set on the connection screen, it will not be displayed.
Applying setProviders Code
AuthUI.setProvidersRegister the Providers the game will support. The order of the array passed is the order of display on the screen. AuthUI.login Must be executed before calling.
=== "Unity"
public void SetProviders()
{
    List<Provider> providers = new List<Provider>
    {
        new EmailProvider(),
        new StoveAppProvider(),
        new GuestProvider(),
        new GoogleProvider(),
        new FacebookProvider(),
        new AppleProvider(),
        new SteamProvider(),
        new LineProvider(),
        new NaverProvider(),
        new TwitterProvider()
    };
    AuthUI.Providers = providers;
}
=== "Unreal"
#include "EmailProvider.h"
#include "StoveAppProvider.h"
#include "GuestProvider.h"
#include "GoogleProvider.h"
#include "FacebookProvider.h"
#include "AppleProvider.h"
#include "SteamProvider.h"
#include "LineProvider.h"
#include "NaverProvider.h"
#include "TwitterProvider.h"
#include "AuthUI.h"

list<Provider*> provider;
provider.push_back(new EmailProvider());
provider.push_back(new StoveAppProvider());
provider.push_back(new GuestProvider());
provider.push_back(new GoogleProvider());
provider.push_back(new FacebookProvider());
provider.push_back(new AppleProvider());
provider.push_back(new SteamProvider());
provider.push_back(new LineProvider());
provider.push_back(new NaverProvider());
provider.push_back(new TwitterProvider());

AuthUI::SetProviders(provider);
=== "Android (Kotlin)"
fun setProviders(context : Context) {
    AuthUI.setProviders(context, listOf(
        EmailProvider(), StoveAppProvider(), GuestProvider(),
        GoogleProvider(), FacebookProvider(), AppleProvider(),
        SteamProvider(), LineProvider(), NaverProvider(), TwitterProvider()
    ))
}
=== "Android (Java)"
public void setProviders(@NotNull Context context) {
    AuthUI.setProviders(context, CollectionsKt.listOf(
        new EmailProvider(), new StoveAppProvider(), new GuestProvider(),
        new GoogleProvider(), new FacebookProvider(), new AppleProvider(),
        new SteamProvider(), new LineProvider(), new NaverProvider(), new TwitterProvider()
    ));
}
=== "iOS"
SGSEmailProvider *emailProvider = [[SGSEmailProvider alloc] init];
SGSStoveAppProvider *stoveappProvider = [[SGSStoveProvider alloc] init];
SGSGuestAppProvider *guestProvider = [[SGSGuestProvider alloc] init];
SGSAppleProvider *appleProvider = [[SGSAppleProvider alloc] init];
SGSGoogleProvider *googleProvider = [[SGSGoogleProvider alloc] init];
SGSFacebookProvider *facebookProvider = [[SGSFacebookProvider alloc] init];
SGSSteamProvider *steamProvider = [[SGSSteamProvider alloc] init];
SGSLineProvider *lineProvider = [[SGSLineProvider alloc] init];
SGSNaverProvider *naverProvider = [[SGSNaverProvider alloc] init];
SGSTwitterProvider *twitterProvider = [[SGSTwitterProvider alloc] init];

NSArray *providers = @[emailProvider, stoveappProvider, guestProvider,
                       appleProvider, facebookProvider, googleProvider,
                       steamProvider, lineProvider, naverProvider, twitterProvider];

[SGSAuthUI setProviders:providers];
!infoFlow automatically handled by the SDK within AuthUI.login
The following processes occur together with a single integrated login call. If you use the integrated UI, separate calls are not required.
Feature Automatic Display Timing Case requiring separate calls Device Registration/Management Automatically displayed when new device registration is required When launching the device management UI directly from the in-game settings screen Identity Verification Automatically displayed when verification is required by law/policy When forcing re-verification before entering payment/sensitive features
AuthUI.loginWhen calling, it operates automatically according to the login flow.
It displays the login screen or refreshes the AccessToken, and if there are terms and conditions to show the user, it proceeds to handle them.
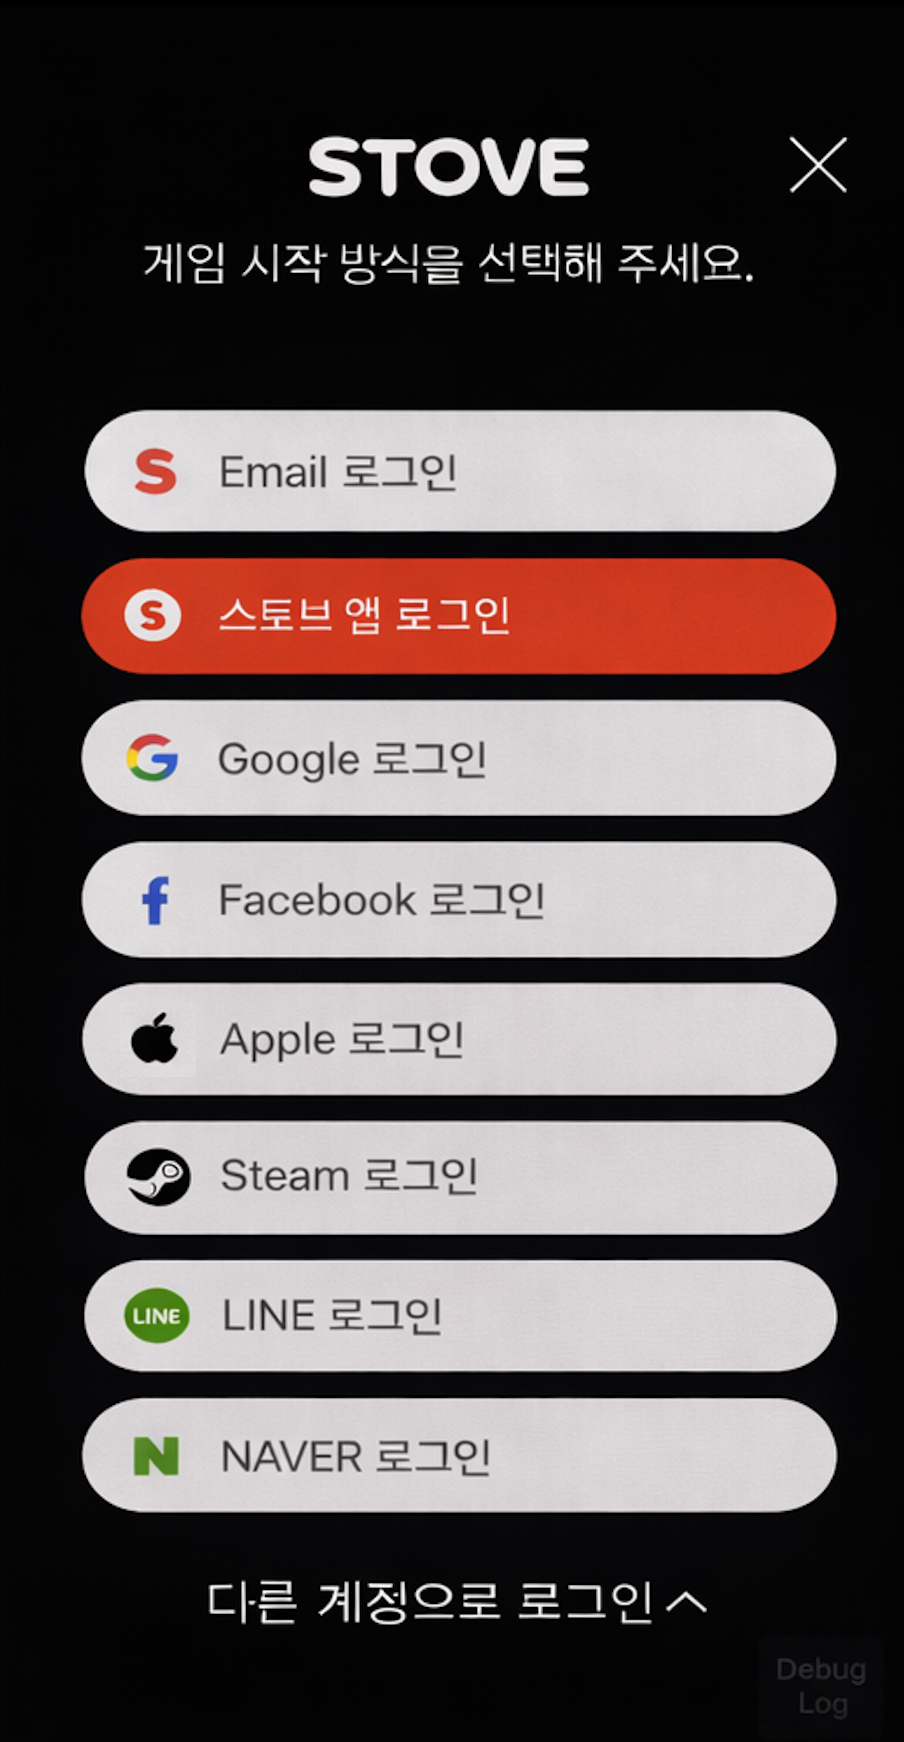
AuthUI.loginLogin UI display and AccessToken refresh are both handled with a single call.- 'Login with Stove APP' is only displayed on devices where the Stove APP is installed.
=== "Unity"
public void Login()
{
    AuthUI.Login((Result result, AccessToken accessToken) =>
    {
        if (result.IsSuccessful)
        {
            if (result.UserInfo != null && result.UserInfo.TryGetValue("userAction", out string userAction))
            {
                if (!string.IsNullOrEmpty(userAction) && userAction.Equals("sanction"))
                {
                    /** ex) 로그아웃 or 재시작 등 게임 시나리오에 맞게 적용 **/
                }
            }
        }
        else
        {
            if (result.IsServerError)
            {
                OperationUI.HandleResult(result, (Result operationResult) =>
                {
                    if (result.ErrorCode == 44008 || result.ErrorCode == 45006) { Auth.Logout(); }
                    if (result.ErrorCode == 44010) { Auth.Logout(); }
                });
            }
            else if(result.IsCanceled) {
                if (Auth.AccessToken != null) {
                    //자동 또는 수동 로그인 재시도
                    Login();
                }
                else {
                    Login();
                }
            }
            else
            {
                OperationUI.HandleResult(result, (Result operationResult) => { });
            }
        }
    });
}
=== "Unreal"
#include "AuthUI.h"
#include "AccessToken.h"
#include "OperationUI.h"
#include "Result.h"
#include "User.h"

AuthUI::Login([] (Result result, AccessToken accessToken) {
    if (result.IsSuccessful()) {
        if (!result.userInfo.IsEmpty()) {
            TMap<FString, FString> userInfoMap = result.userInfo;
            FString userAction = userInfoMap.FindRef(TEXT("userAction"));
            if (userAction == TEXT("sanction")) {
                //제재 처리
            }
        }
    } else {
        if (result.IsServerError()) {
            OperationUI::HandleResult(result, [] (Result operationResult){
                if (result.errorCode == 44008 || result.errorCode == 45006) { Auth::Logout(); }
                if (result.errorCode == 44010) { Auth::Logout(); }
            });
        } else if(result.IsCanceled()) {
            AccessToken accessToken = Auth::GetAccessToken();
            if (!accessToken.IsNull()) {
                //자동 또는 수동 로그인 재시도
            }
        } else {
            OperationUI::HandleResult(result, [] (Result operationResult) { });
        }
    }
});
=== "Android (Kotlin)"
fun login(activity: Activity) {
    AuthUI.login(activity) { result, accessToken ->
        when {
            result.isSuccessful() -> {
                //제재된 사용자 확인 (=게임에서 직접 처리하는 경우)
                if(result.userInfo == AuthUI.Sanctioned) {
                    // 로그아웃 or 재시작 등 게임 시나리오에 맞게 적용
                    return@login
                }

                //로그인 이후 화면으로 이동
                val token = accessToken!!.token //AccessToken
                val user = accessToken.user
                val memberNumber: Long = user.memberNumber
                val verifiedIdentity: Boolean = user.verifiedIdentity
                val nationality: String = user.nationality
                val isGuest: Boolean = user.isGuest()
                val providers = user.providerUsers
                for (provider in providers) {
                    val type: Int = provider.type //1:StoveEmail, 2:Facebook, 3:Twitter, 6:Naver, 9:Google, 12:Apple, 13:Line, 15:Steam
                    val userId: String = provider.userId
                    val email: String? = provider.email
                    val verifiedEmail: Boolean? = provider.verifiedEmail
                }
            }
            result.isCanceled() -> {
                //사용자 취소, 로그인 화면 유지
            }
            result.isServerError() -> {
                OperationUI.handleResult(activity, result) { }
            }
            else -> {
                OperationUI.handleResult(activity, result) { }
            }
        }
    }
}
=== "Android (Java)"
public void login(@NotNull final Activity activity) {
    AuthUI.login(activity, (@NotNull Result result, @Nullable AccessToken accessToken) -> {
        if (result.isSuccessful()) {
            Map<String, String> userInfo = result.getUserInfo();
            if(userInfo != null && userInfo.containsKey("userAction")) {
                String userAction = userInfo.get("userAction");
                if(userAction != null && userAction.equals("sanction")) {
                    return null;
                }
            }
            String token = accessToken.getToken();
            User user = accessToken.getUser();
            long memberNumber = user.getMemberNumber();
            boolean verifiedIdentity = user.getVerifiedIdentity();
            String nationality = user.getNationality();
            boolean isGuest = user.isGuest();
            List<ProviderUser> providers = user.getProviderUsers();
            for (ProviderUser provider : providers) {
                int type = provider.getType();
                String userId = provider.getUserId();
                String email = provider.getEmail();
                boolean verifiedEmail = provider.getVerifiedEmail();
            }
        } else if (result.isCanceled()) {
            //사용자 취소
        } else if (result.isServerError()) {
            OperationUI.handleResult(activity, result, (@NotNull Result it) -> null);
        } else {
            OperationUI.handleResult(activity, result, (@NotNull Result it) -> null);
        }
        return null;
    });
}
=== "iOS"
[SGSAuthUI loginWithFromViewController:nil completionHandler:^(SGSResult * _Nonnull result, SGSAccessToken * _Nullable accessToken) {
    if (result.isSuccessful) {
        NSString *userAction = [result.userInfo objectForKey:@"userAction"];
        if ([userAction isEqualToString:@"sanction"]) {
            return;
        }

        NSString *token = accessToken.token;
        SGSUser *user = accessToken.user;
        NSNumber *memberNumber = user.memberNumber;
        BOOL verifiedIdentity = user.verifiedIdentity;
        NSString *nationality = user.nationality;
        BOOL isGuest = user.isGuest;
        NSArray *providers = user.providerUsers;
        for (SGSProviderUser *providerUser in providers) {
            int type = providerUser.type;
            NSString *userId = providerUser.userId;
            NSString *email = providerUser.email;
            BOOL verifiedEmail = providerUser.verifiedEmail;
        }
    } else if (result.isCanceled) {
        //사용자 취소
    } else if (result.isServerError) {
        [SGSOperationUI handleResult:result fromViewController:self completionHandler:^(SGSResult * _Nonnull result) { }];
    } else {
        [SGSOperationUI handleResult:result fromViewController:self completionHandler:^(SGSResult * _Nonnull result) { }];
    }
}];
ErrorCodes
!infoCases with clear actions
30001AuthConfigurationError:client_id·service_idis null/empty. Check if the key issued by Partners is set correctly before calling SDK initialization.44010Invalid refresh token: The stored refresh token is expired/invalid. Revoke the token and guide the user to the login screen to receive a new one.44009Password has been changed: The existing token is invalid after a password change. Revoke the token and guide the user through the re-login flow.30302ServerError (Device time change): This occurs when the user has arbitrarily changed the device time. Instruct the user to revert the time settings to automatic.
| Domain | ErrorCode | Description |
|---|---|---|
| com.stove.success | 0 | Success |
| com.stove.auth | 30001 | AuthConfigurationError : Check constants server : client_id and service_id are null or empty |
| com.stove.server | 43000 | ID or PW is incorrect. |
| com.stove.server | 43104 | Game restrict member |
| com.stove.server | 10125 | Error : It works only on normal devices. If this error persists, please contact Customer Service. |
| com.stove.server | 49500 | blocked IP address |
| com.stove.server | 41002 | Invalid game id |
| com.stove.server | 44001 | Withdrawal request member |
| com.stove.server | 44002 | Withdrawal member |
| com.stove.server | 44008 | Already Stove Account Link. |
| com.stove.server | 44010 | Invalid refresh token |
| com.stove.server | 41001 | Invalid client id |
| com.stove.server | 44000 | Sleep member |
| com.stove.server | 44009 | Password has been changed. Please login again. |
| com.stove.server | 30302 | ServerError — Occurs when the user plays after arbitrarily changing the device time |
| com.stove.base.network | 10001 | NoConnectionError |
| com.stove.base.network | 10002 | TimeoutError |
After login is complete, enter the user's character and world information. The entered information is used by each feature (coupon/popup/billing/push) differentiated by world and character. Since the SDK does not separately validate the game profile, please be sure to perform a null check when entering it.
!dangerCharacter setting is mandatory
If you do not perform the character setting task, you cannot normally use the features (coupon/popup/billing/push) set through the Stove Backoffice.
Prerequisites:
- To use Stove IAP/coupon services, World information must be pre-registered in Partners.
- Even for games that do not support worlds, at least one world must be specified as default.
World-supported games
=== "Unity"
private void SetGameProfile()
{
    string CharacterNumber = "setYourCharacterNumber";
    string WorldId = "setYourWorld";
    AccessToken accessToken = Auth.AccessToken;
    if(accessToken == null) { return; }
    accessToken.User.GameProfile = new GameProfile(CharacterNumber, WorldId);
}
=== "Unreal"
#include "Auth.h"
#include "AccessToken.h"
#include "GameProfile.h"

FString world = "setYourWorld";
int64 chracternumber = "setYourCharacterNumber";

GameProfile gameProfile = GameProfile(chracternumber, world);

AccessToken accessToken = Auth::GetAccessToken();
if (!accessToken.IsNull()) {
    accessToken.user.SetGameProfile(gameProfile);
}
=== "Android (Kotlin)"
private fun setGameProfile() {
    val characterNumber = "setYourCharacterNumber"
    val worldId = "setYourWorld"
    // characterNumber, world 값의 유효성 체크(null)를 꼭 해주세요.
    Auth.accessToken?.user?.gameProfile = GameProfile(characterNumber, worldId)
}
=== "Android (Java)"
private void setGameProfile(@NotNull Context context) {
    Long characterNumber = 111L; // setYourCharacterNumber
    String world = ""; // setYourCharacterWorld
    // characterNumber, world 값의 유효성 체크(null)를 꼭 해주세요.
    AccessToken accessToken = Auth.getAccessToken();
    if (accessToken != null) {
        User user = accessToken.getUser();
        user.setGameProfile(context, new GameProfile(characterNumber, world));
    }
}
=== "iOS"
NSString *characterNumber = @"setYourCharacterNumber";
NSString *worldId = @"setYourWorld";
SGSAccessToken *accessToken = [SGSAuth accessToken];
if(accessToken == nil) { return; }
SGSGameProfile *gameProfile = [[SGSGameProfile alloc] initWithCharacterNumber:characterNumber world:worldId];
[[accessToken user] setGameProfile:gameProfile];
Games without world support
Even for games that do not support worlds, you only need to set characterNumber. world argument should be passed as null. However, at least one default world must be registered in Partners.
=== "Unity"
private void SetGameProfile()
{
    string CharacterNumber = "setYourCharacterNumber";
    AccessToken accessToken = Auth.AccessToken;
    if (accessToken == null) { return; }
    accessToken.User.GameProfile = new GameProfile(CharacterNumber);
}
=== "Unreal"
#include "Auth.h"
#include "AccessToken.h"
#include "GameProfile.h"

int64 chracternumber = "setYourCharacterNumber";

GameProfile gameProfile = GameProfile();
gameProfile.characterNumber = chracternumber;

AccessToken accessToken = Auth::GetAccessToken();
if ( accessToken != nullptr) {
    accessToken.user.SetGameProfile(gameProfile);
}
=== "Android (Kotlin)"
private fun setGameProfile() {
    val characterNumber = "setYourCharacterNumber"
    // characterNumber 값의 유효성 체크(null)를 꼭 해주세요.
    Auth.accessToken?.user?.gameProfile = GameProfile(characterNumber, null)
}
=== "Android (Java)"
private void setGameProfile(@NotNull Context context) {
    Long characterNumber = 111L;
    AccessToken accessToken = Auth.getAccessToken();
    if (accessToken != null) {
        User user = accessToken.getUser();
        user.setGameProfile(context, new GameProfile(characterNumber, null));
    }
}
=== "iOS"
NSString *characterNumber = @"setYourCharacterNumber";
SGSAccessToken *accessToken = [SGSAuth accessToken];
if(accessToken == nil) { return; }
SGSGameProfile *gameProfile = [[SGSGameProfile alloc] initWithCharacterNumber:characterNumber world:nil];
[[accessToken user] setGameProfile:gameProfile];
SDK Token Management
The SDK automatically renews the AccessToken when it reaches 80% of its expiration time. Since automatic renewal only works while the process is running, you should always query and use the AccessToken.
=== "Unity"
public void GetToken()
{
    string token = Auth.AccessToken.Token;
}
=== "Unreal"
#include "Auth.h"
#include "AccessToken.h"

AccessToken accessToken = Auth::GetAccessToken();

if (!accessToken.IsNull()) {
    FString token = accessToken.token;
}
=== "Android (Kotlin)"
fun getAccessToken() {
    val token : String? = Auth.accessToken?.token
}
=== "Android (Java)"
public void getAccessToken() {
    AccessToken accessToken = Auth.getAccessToken();
}
=== "iOS"
NSString *token = [[SGSAuth accessToken] token];
GPG Login Implementation
Used when implementing a 1:1 account link between a PGS ID and a Stove account for games preparing to launch Google Play Games Service (GPG). The SDK provides 3 APIs: Fetch (query linked account) / Load (load) / Link (link account).
!infoPGS ID ↔ Stove Account 1:1 Policy
After the initial link, if you log in with a different Stove account, it will operate by overriding the existing account information.
If a Stove account change occurs, such as converting to a full member, be sure to call GPG linking again.
Prerequisites
API Console / Partners Work
- Apply for Console Permissions: Provide the package name (Android) for each service environment to the publishing technical manager to request it from Google
Allowlist(takes 1-2 days) - Create Private Key: Issued in the Google Cloud Console. 생성 매뉴얼 PDF
- Register Stove Partners:
[파트너스] > [Launching] > [서비스 연동] > [모바일 마켓 정보] > [플레이스토어 마켓 앱] > [Private Key File 업로드]
SDK Module Application
play-services-games-v2Library: Module officially released as of 2023/09/18. Manual EAP application is no longer required. Google 공식 다운로드AUTH-GooglePlayGamesModule: GPG connection module for the STOVE SDK. 최신 라이브 버전 Required for use
Project ID Settings (Android)
- Google Play ConsoleSelect your app in
Play 게임서비스 > 설정 및 관리 > 설정Check the project ID in- Apply to the files below
=== "build.gradle"
repositories {
    google()
    jcenter()
    maven {
        url "https://externalnexus.iam0.com/repository/mvp"
        // Android Gradle Plugin 7.0 이상 사용 시 아래 옵션 추가
        allowInsecureProtocol = true
    }
    mavenCentral()
}

dependencies {
    implementation 'com.stove:auth-googleplaygames:2.8.1'
}
=== "strings.xml"
<?xml version="1.0" encoding="utf-8"?>
<resources>
    <string name="google_play_games_project_id" translatable="false">{your_project_id}</string>
</resources>
=== "AndroidManifest.xml"
<manifest>
    <application>
        <meta-data
            android:name="com.google.android.gms.games.APP_ID"
            android:value="@string/google_play_games_project_id"/>
    </application>
</manifest>
Project ID Settings (Unity / Unreal)
- Unity:
Stove > Edit Settings→Use Auth-GooglePlayGamescheck →Projectidenter google_playgames_projectid in - Unreal:
프로젝트 셋팅 > Android > GooglePlayServices > 게임 앱 IDenter
Development Flow
- PGS SignIn and recallSessionID Acquisition (CP implementation area): After processing Google Play Games v2 SignIn, acquire the
recallSessionID, which is the unique PGS identifier. Refer to Google 공식 가이드 for acquisition methods by language. - SDK Initialization + Provider Settings: Call
Auth.initialize,AuthUI.setProvidersas in the existing integrated login flow. - Auto-login Branching:
Auth.AccessTokenexists → Proceed with existing auto-login flow (no separate GPG processing required)Auth.AccessTokendoes not exist →GPGProvider(recallSessionID).fetch()look up STOVE account linked to
- Query Result Branching:
- No linked account → Enter guest start or integrated login screen
- Linked account exists + Game direct UI →
GPGProvider(recallSessionID, account)create →Auth.Login(provider) - Linked account exists + SDK provided UI →
GPGProvider.load()→Auth.login(loadedProvider)
- Account Linking (Link): After login is complete, link the PGS ID and STOVE account with
AccessToken.User.Link(GPGProvider)at an appropriate time (e.g., entering the lobby, returning to account settings). Must be re-called when converting to a full member.
Full Connection Sequence
This is a diagram showing the entire flow of PGS SignIn → acquiring recallSessionID → querying, logging in, and linking the connected account.
!info ※1 Linking follows a 1:1 policy, with a maximum of 1 linked account in the list
※2 Only applicable if the game directly configures an optimized UI for the user
Fetch — Query Linked Account
recallSessionID Query the list of STOVE accounts linked to the corresponding PGS ID from the STOVE server with
=== "Unity"
public void googlePlayGamesFetch(string sessionId)
{
    GPGProvider provider = new GPGProvider(sessionId); // recallSessionId
    provider.Fetch((Result result, List<Dictionary<string, object>> accounts) =>
    {
        if (result.IsSuccessful)
        {
            // accounts : 계정 목록
        }
    });
}
=== "Unreal"
#include "Auth.h"
#include "GPGProvider.h"
#include "Result.h"

GPGProvider* provider = new GPGProvider(googleGameSessionId);
provider->Fetch([] (Result result, list<map<string, string>> accounts) {
    if (result.IsSuccessful()) {
        // accounts : 계정 목록
    }
});
=== "Android (Kotlin)"
private fun googlePlayGamesFetch(context: Context, sessionId: String) {
    val provider = GPGProvider(sessionId) // recallSessionId
    provider.fetch(context) { result, jsonArray ->
        if (result.isSuccessful()) {
            // jsonArray : 계정 목록
        }
    }
}
=== "Android (Java)"
public void googlePlayGamesFetch(@NotNull Context context, @NotNull String sessionId) {
    GPGProvider provider = new GPGProvider(sessionId); // recallSessionId
    provider.fetch(context, (result, jsonArray) -> {
        if (result.isSuccessful()) {
            // jsonArray : 계정 목록
        }
        return null;
    });
}
Load — Load Linked Account
Fetch After the user selects the account information received as a result in the SDK-provided UI, prepare the Provider so that they can auto-login with that account. Pass the returned loadedProvider to Auth.login.
=== "Unity"
public void googlePlayGamesLoad(string sessionId, Dictionary<string, object> account)
{
    /** account → Fetch의 결과로 얻은 계정 목록에서 획득 **/
    GPGProvider provider = new GPGProvider(sessionId); // recallSessionId
    provider.Load(account, (Result result, GPGProvider loadedProvider) =>
    {
        if (loadedProvider != null) {
            Auth.Login(loadedProvider, (Result loginResult, AccessToken accessToken) => {
                if (loginResult.IsSuccessful) {
                    // 로그인 성공
                } else if (loginResult.IsServerError) {
                    OperationUI.HandleResult(loginResult, (Result operationResult) =>
                    {
                        // 게스트 자동 로그인 불가 케이스
                        if (loginResult.ErrorCode == 44008 || loginResult.ErrorCode == 45006) {
                            Auth.Logout();
                        }
                    });
                }
            });
        }
    });
}
=== "Unreal"
#include "Auth.h"
#include "GPGProvider.h"
#include "Result.h"
#include "AccessToken.h"

GPGProvider* provider = new GPGProvider(googleGameSessionId);

provider->Load(list.front(), [] (Result result, GPGProvider* gpgProvider) {
    if (gpgProvider != nullptr) {
        Auth::Login(gpgProvider, [] (Result result, AccessToken* accessToken) {
            if (result.IsSuccessful()) {
                // 로그인 성공
            } else if (result.IsServerError()) {
                OperationUI::HandleResult(result, [] (Result operationResult) {
                    if (result.errorCode == 44008 || result.errorCode == 45006) {
                        Auth::Logout();
                    }
                });
            }
        });
    }
});
=== "Android (Kotlin)"
private fun googlePlayGamesLoad(activity: Activity, sessionId: String, jsonObject: JSONObject) {
    /** jsonObject → Fetch의 결과로 얻은 계정 목록에서 획득 **/
    val provider = GPGProvider(sessionId) // recallSessionId
    provider.load(activity, jsonObject) { result, loadProvider ->
        loadProvider?.let {
            Auth.login(activity, it) { loginResult: Result, accessToken: AccessToken? ->
                if (loginResult.isSuccessful()) {
                    // 로그인 성공
                }
            }
        }
    }
}
=== "Android (Java)"
private void googlePlayGamesLoad(@NotNull Activity activity, @NotNull String sessionId, @NotNull JSONObject jsonObject) {
    /** jsonObject → Fetch의 결과로 얻은 계정 목록에서 획득 **/
    GPGProvider provider = new GPGProvider(sessionId); // recallSessionId
    provider.load(activity, jsonObject, (@NotNull Result result, @Nullable GPGProvider loadedProvider) -> {
        if (loadedProvider != null) {
            Auth.login(activity, loadedProvider, (@NotNull Result loginResult, @Nullable AccessToken accessToken) -> {
                if (loginResult.isSuccessful()) {
                    // 로그인 성공
                }
                return null;
            });
        }
        return null;
    });
}
Link — Linking Accounts
After logging in, link the PGS ID to the current STOVE account at an appropriate time. When a conversion to a full member occurs, you must call it again to maintain the link.
=== "Unity"
public void googlePlayGamesLink(string sessionId)
{
    GPGProvider provider = new GPGProvider(sessionId); // recallSessionId

    AccessToken accessToken = Auth.AccessToken;
    if (accessToken == null) { return; }
    accessToken.User.Link(provider, (Result result) =>
    {
        if (result.IsSuccessful)
        {
            // Google Play Games 연결 성공
        }
    });
}
=== "Unreal"
#include "Auth.h"
#include "GPGProvider.h"
#include "Result.h"
#include "AccessToken.h"

GPGProvider* provider = new GPGProvider(googleGameSessionId);

AccessToken *accessToken = Auth::GetAccessToken();
if (accessToken != nullptr) {
    accessToken->user.Link(provider, [] (Result result) {
        if (result.IsSuccessful()) {
            // Google Play Games 연결 성공
        }
    });
}
=== "Android (Kotlin)"
private fun googlePlayGamesLink(activity: Activity, sessionId: String) {
    val provider = GPGProvider(sessionId) // recallSessionId
    Auth.accessToken?.user?.link(activity, provider) { result: Result ->
        if (result.isSuccessful()) {
            // Google Play Games 연결 성공
        }
    }
}
=== "Android (Java)"
private void googlePlayGamesLink(@NotNull Activity activity, @NotNull String sessionId) {
    GPGProvider provider = new GPGProvider(sessionId); // recallSessionId
    AccessToken accessToken = Auth.getAccessToken();
    if (accessToken != null) {
        User user = accessToken.getUser();
        if (user != null) {
            user.link(activity, provider, (@NotNull Result result) -> {
                if (result.isSuccessful()) {
                    // Google Play Games 연결 성공
                }
                return null;
            });
        }
    }
}
Troubleshooting
| Situation | Cause | Solution |
|---|---|---|
| GPG link is disconnected after conversion to a full member | The PGS ID ↔ STOVE account relationship follows a 1:1 policy. When a STOVE account is converted to a full member, the existing PGS link must also be updated to function correctly. | Immediately after the conversion to a full member is complete, AccessToken.User.Link(GPGProvider(recallSessionID)) call it again. |
ErrorCode 44008 occurs — when using the guest retention option | If a conversion to a full member occurs on another device, the guest token backed up on the existing device expires. | Delete the backed-up guest token and call Auth.logout to re-enter the login flow. |
Fetch result returns an empty list | It may be a normal state where no STOVE account is linked to the PGS ID yet. (Allowlist Communication itself may fail if unapproved or if the Private Key is not registered) | If it is a new user, naturally guide them to the guest start or integrated login screen. If communication failure is suspected, check the partner's Private Key registration and the console Allowlist approval status. |
Google Console API Settings
This is how to register IAP (In-App Purchase) information for apps released on Google Play to STOVE Partner Billing. Since IAP authentication for STOVE SDK V2 uses Google's OAuth client method, Google Android Publisher API connection is required.
!warningPerform Google Play Console tasks with the owner (master) account.
If you proceed with another authorized account, access to some menus may be blocked, and the task may be interrupted.
The workflow consists of the following 4 steps.
- Connect Google Play Console API access permissions
- Create Google Cloud project and set up API/OAuth
- Obtain Refresh Token in OAuth 2.0 Playground
- Enter issuance information in STOVE Partner Billing settings
1. Obtain Google Play Console API Access Permissions
Connect to the Google Android Publisher API to verify IAP payments for apps registered on Google Play.
- Google Play Console >
설정>API 액세스Go to . - Select an existing Cloud project or connect a project created in advance at Google Cloud Console.
- Once the connection is successfully completed, the connected
Google Cloud 프로젝트and프로젝트의 API 목록will be displayed on the settings page.
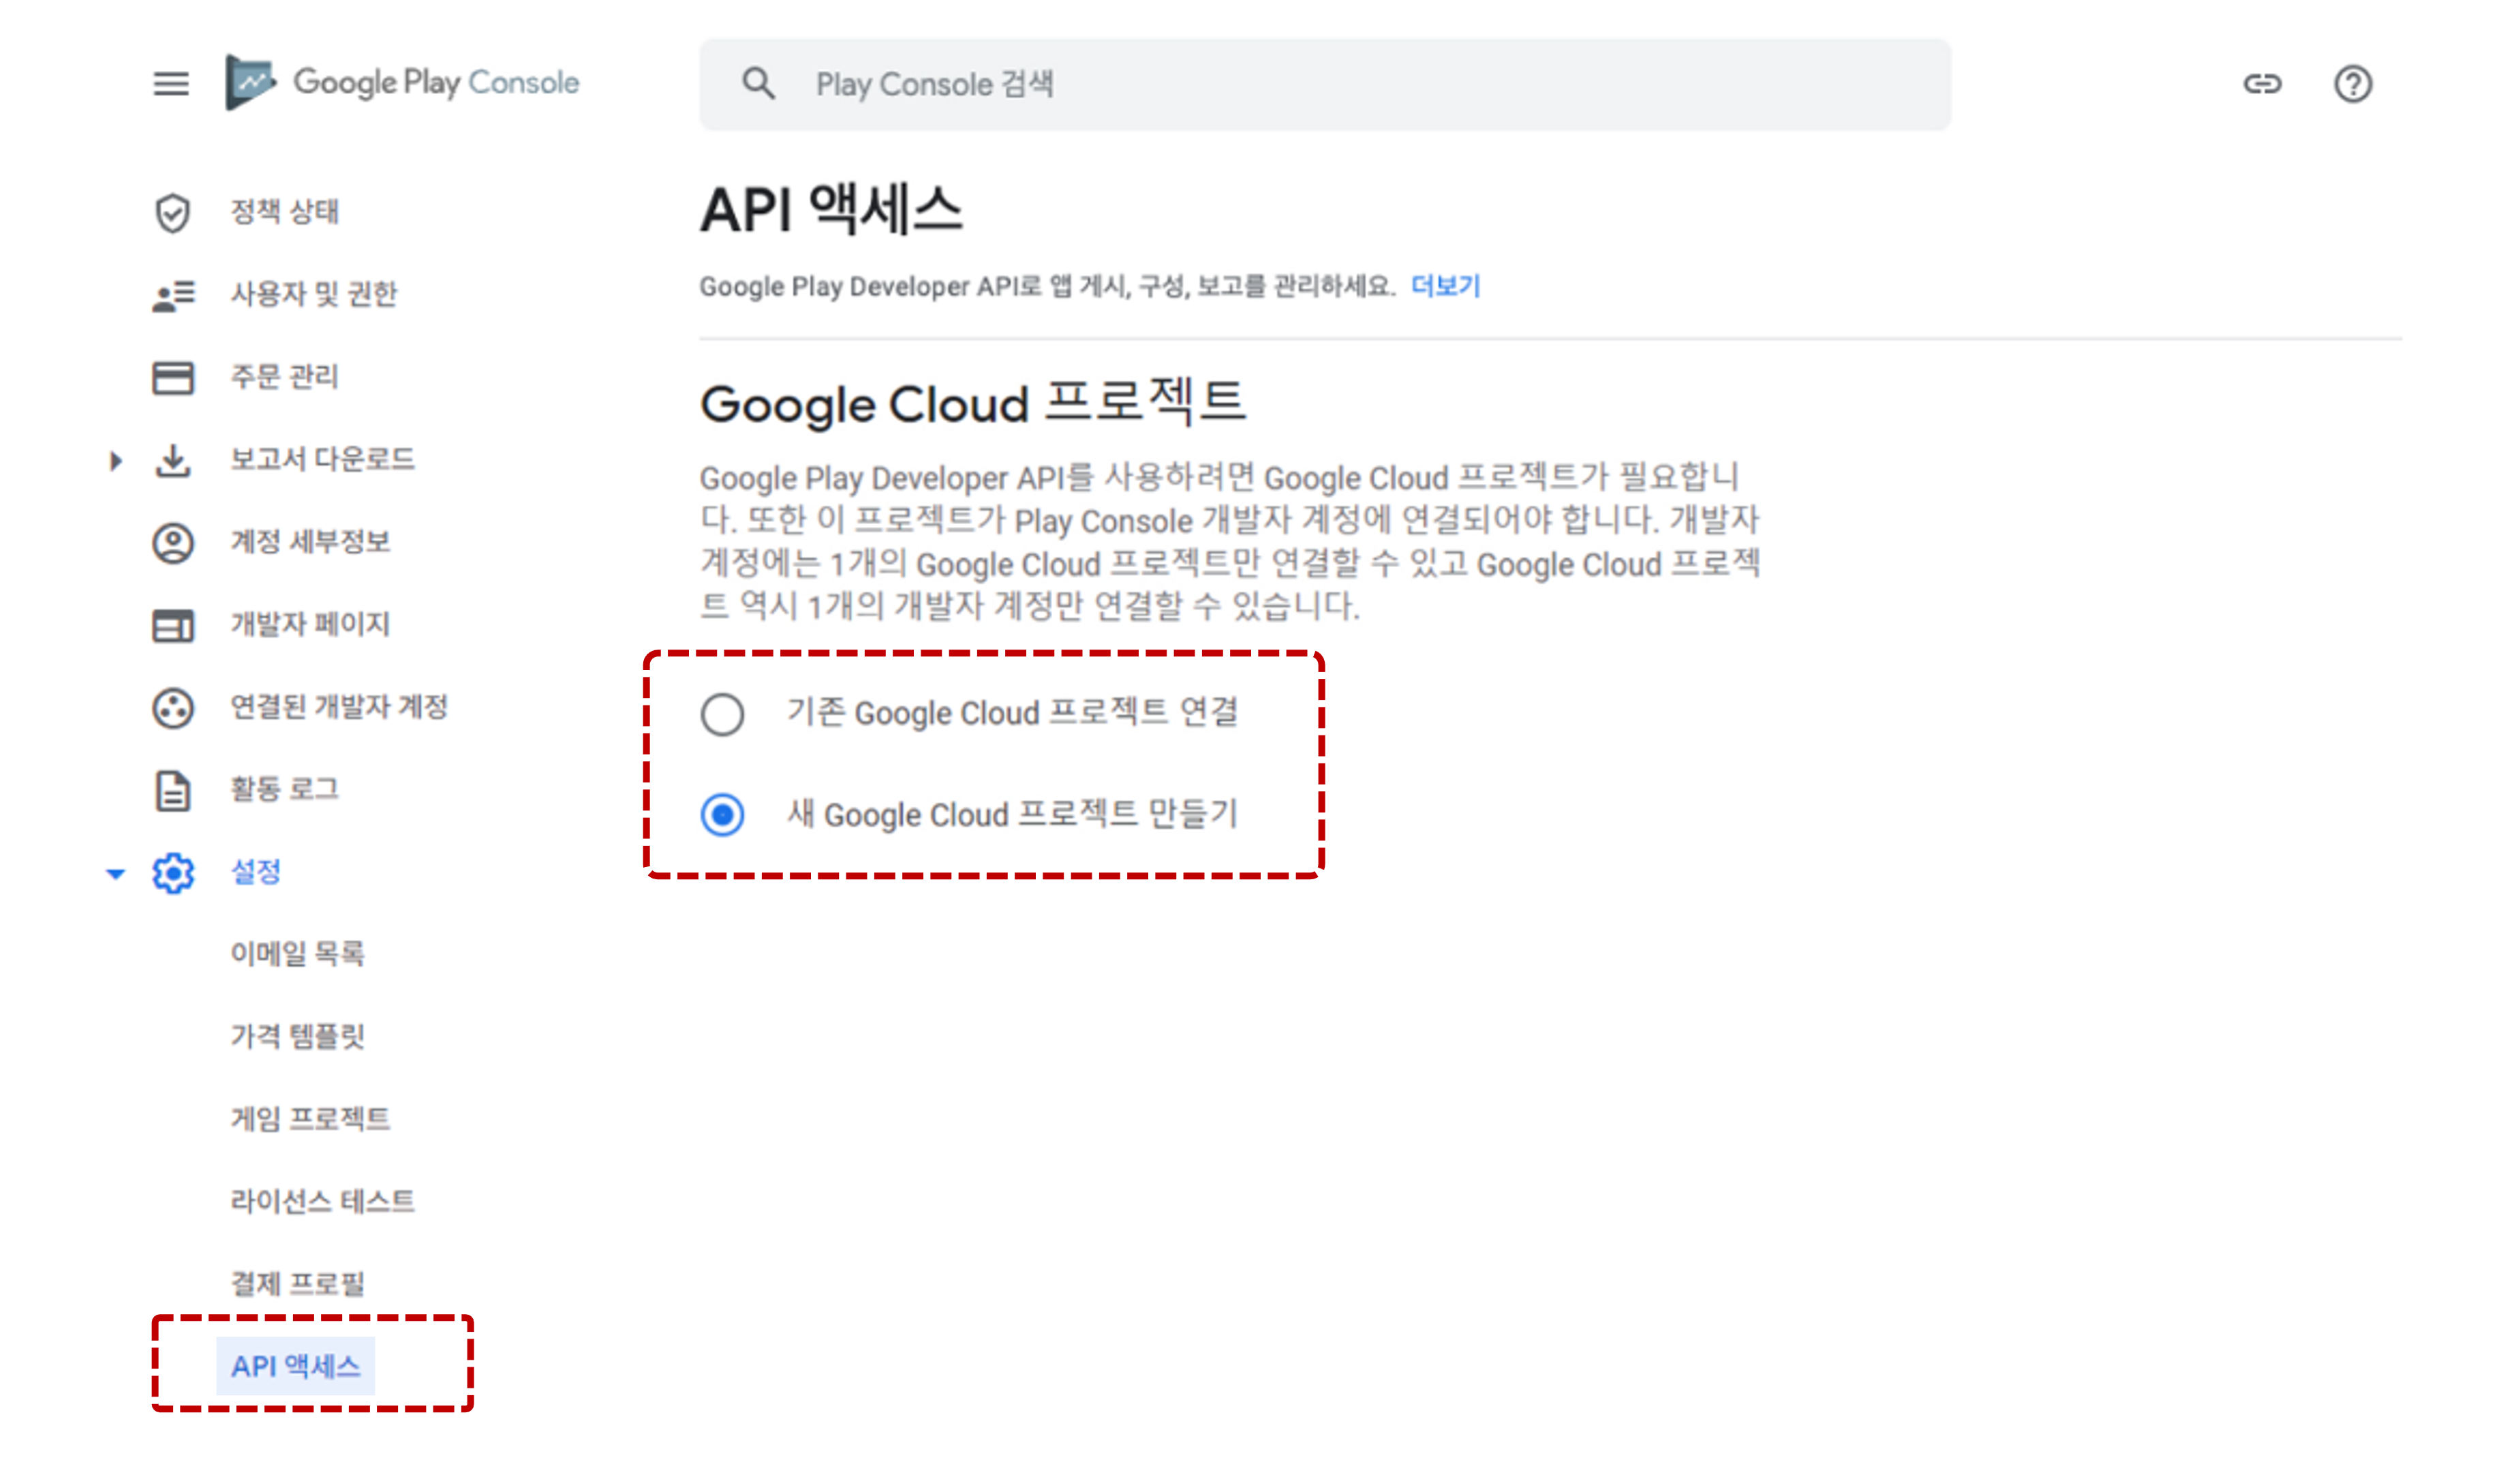
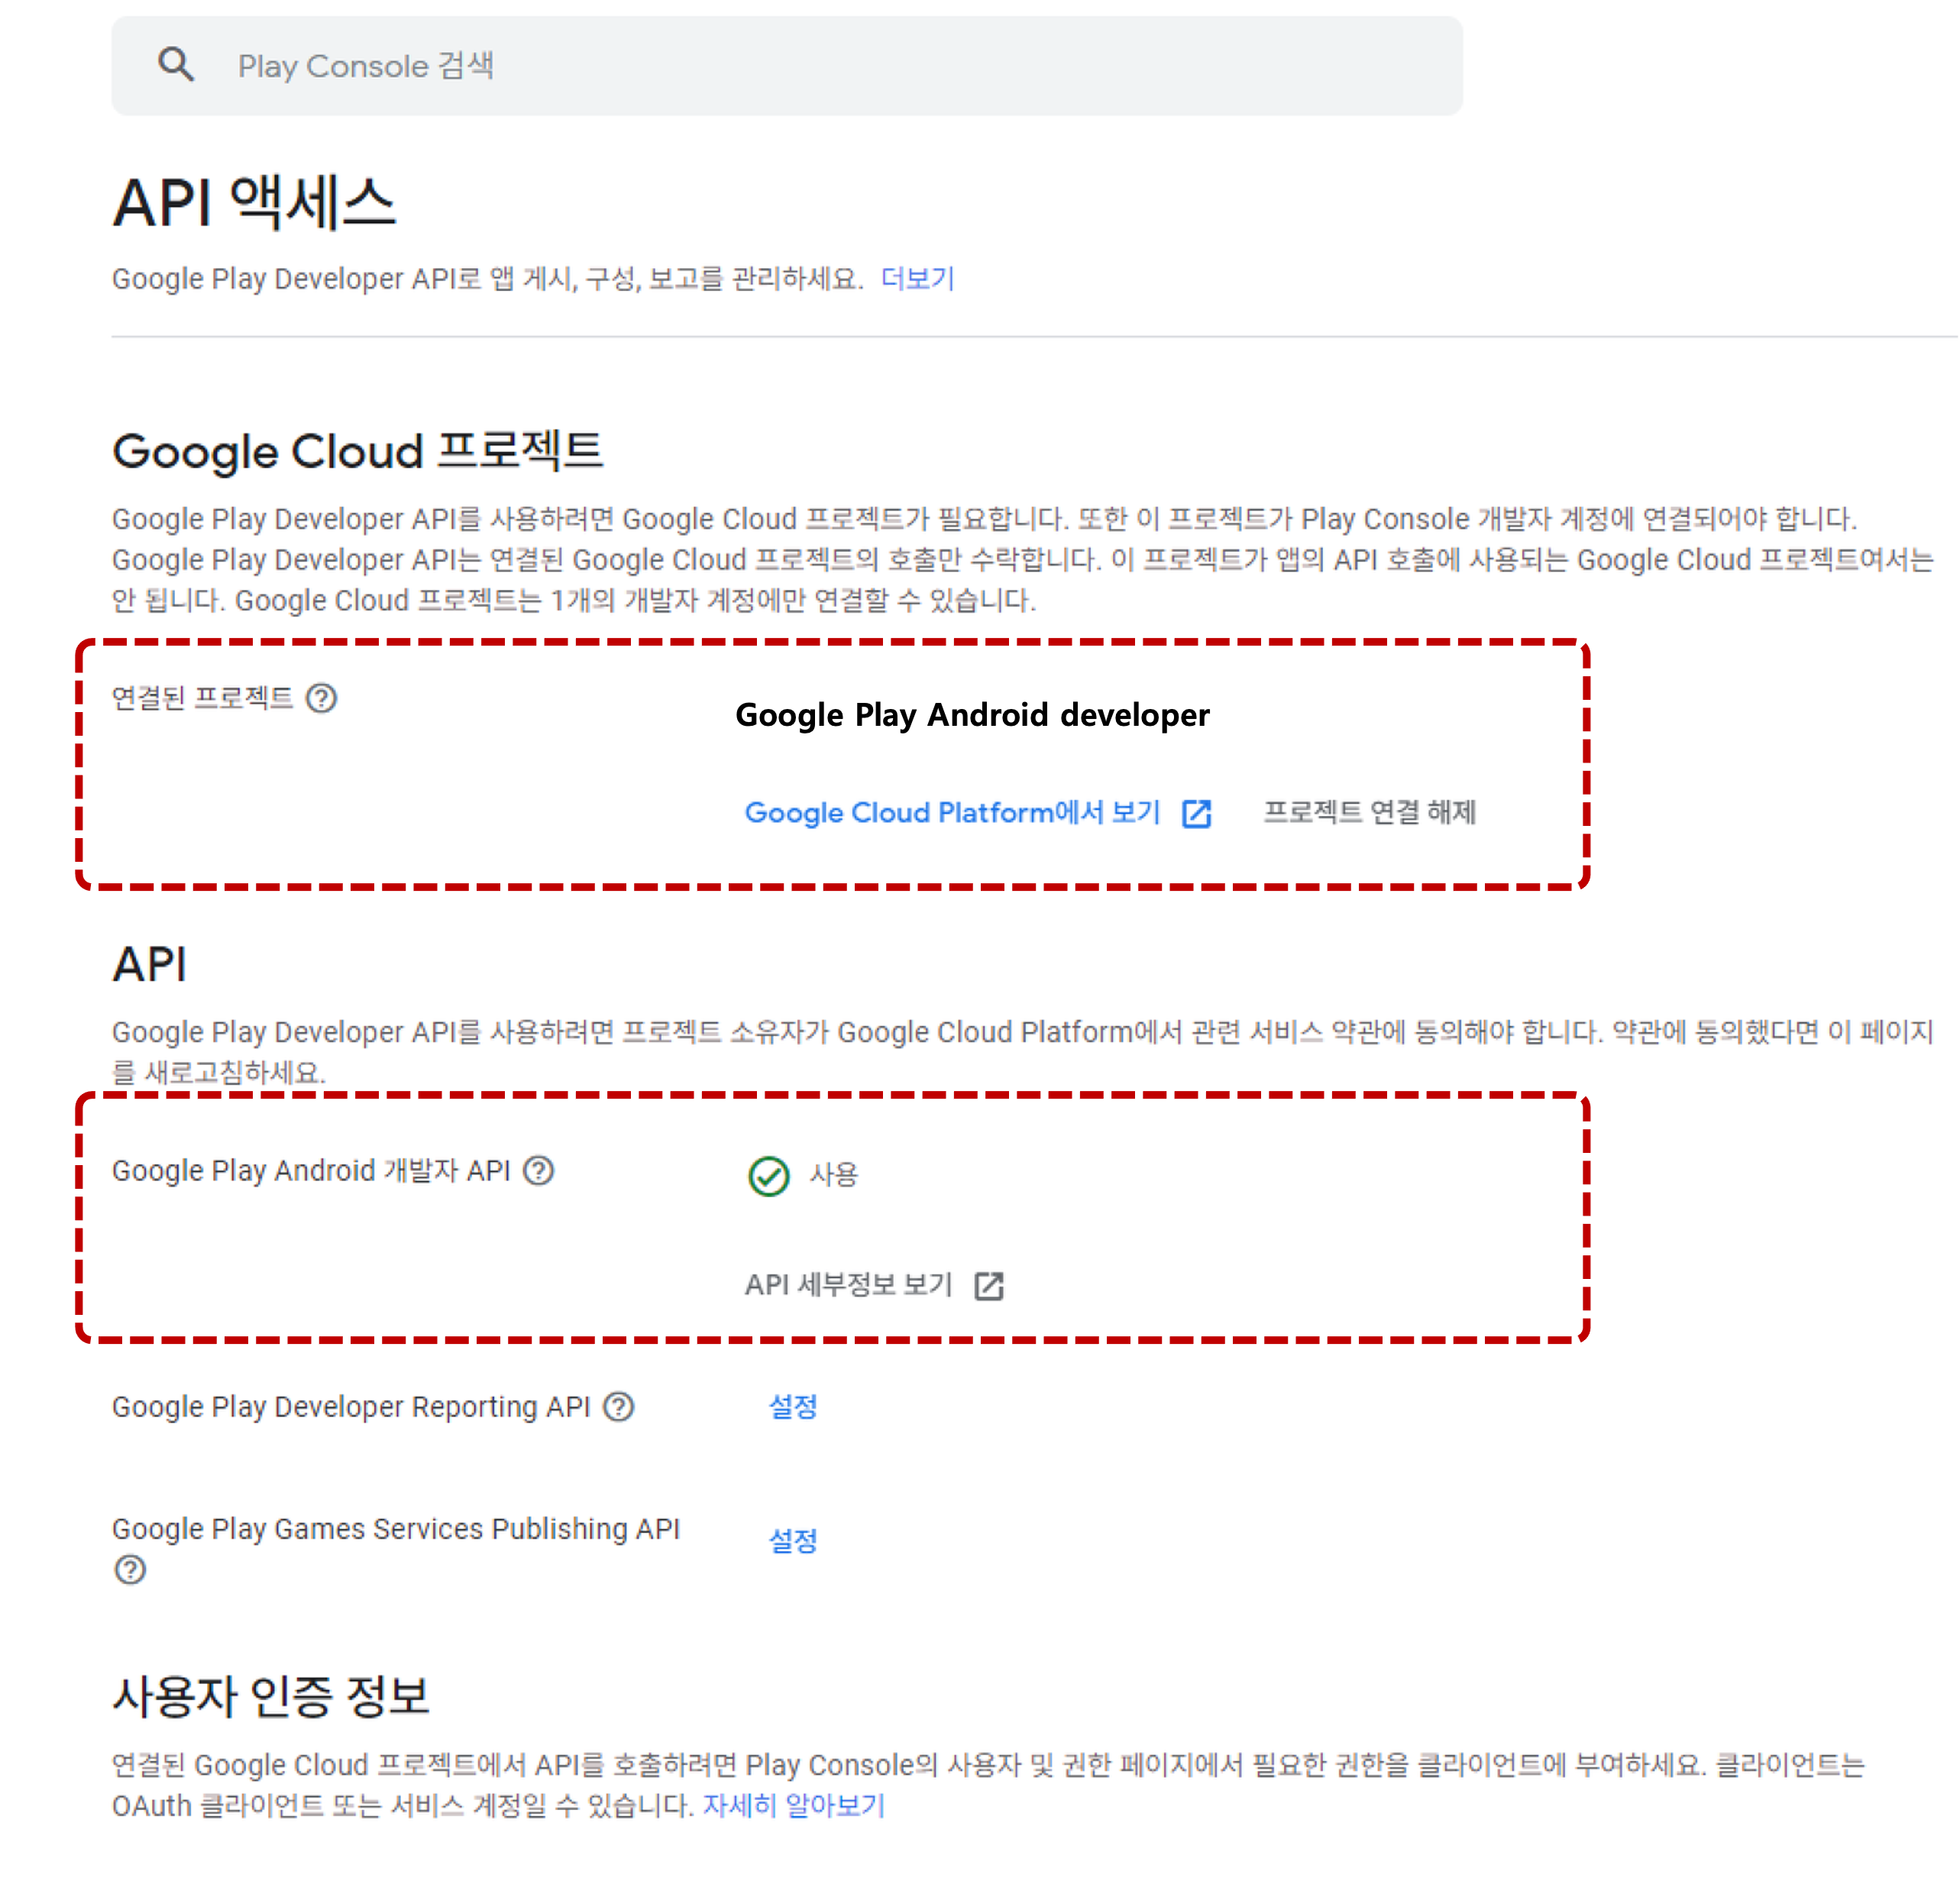
If the connected project status does not appear on the screen, check the connection with Google Cloud first. If the problem persists after settings, refer to the official Google guide.
2. Create Google Cloud Project
!warningProceed only in the project connected to the actual service app (service project).
If you work in a test project, live billing verification will not work.
2-1) Create Project
- Access Google Cloud Console. The login account must be the owner of the Google Play Console developer account.
- Select
IAM 및 관리자>프로젝트 만들기. - Enter the project name and location to create the project.
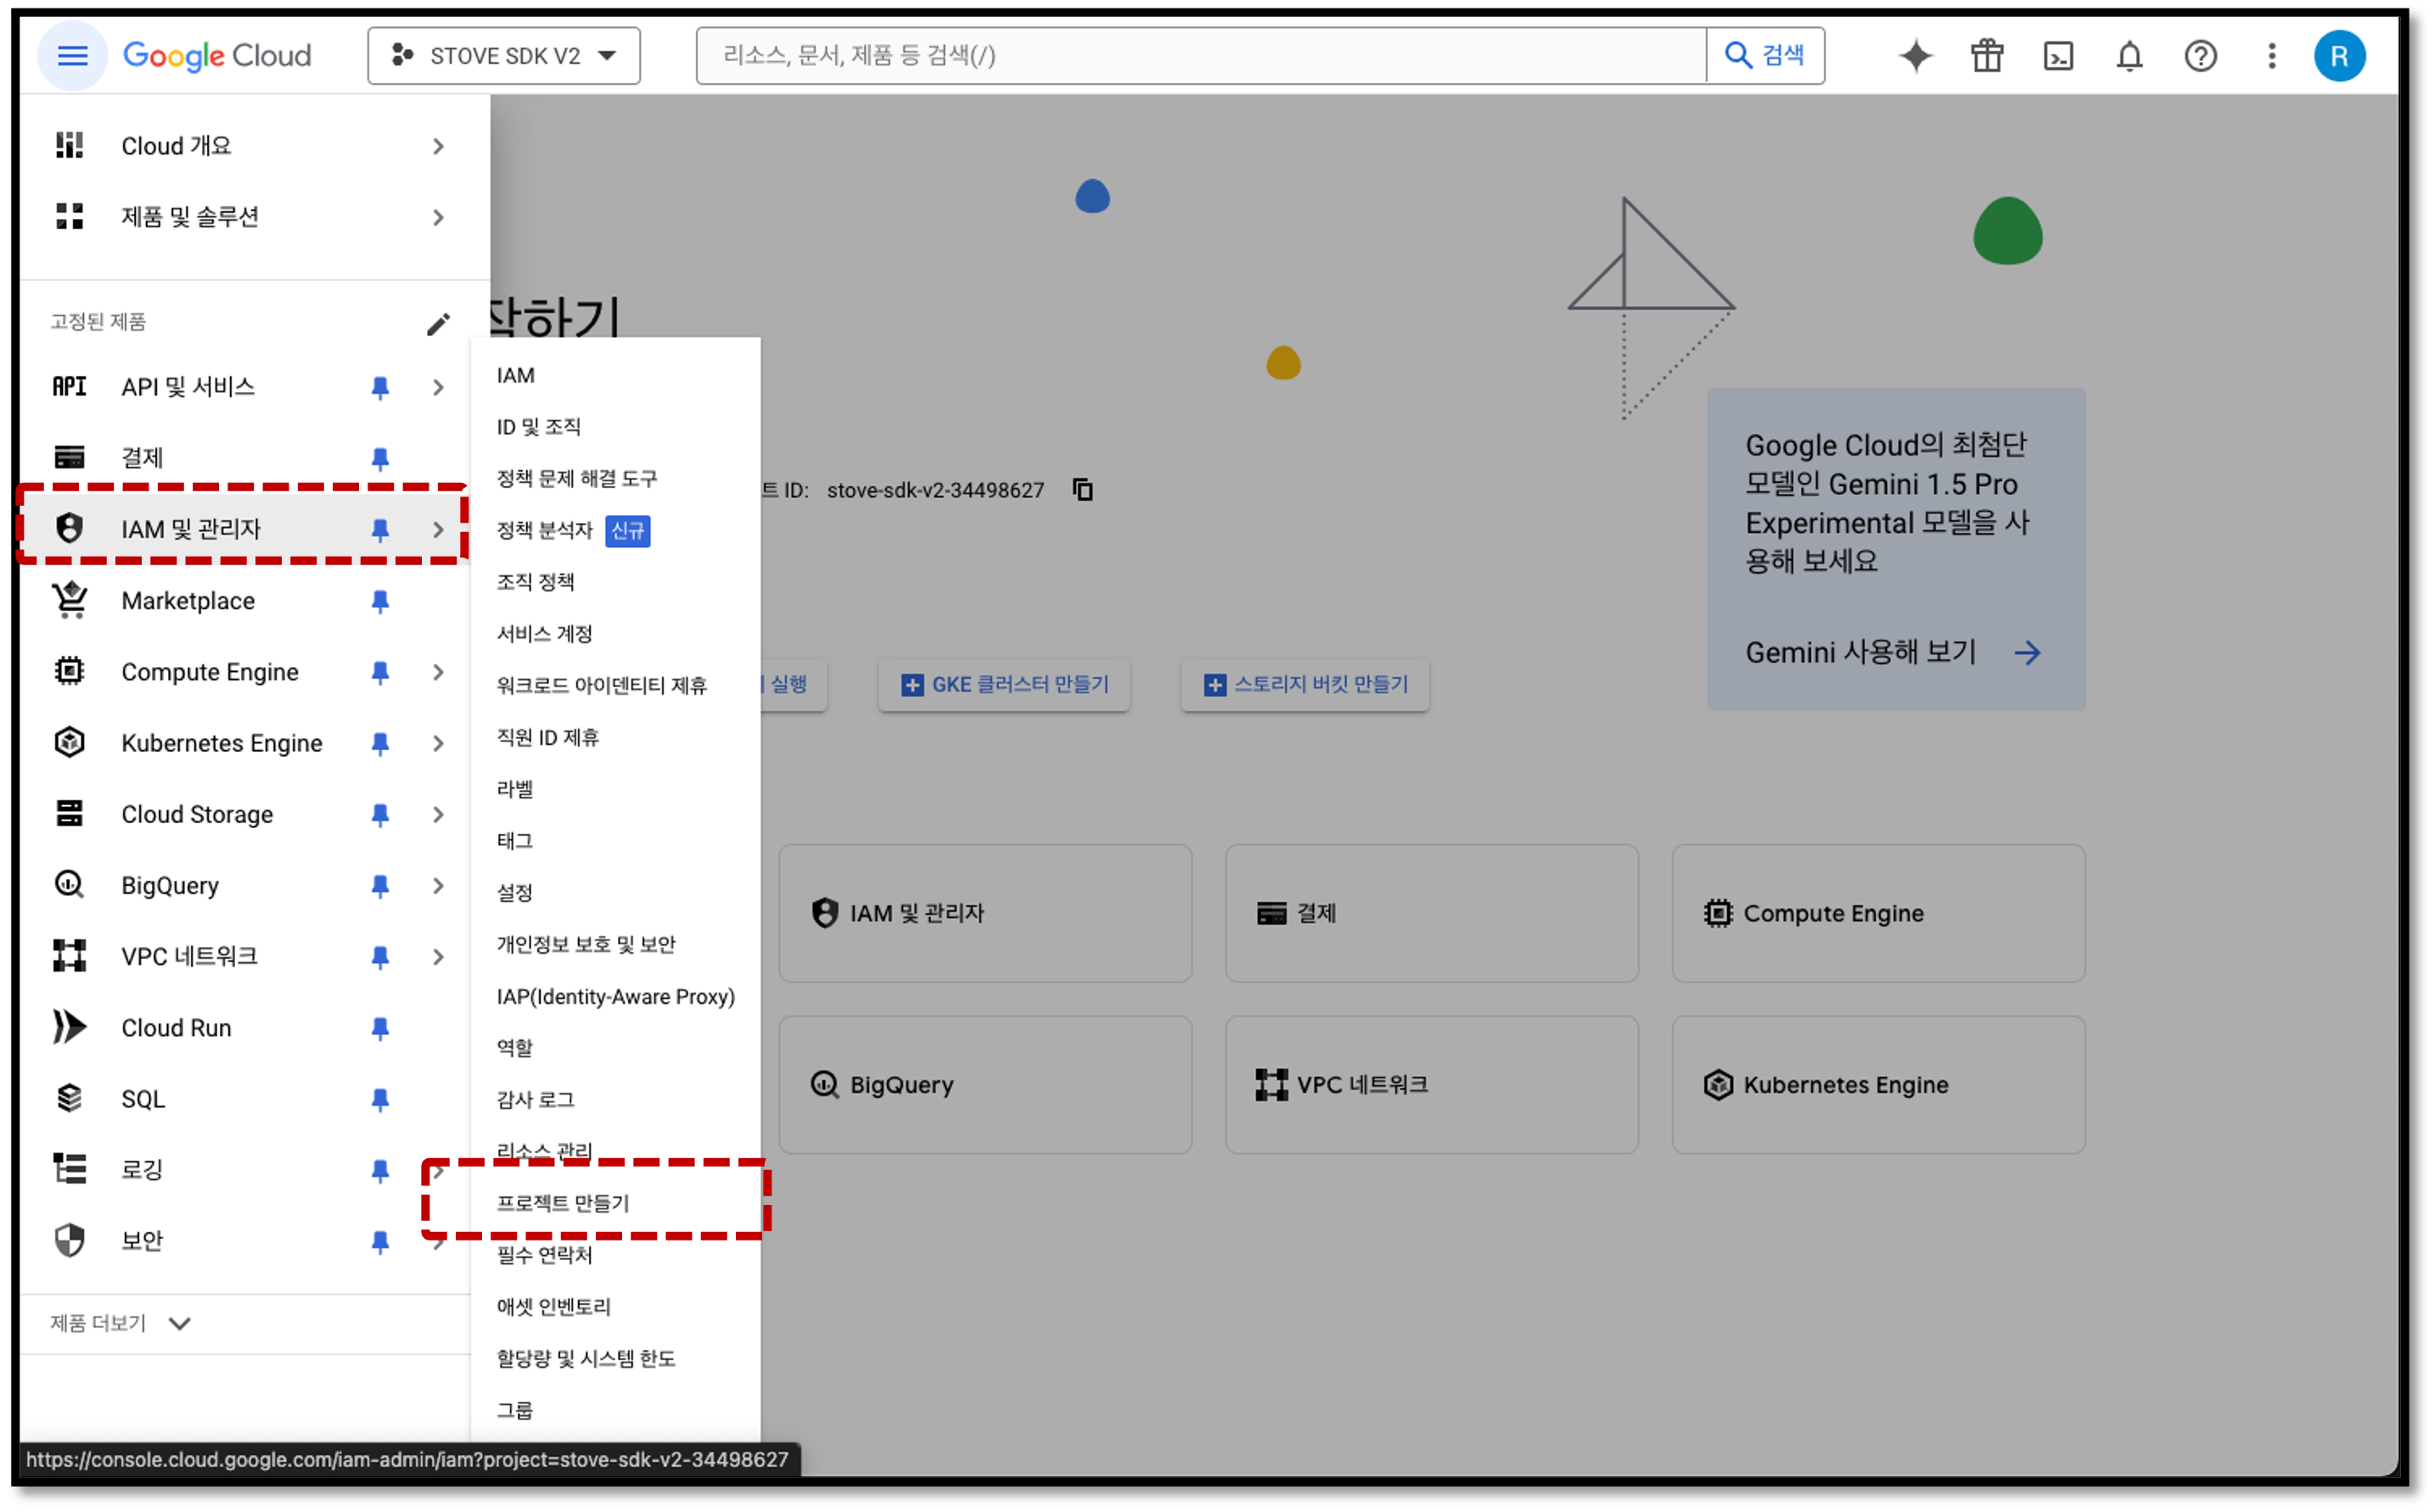
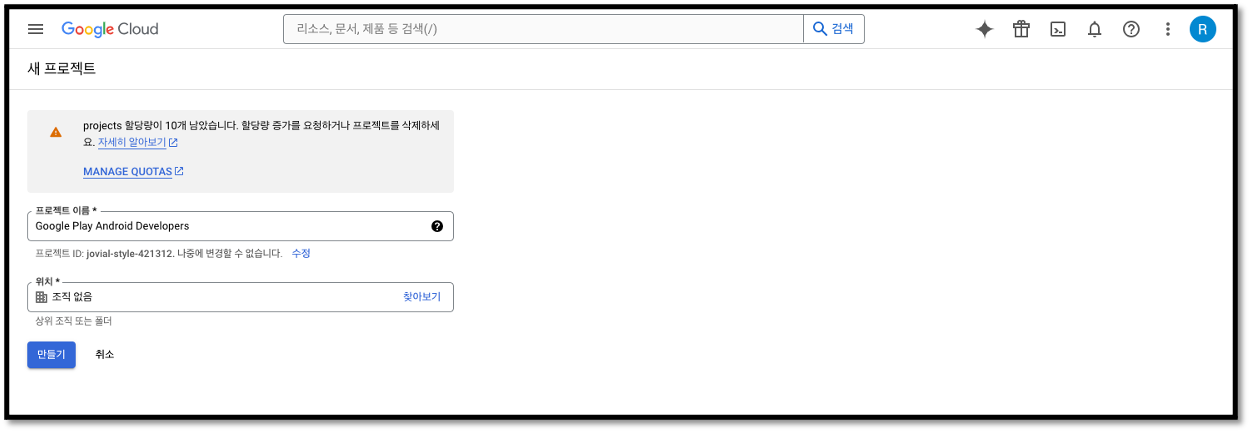
2-2) Add API to use in project (Play Android Developer API)
- After selecting the created project, go to
API 및 서비스>라이브러리. - Search for and select
Play Android Developer API, and set it to사용in the product details.
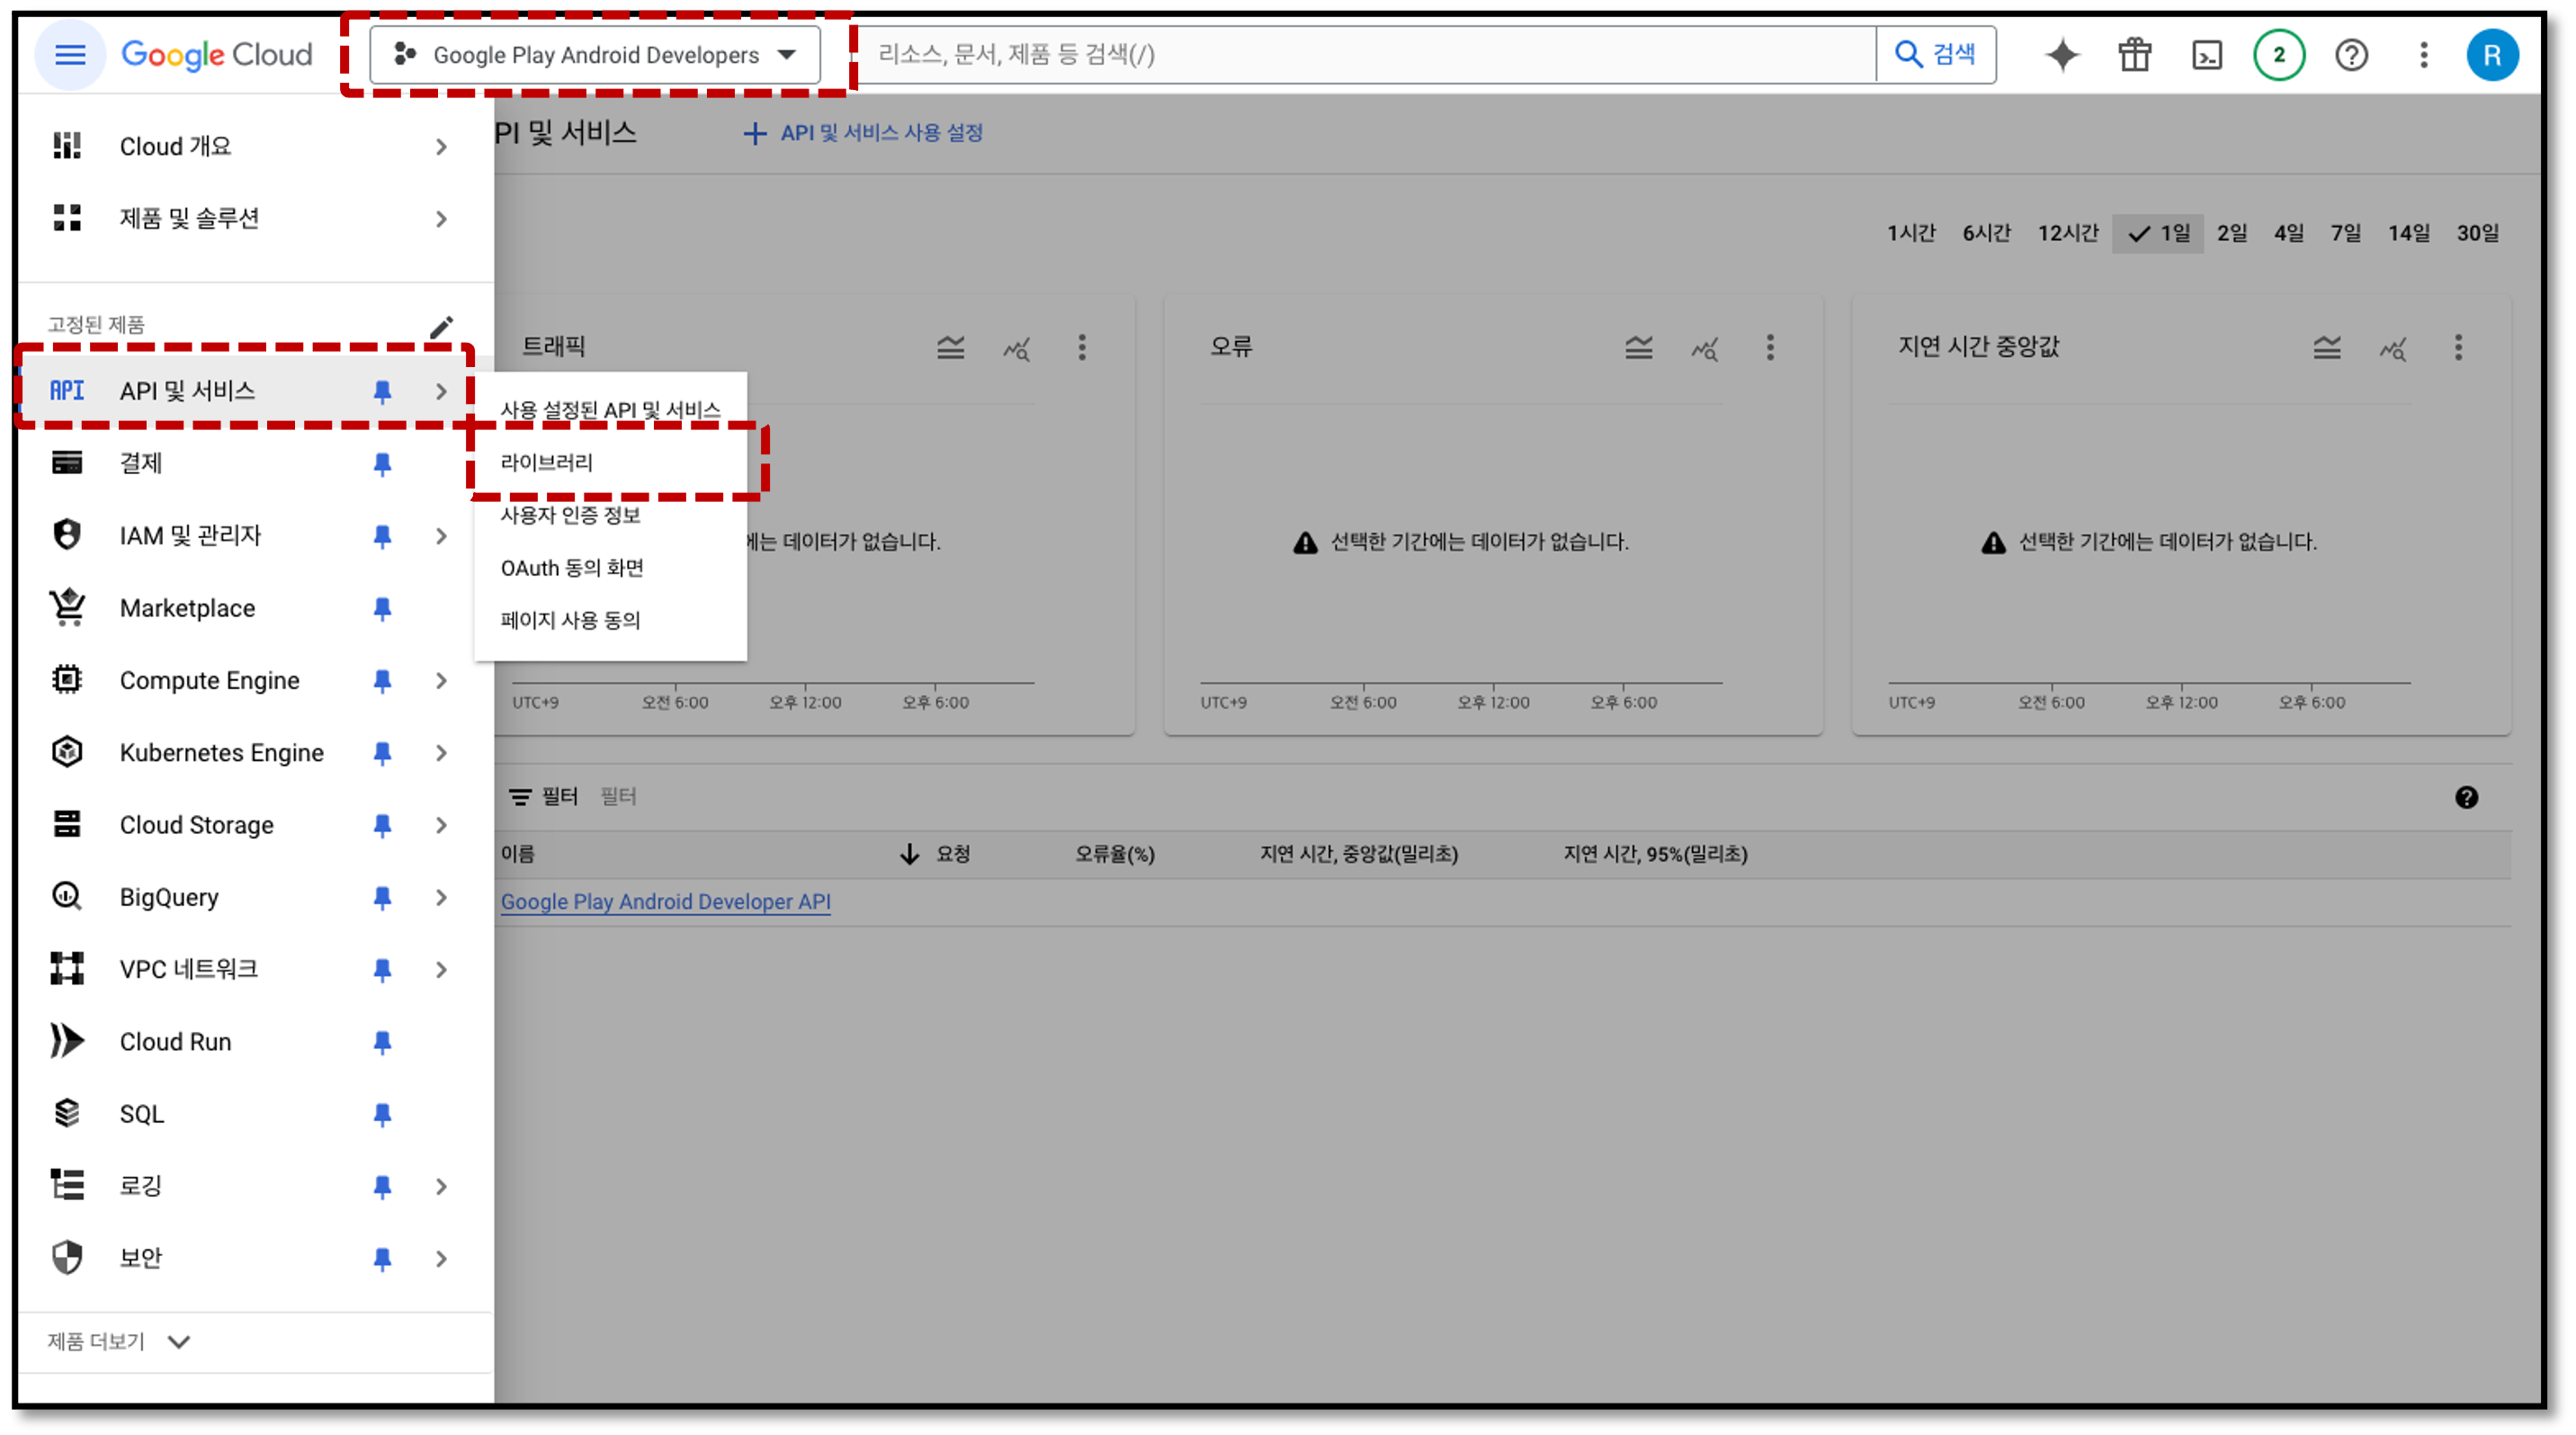
!warningIt must be activated in the same project as the one connected to the Play Console's
API 액세스.
For IAP verification,Google Play Android Developer APImust be enabled.
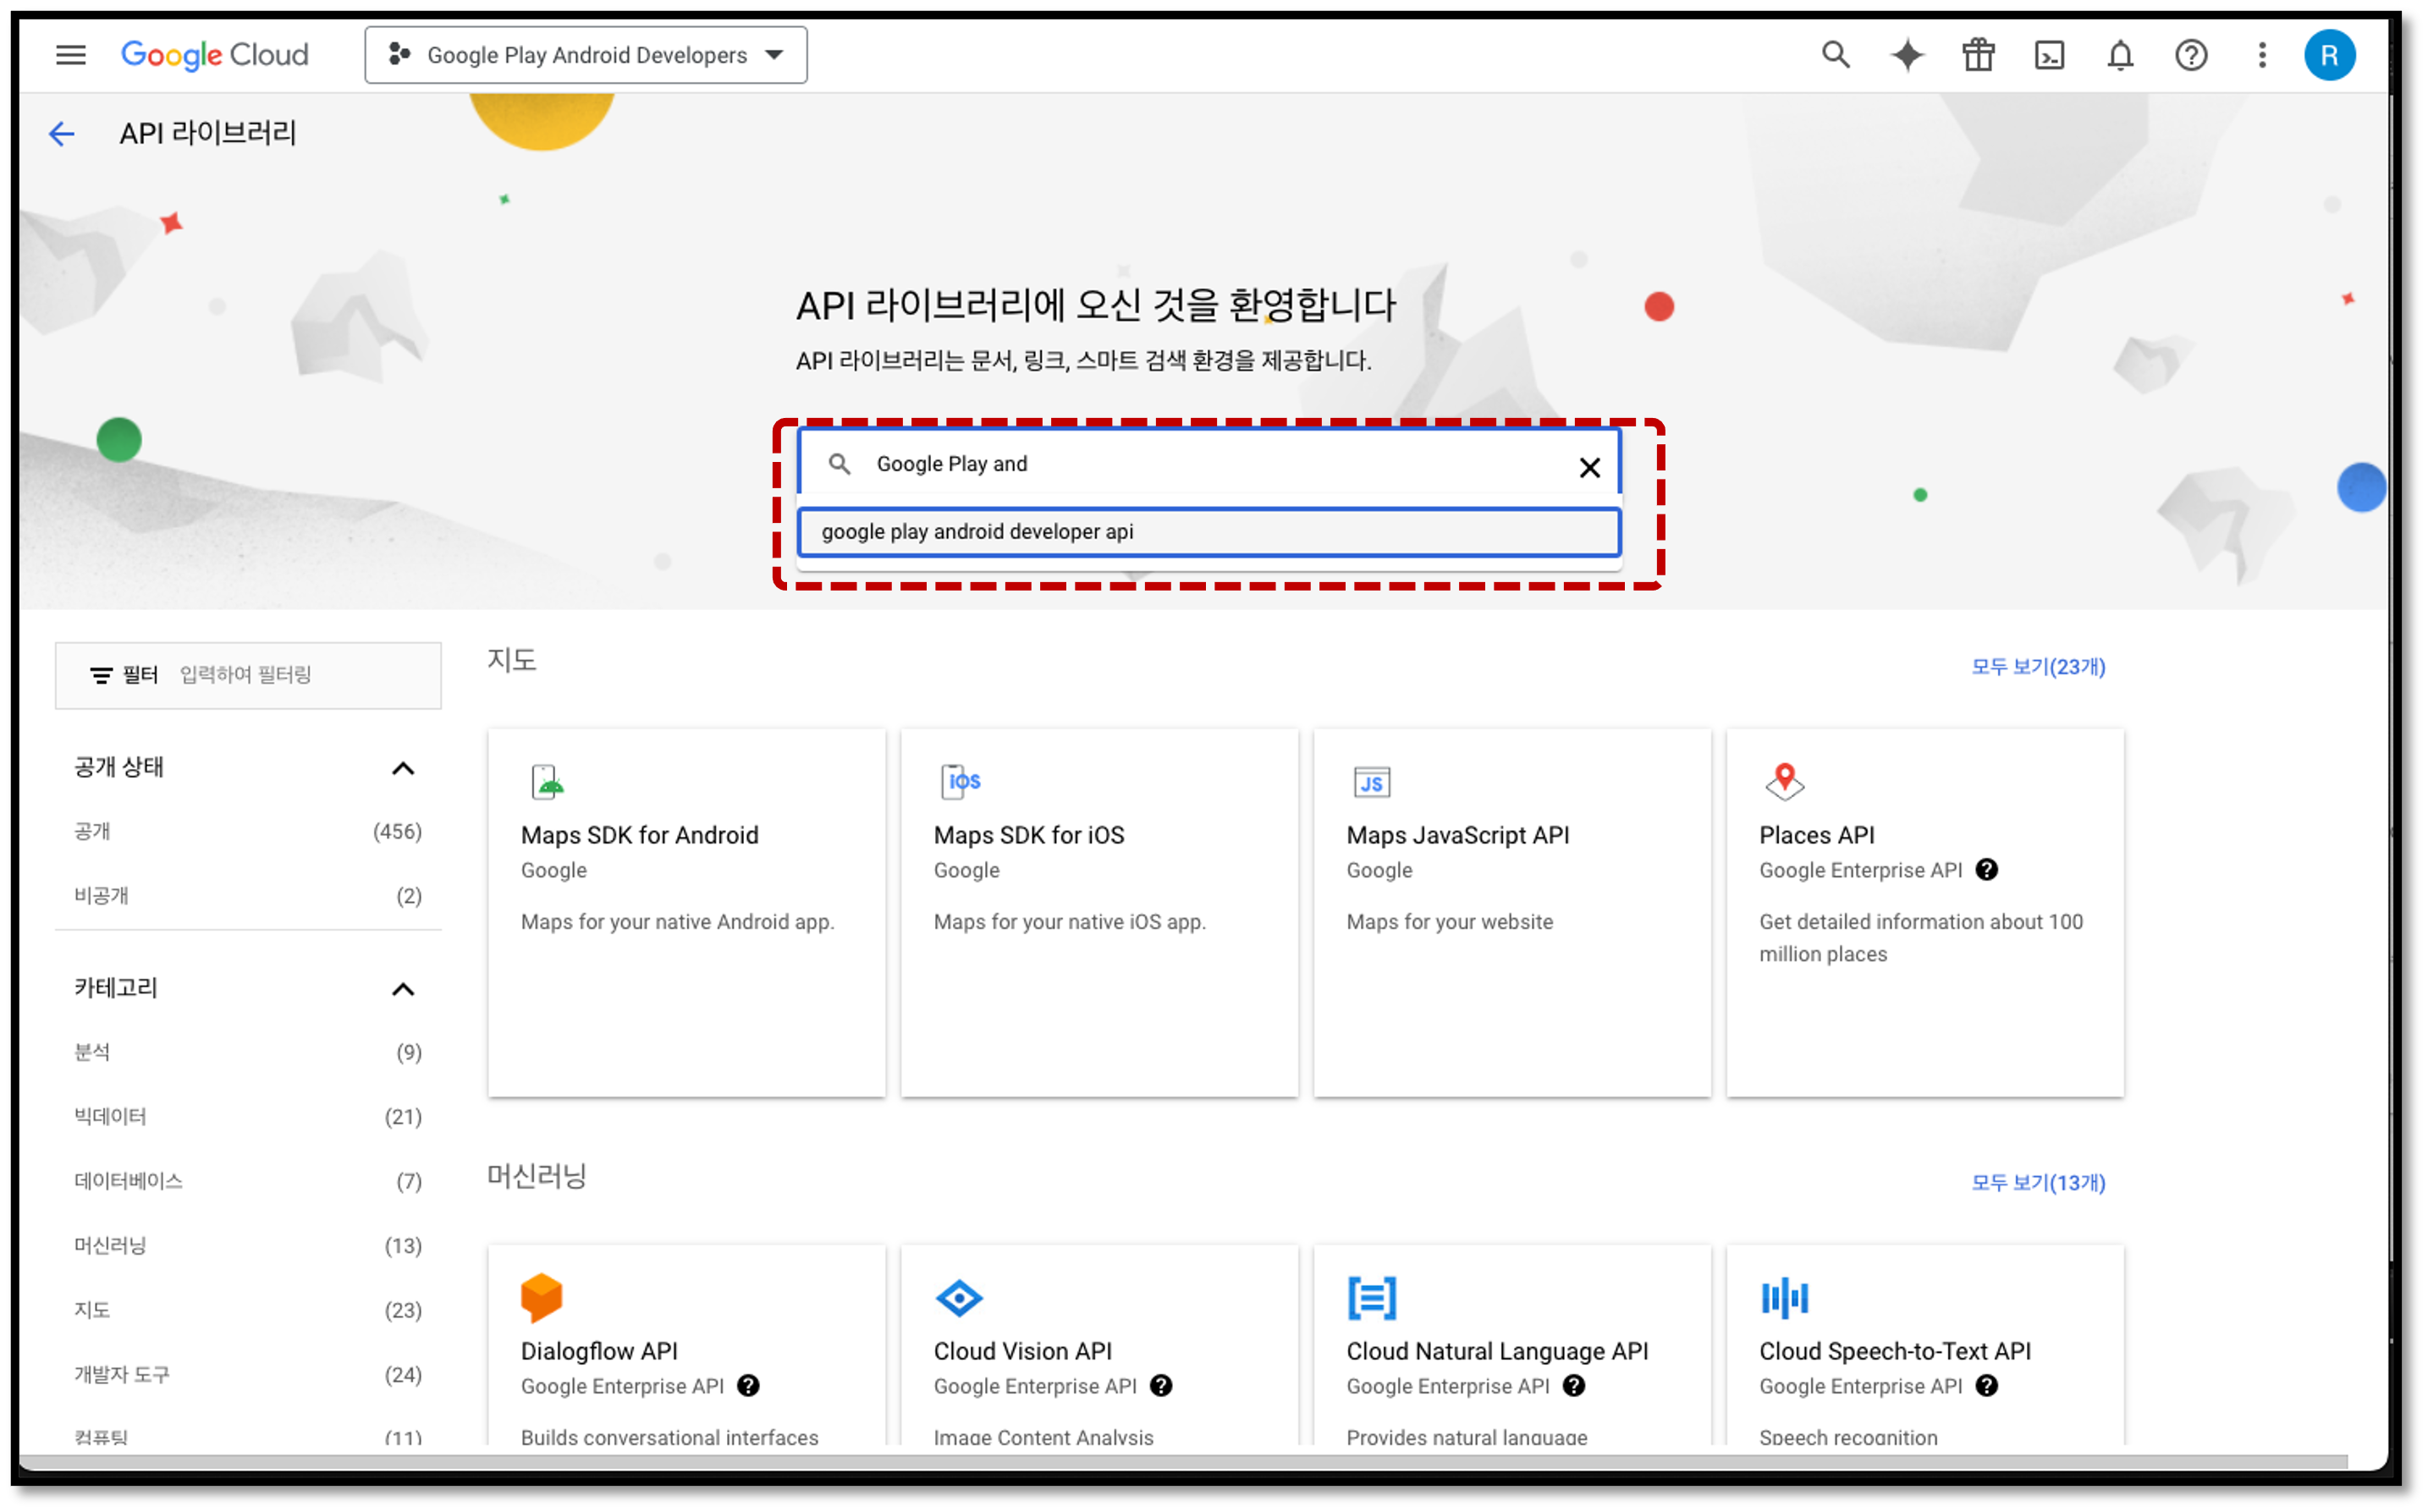
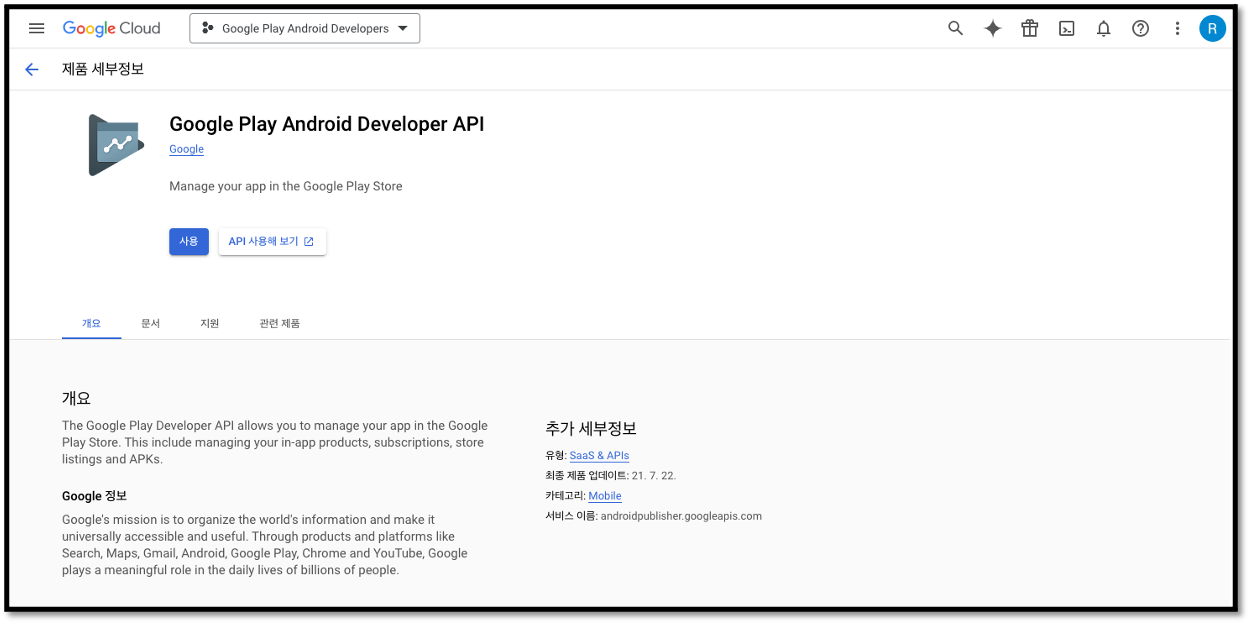
2-3) OAuth Consent Screen Setup and OAuth Client ID Creation
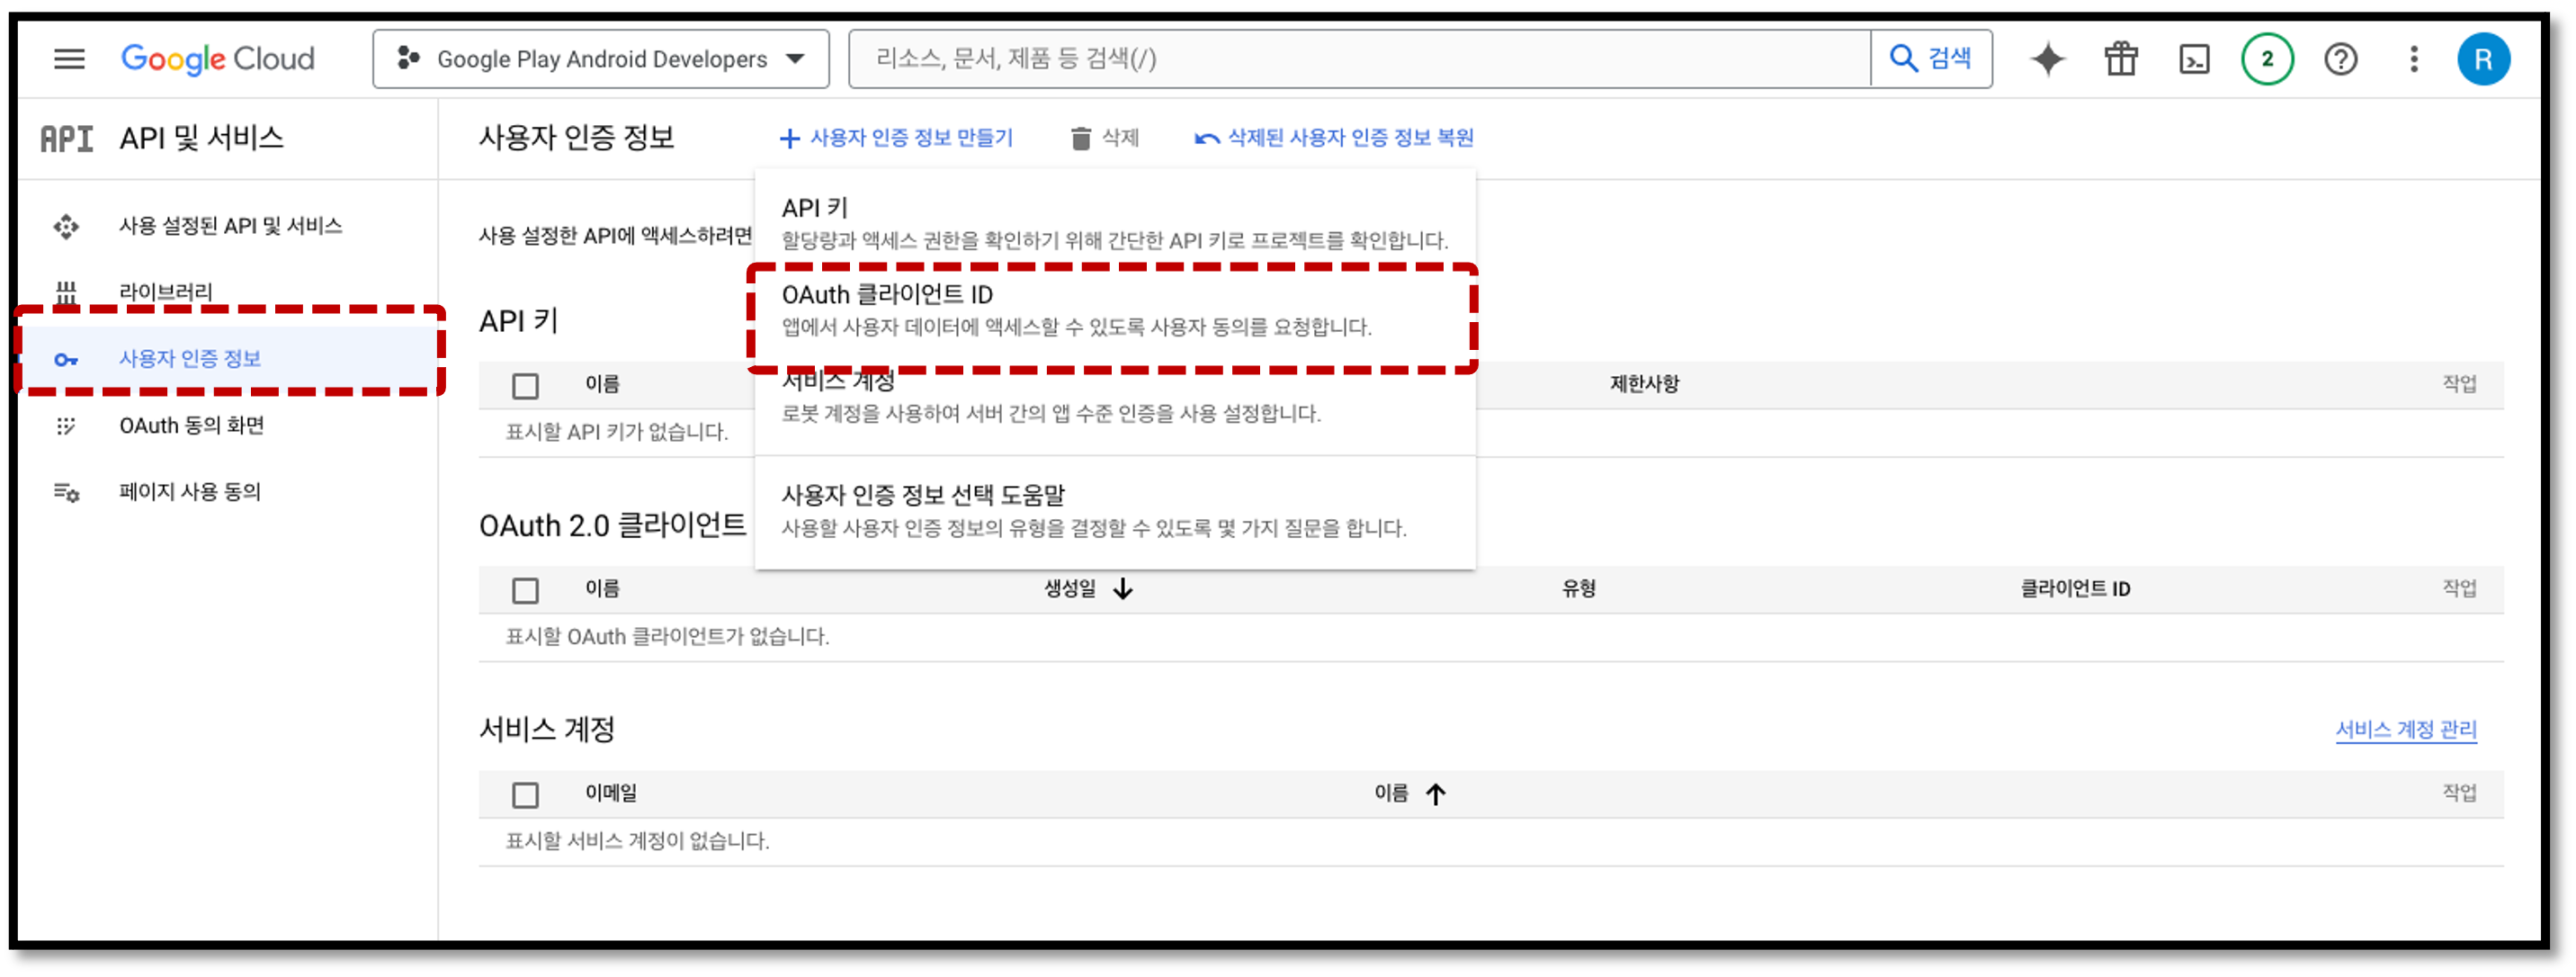
API 및 서비스Select the project to link in the dashboard.사용자 인증 정보In the menu, select사용자 인증 정보 만들기>OAuth 클라이언트 ID.
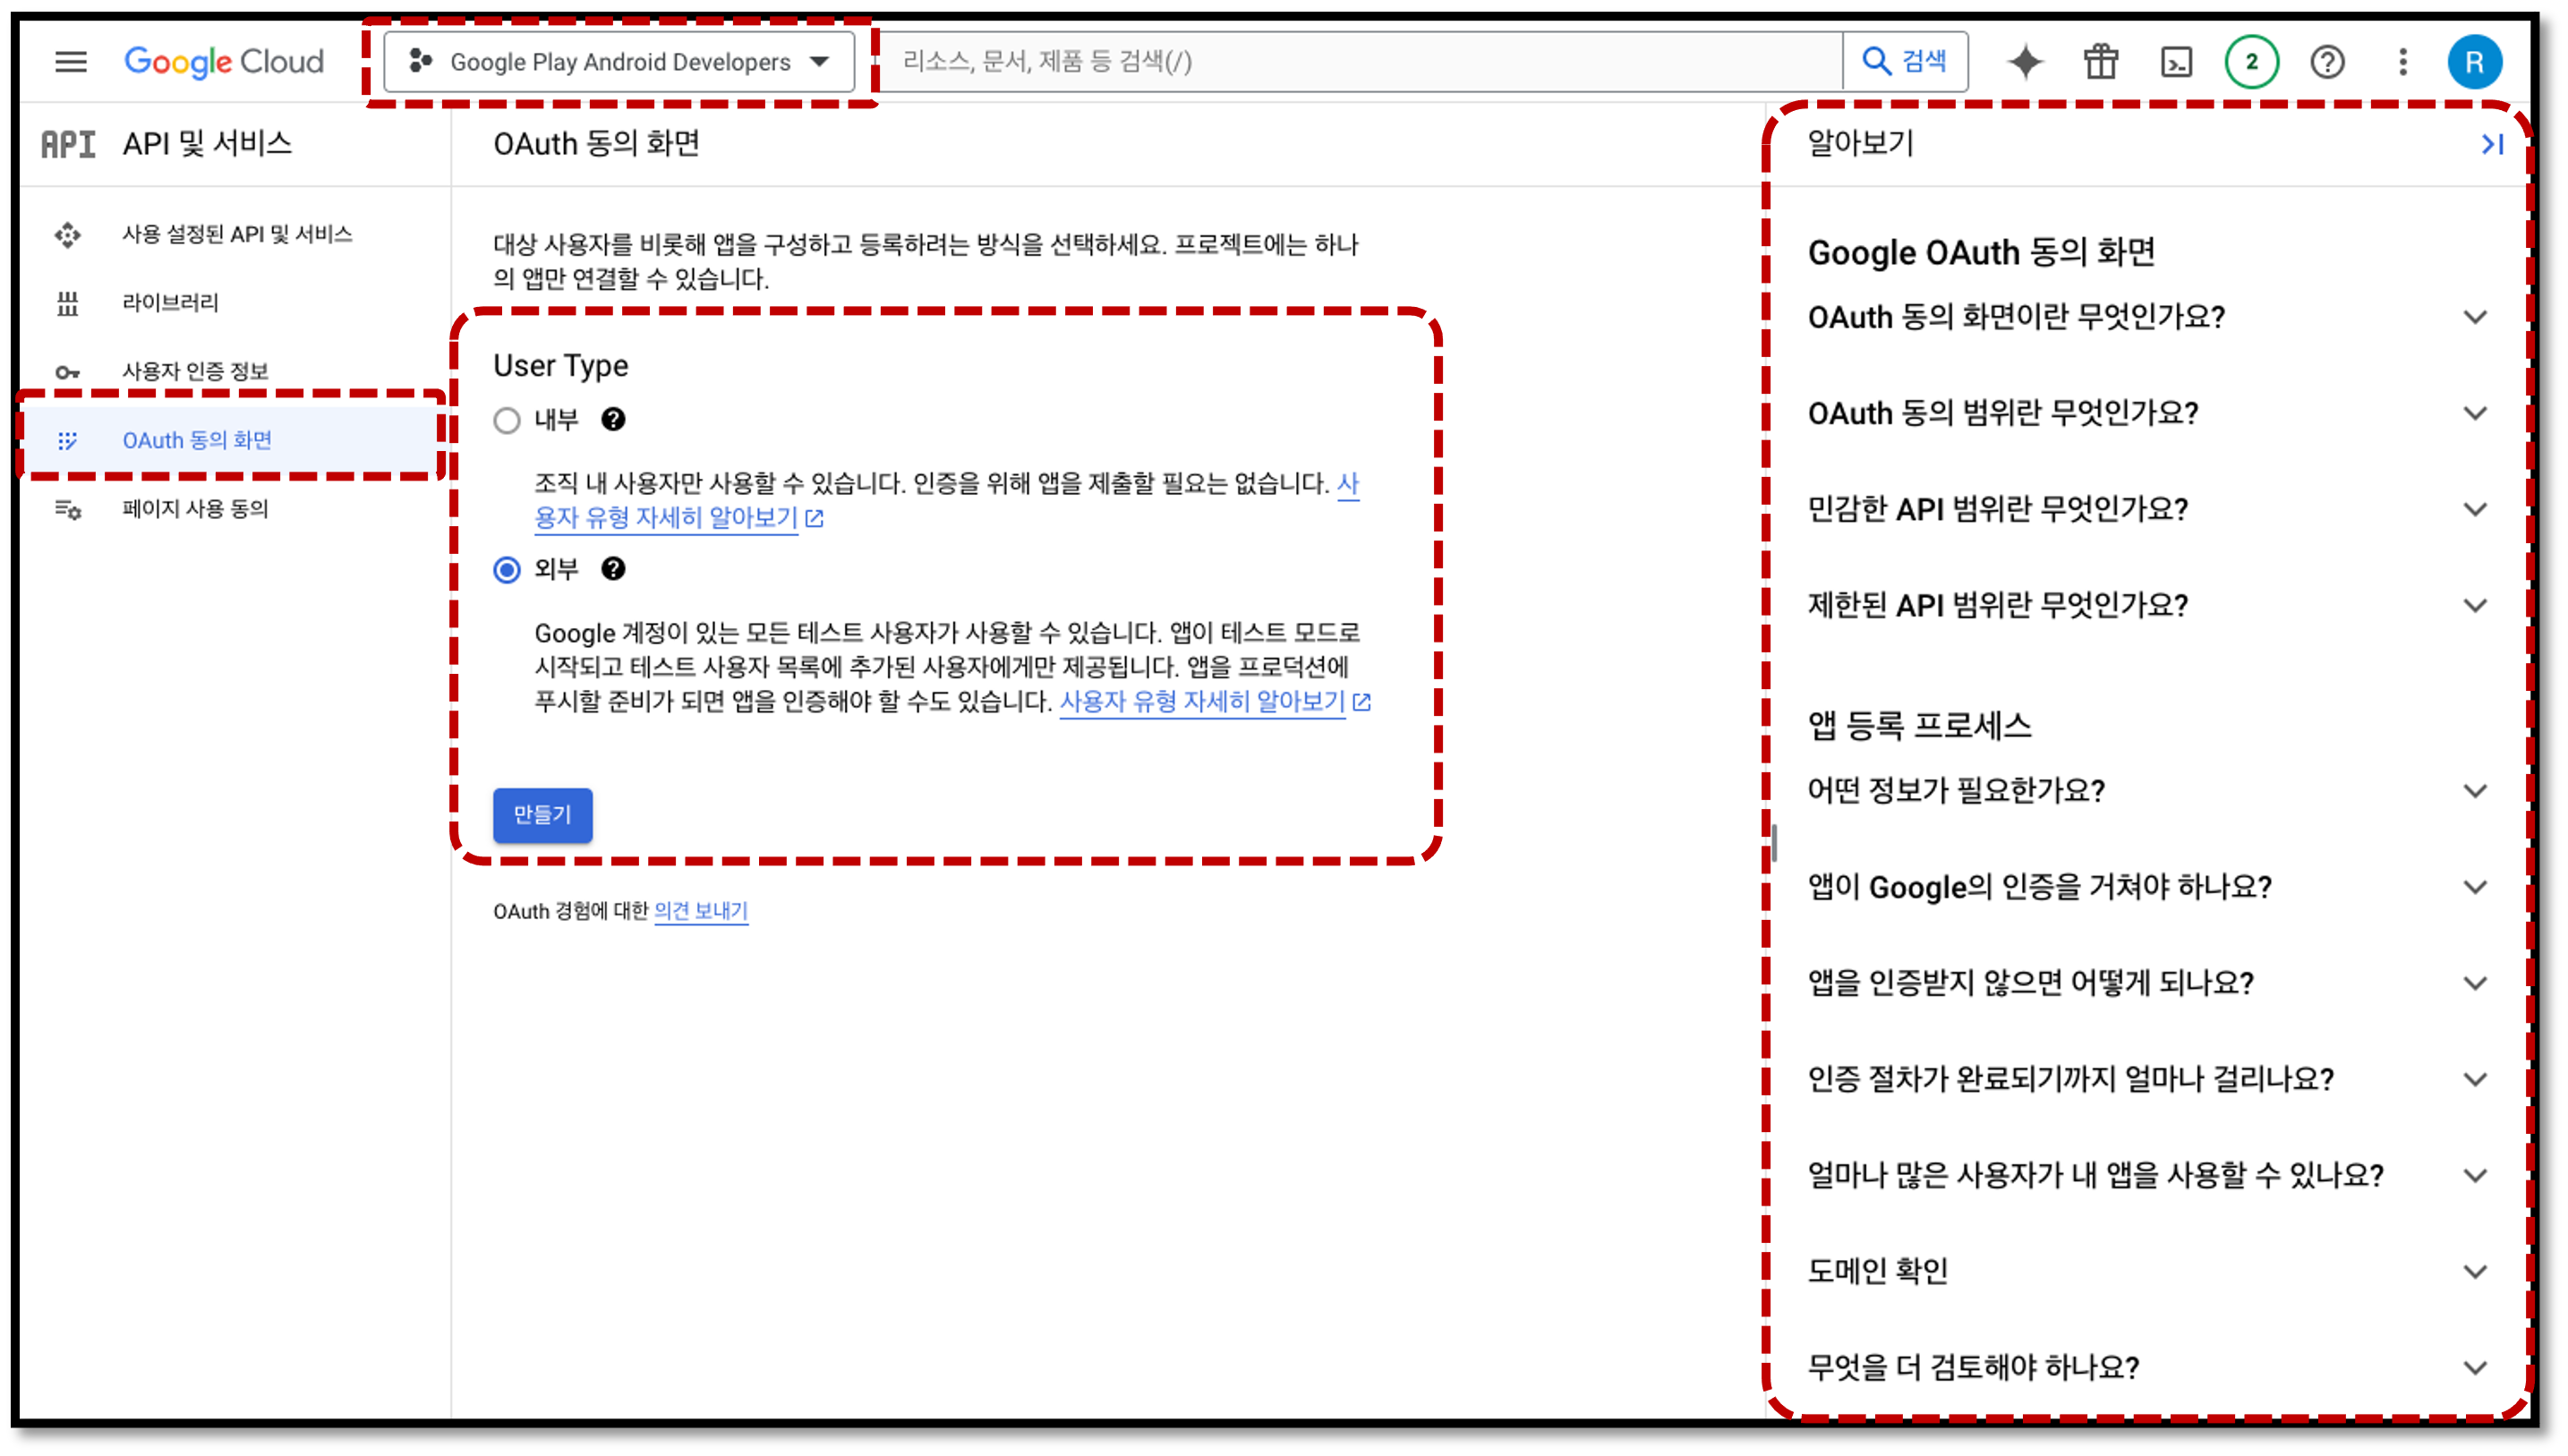
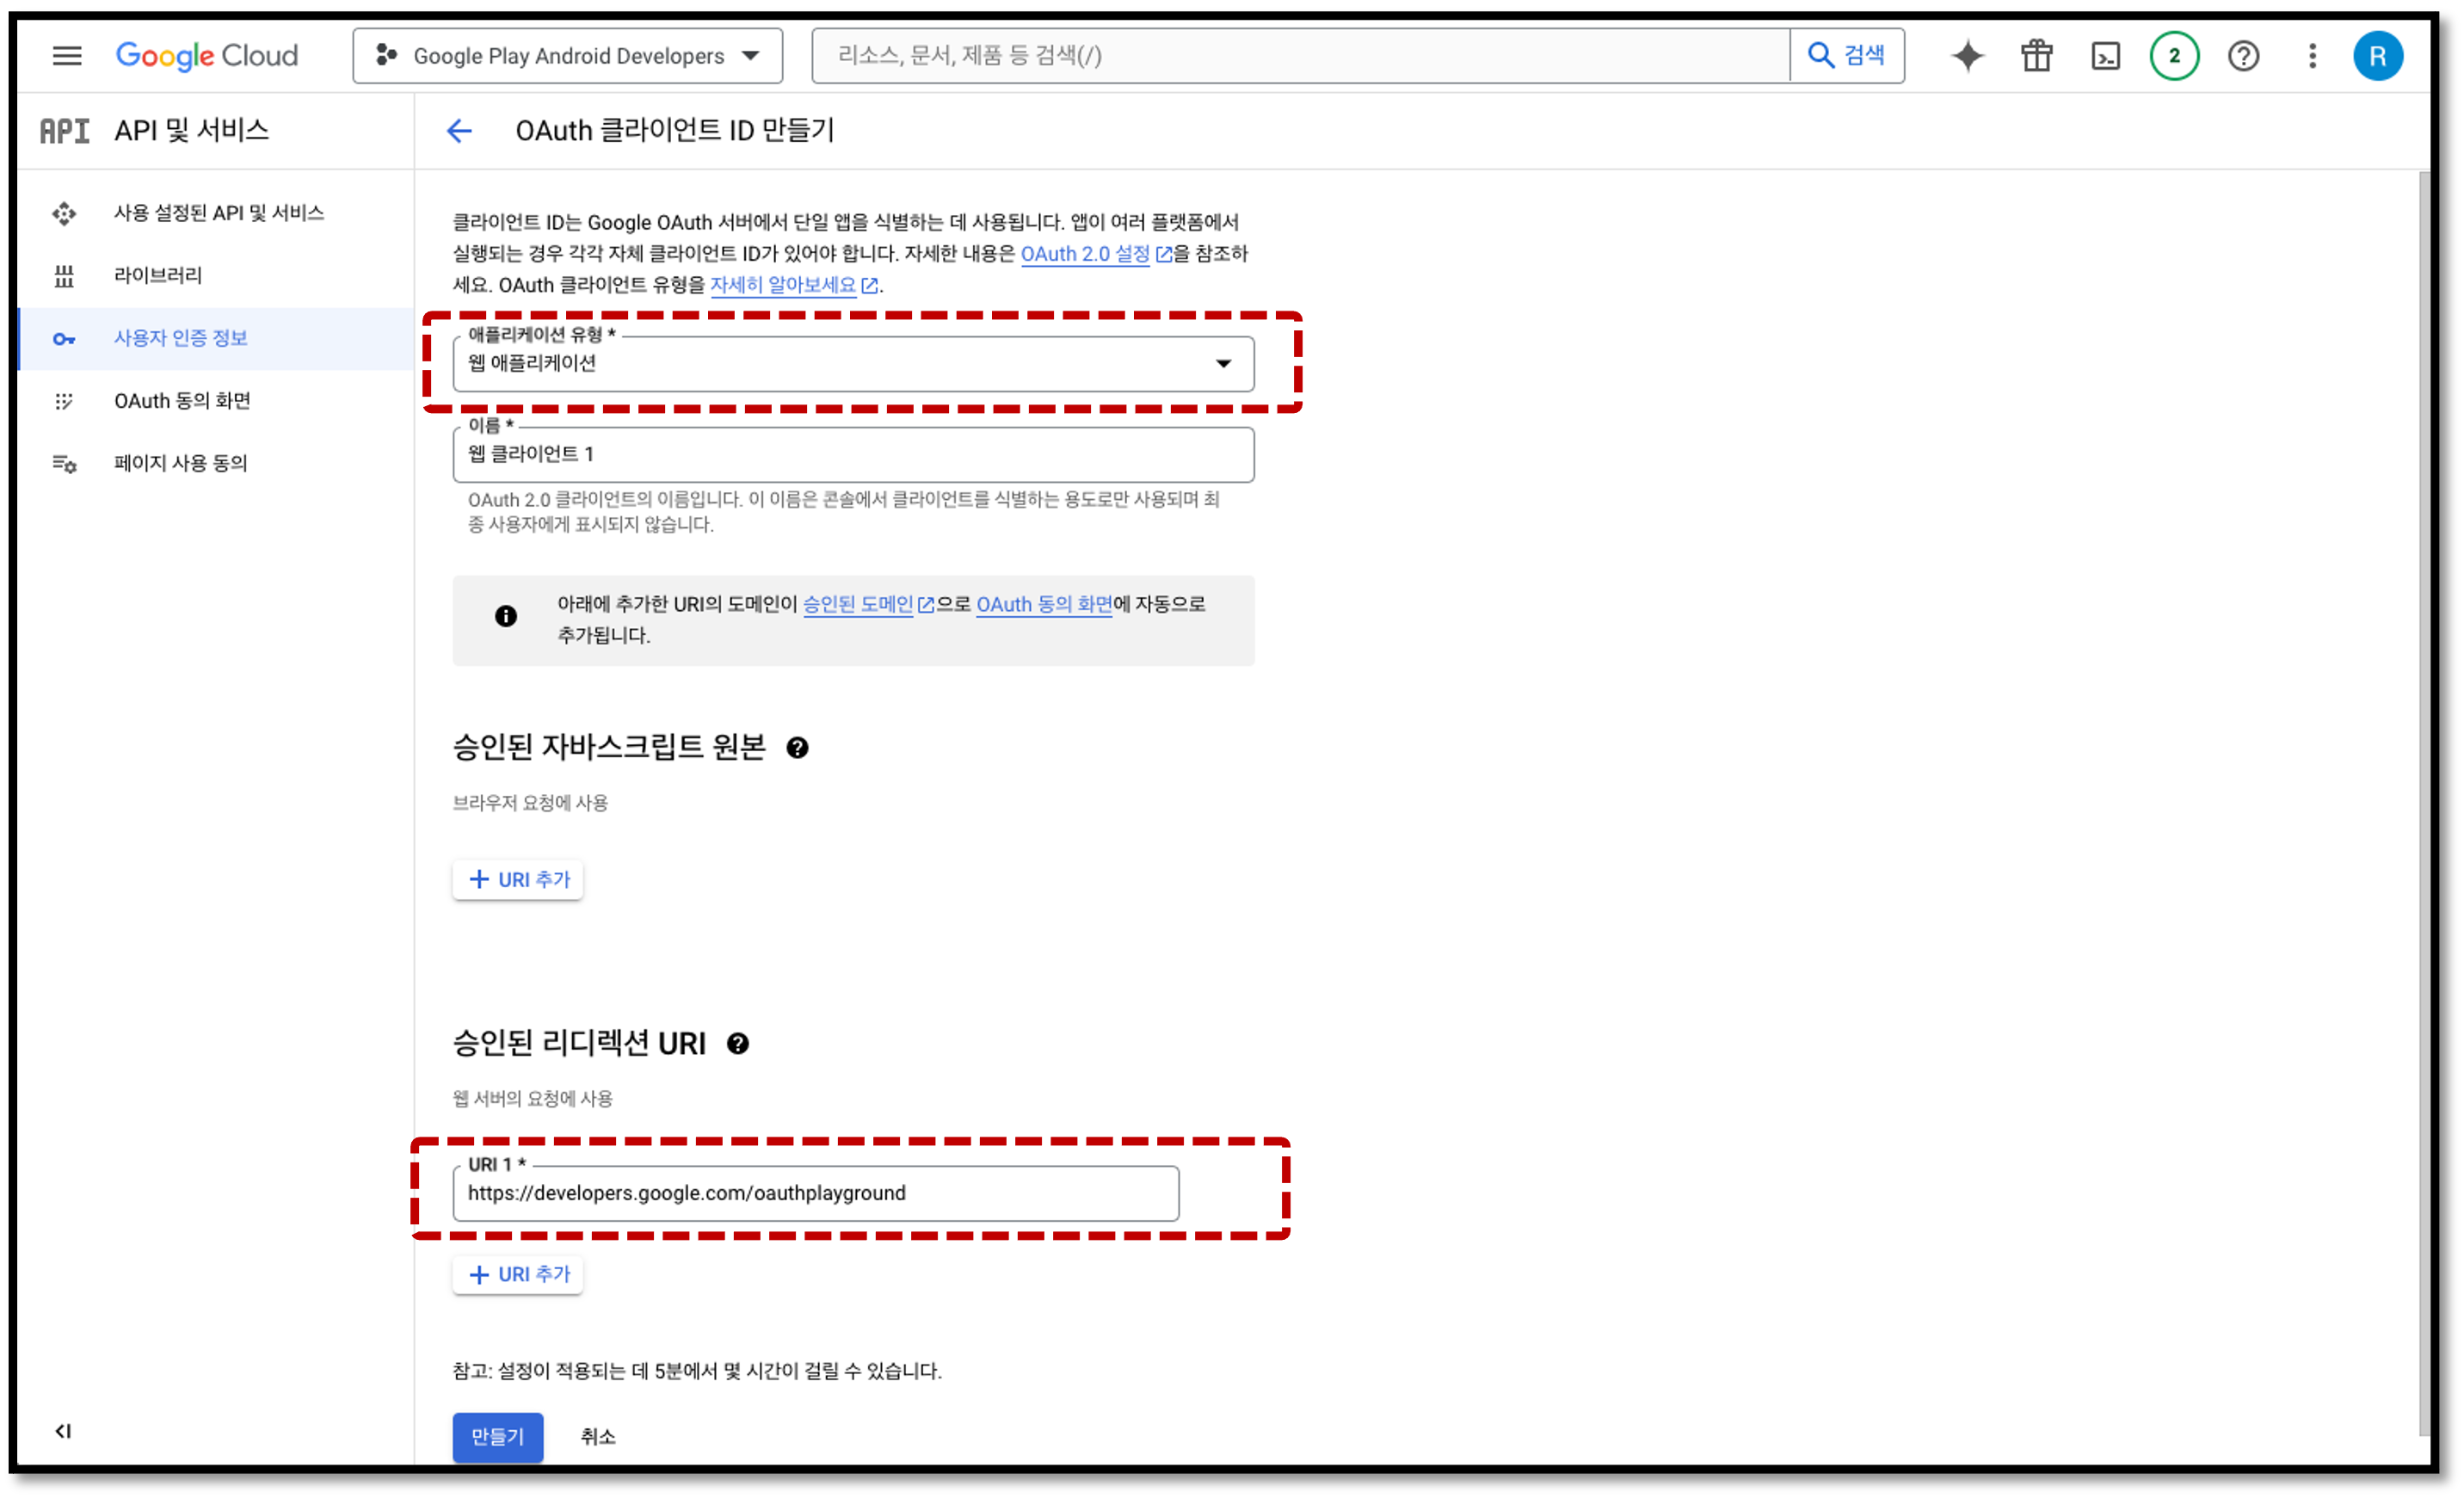
- Enter the basic information for the new OAuth client.
- Application type:
웹 애플리케이션 - Client name: A name that allows identification of IAP usage
- Authorized JavaScript origins: Leave blank
- Authorized redirect URIs:
+ URI 추가Click and then enterhttps://developers.google.com/oauthplayground
- Application type:
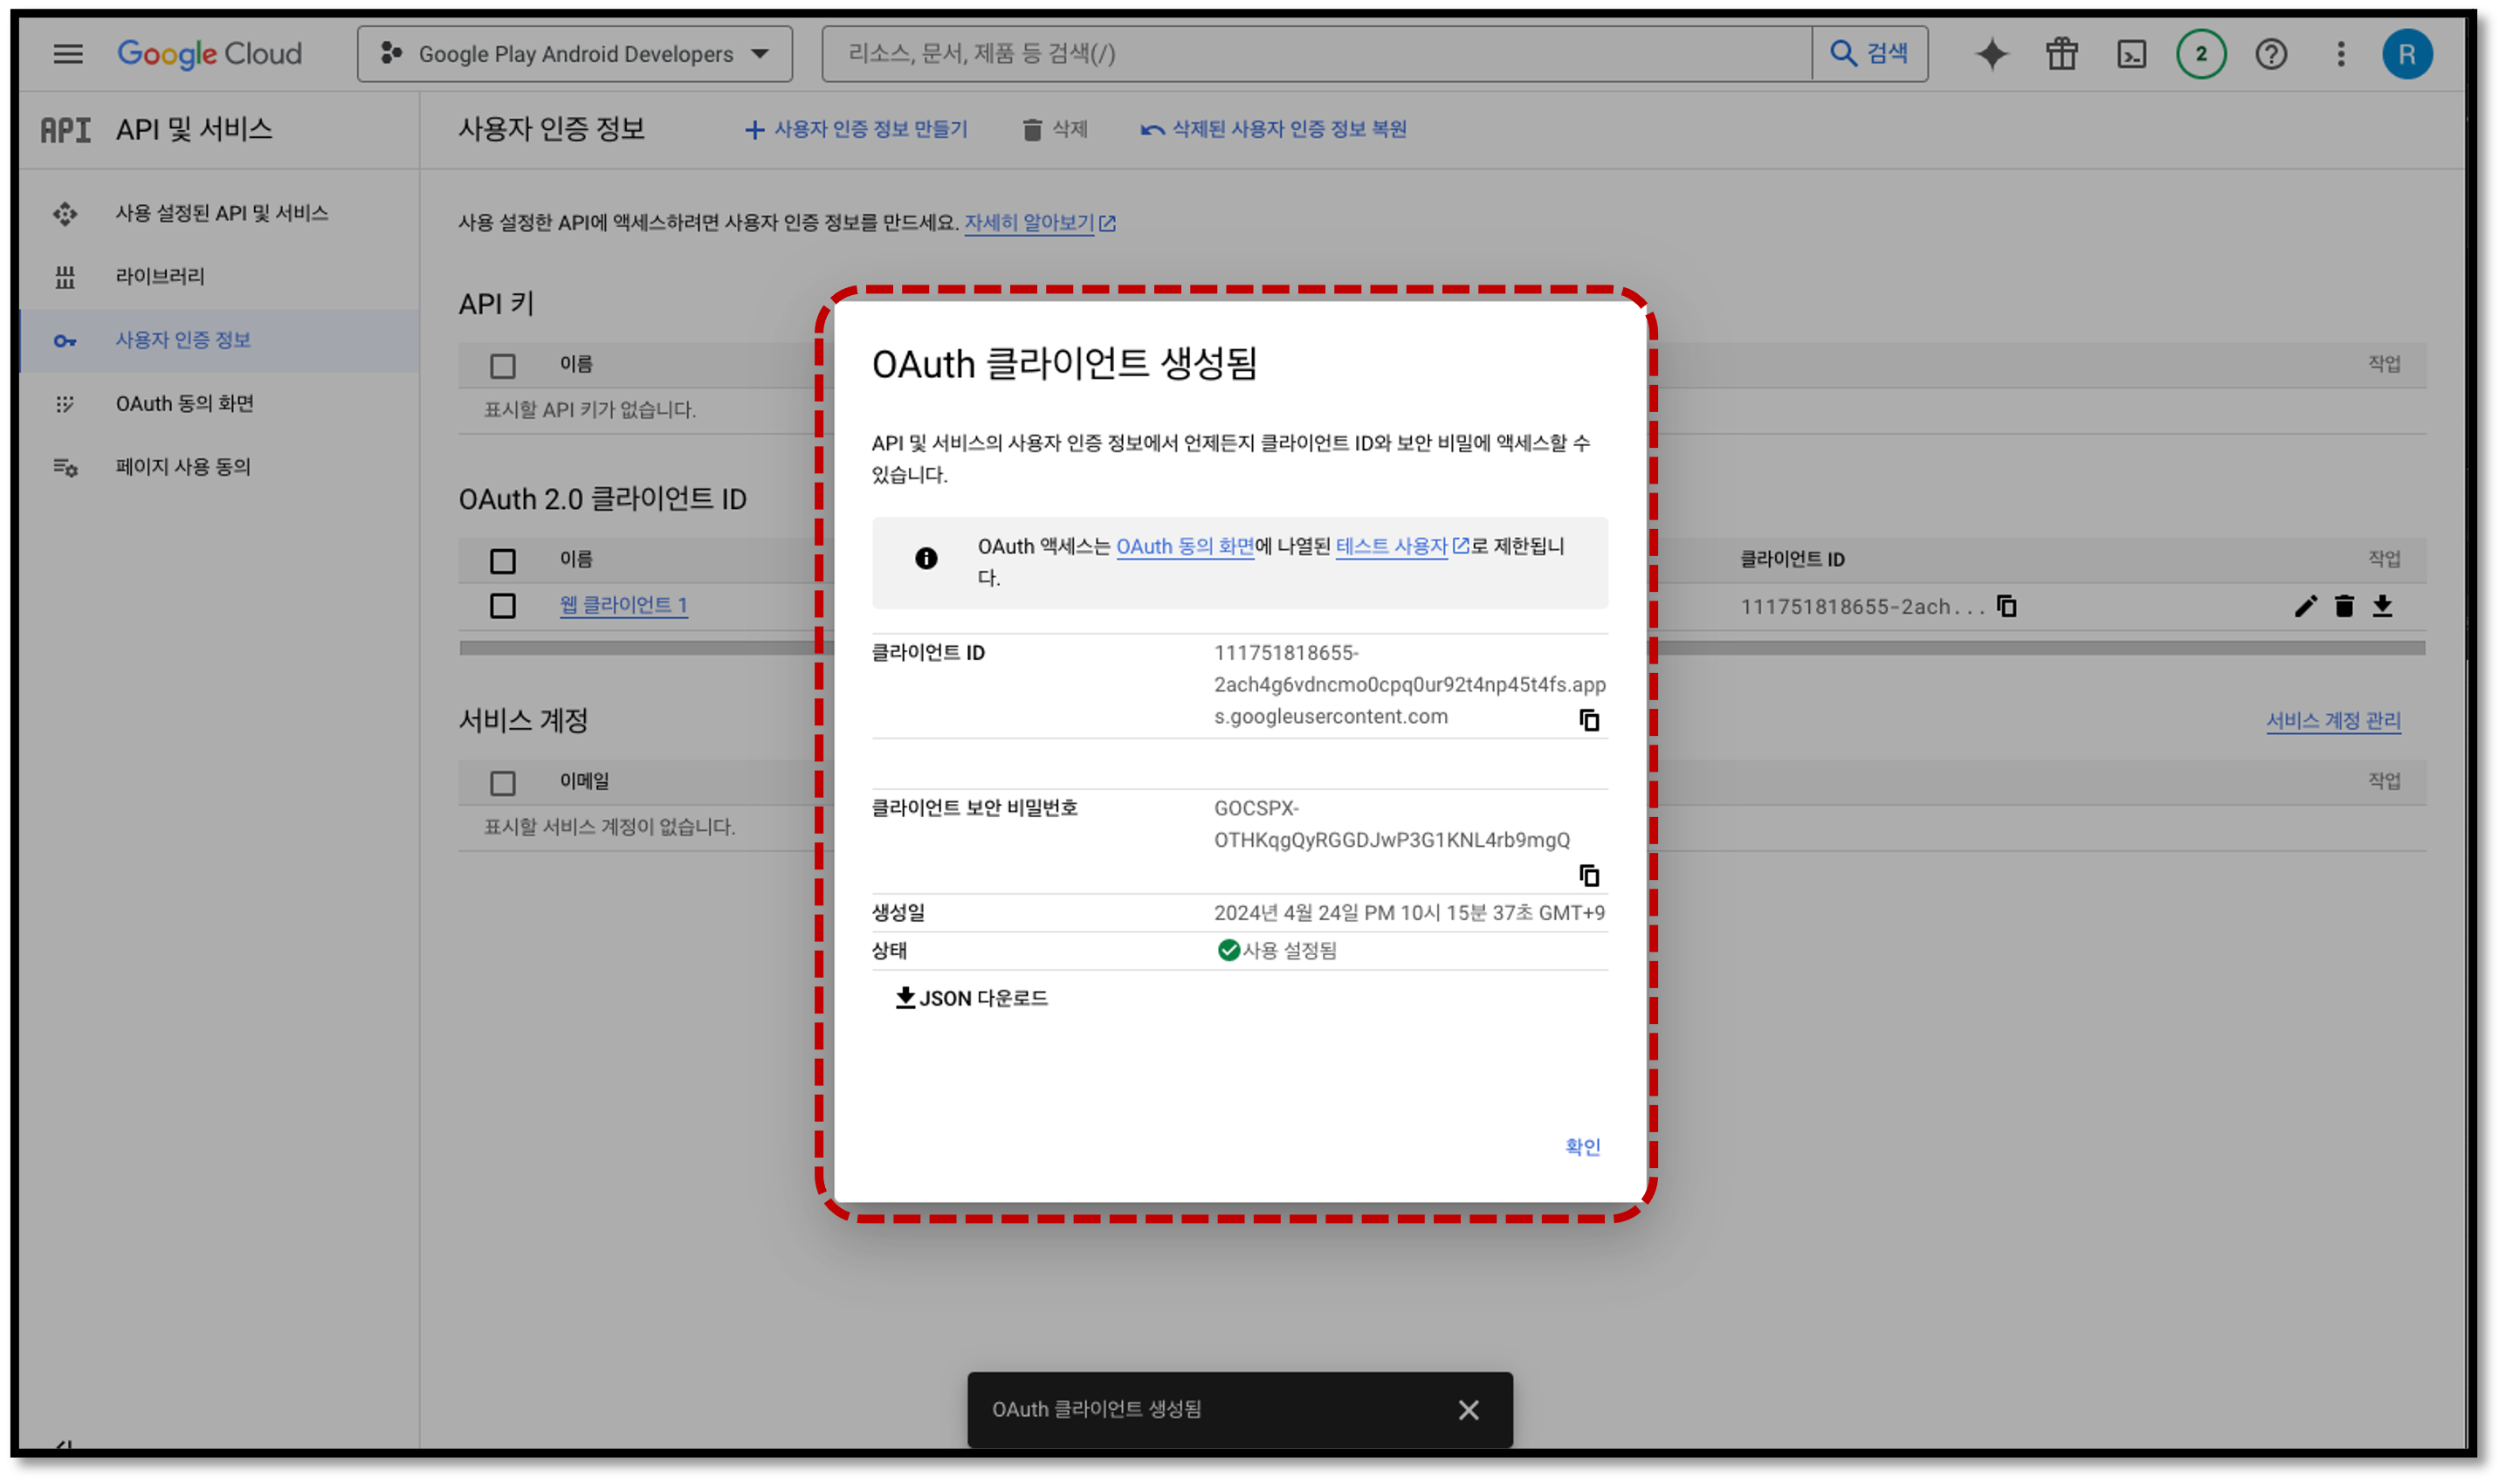
- Once created, check and save the two values from the guide pop-up. (Used later for Partner input + Refresh Token issuance)
- Client ID (
OAuth Client ID) - Client Secret (
OAuth Client Secret)
- Client ID (
The values can also be found on the OAuth client information screen or in the downloaded client JSON.
For detailed OAuth setup methods, refer to the Google OAuth2 Guide.
3. Refresh Token Generation (OAuth 2.0 Playground)
- Go to Google OAuth 2.0 Playground.
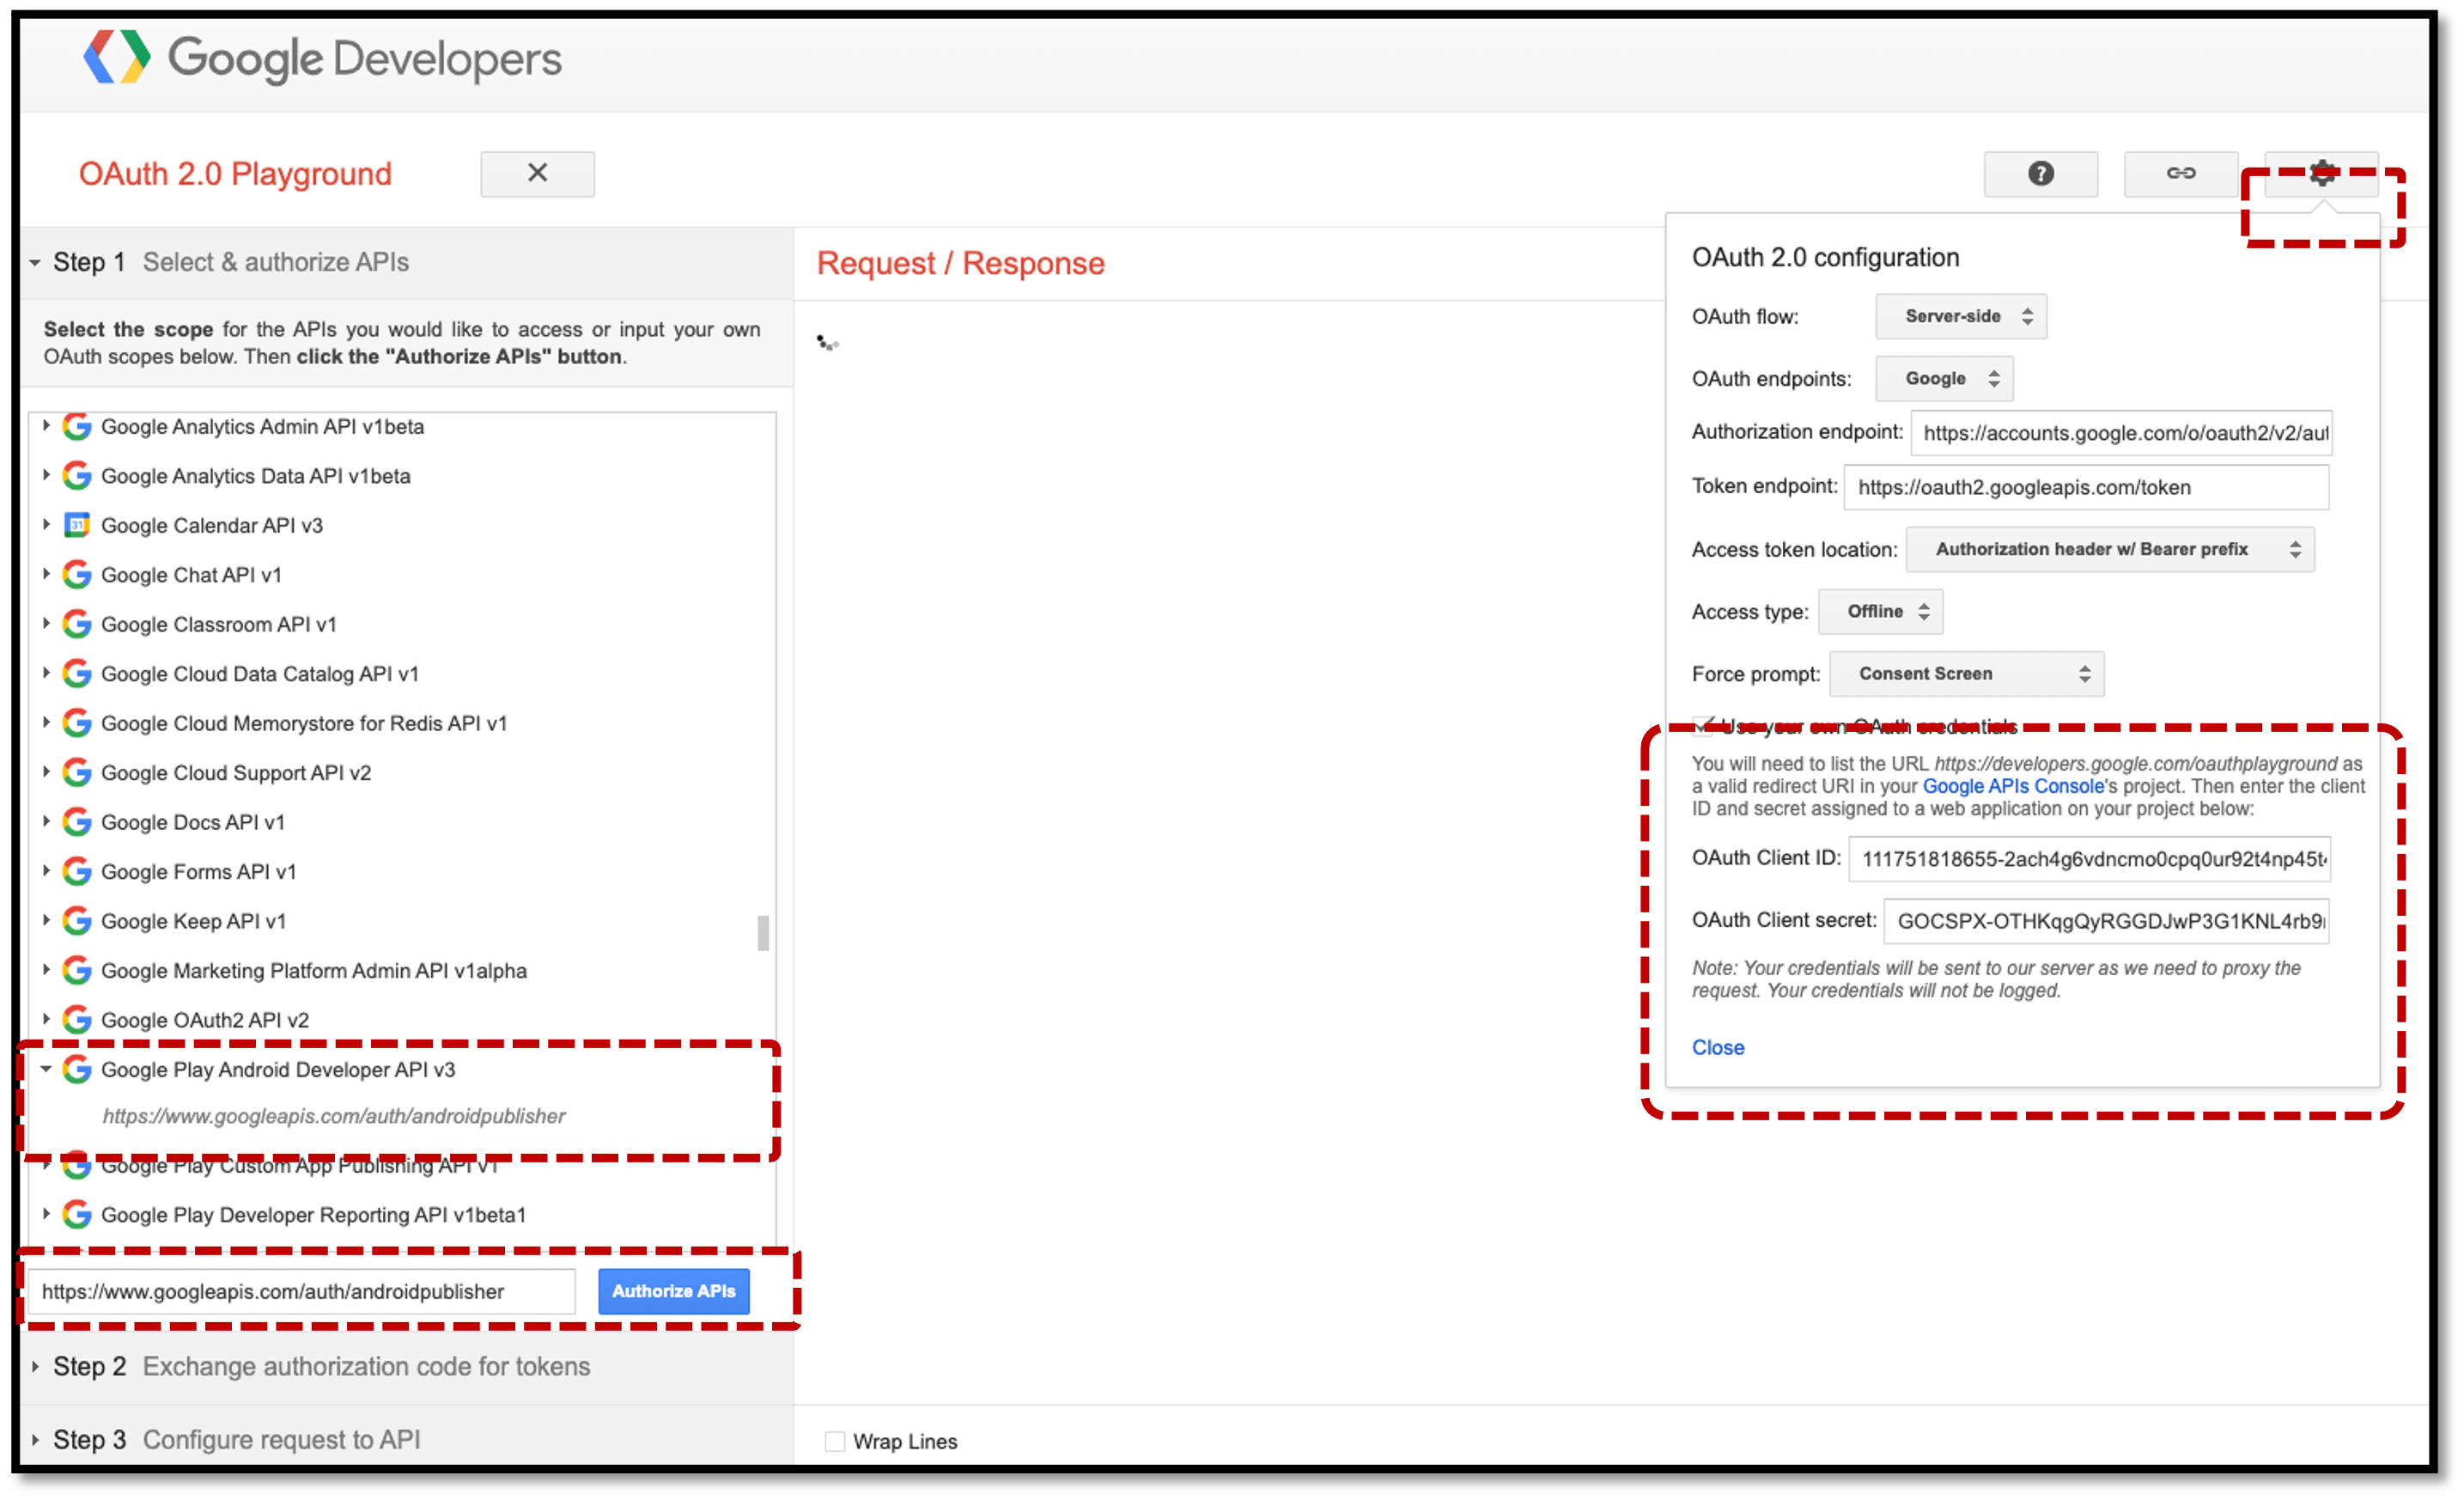
- Click the gear button in the top right of the screen to open the
OAuth 2.0 Configurationpanel, and select theUse your own OAuth credentialscheckbox. - Enter the
OAuth Client IDandOAuth Client Secretissued in the previous step, respectively. - In the
Step 1area on the left, selectGoogle Play Android Developer APIor enterhttps://www.googleapis.com/auth/androidpublisherdirectly in the scope input field at the bottom. - Click the
Authorize APIsbutton at the bottom left.
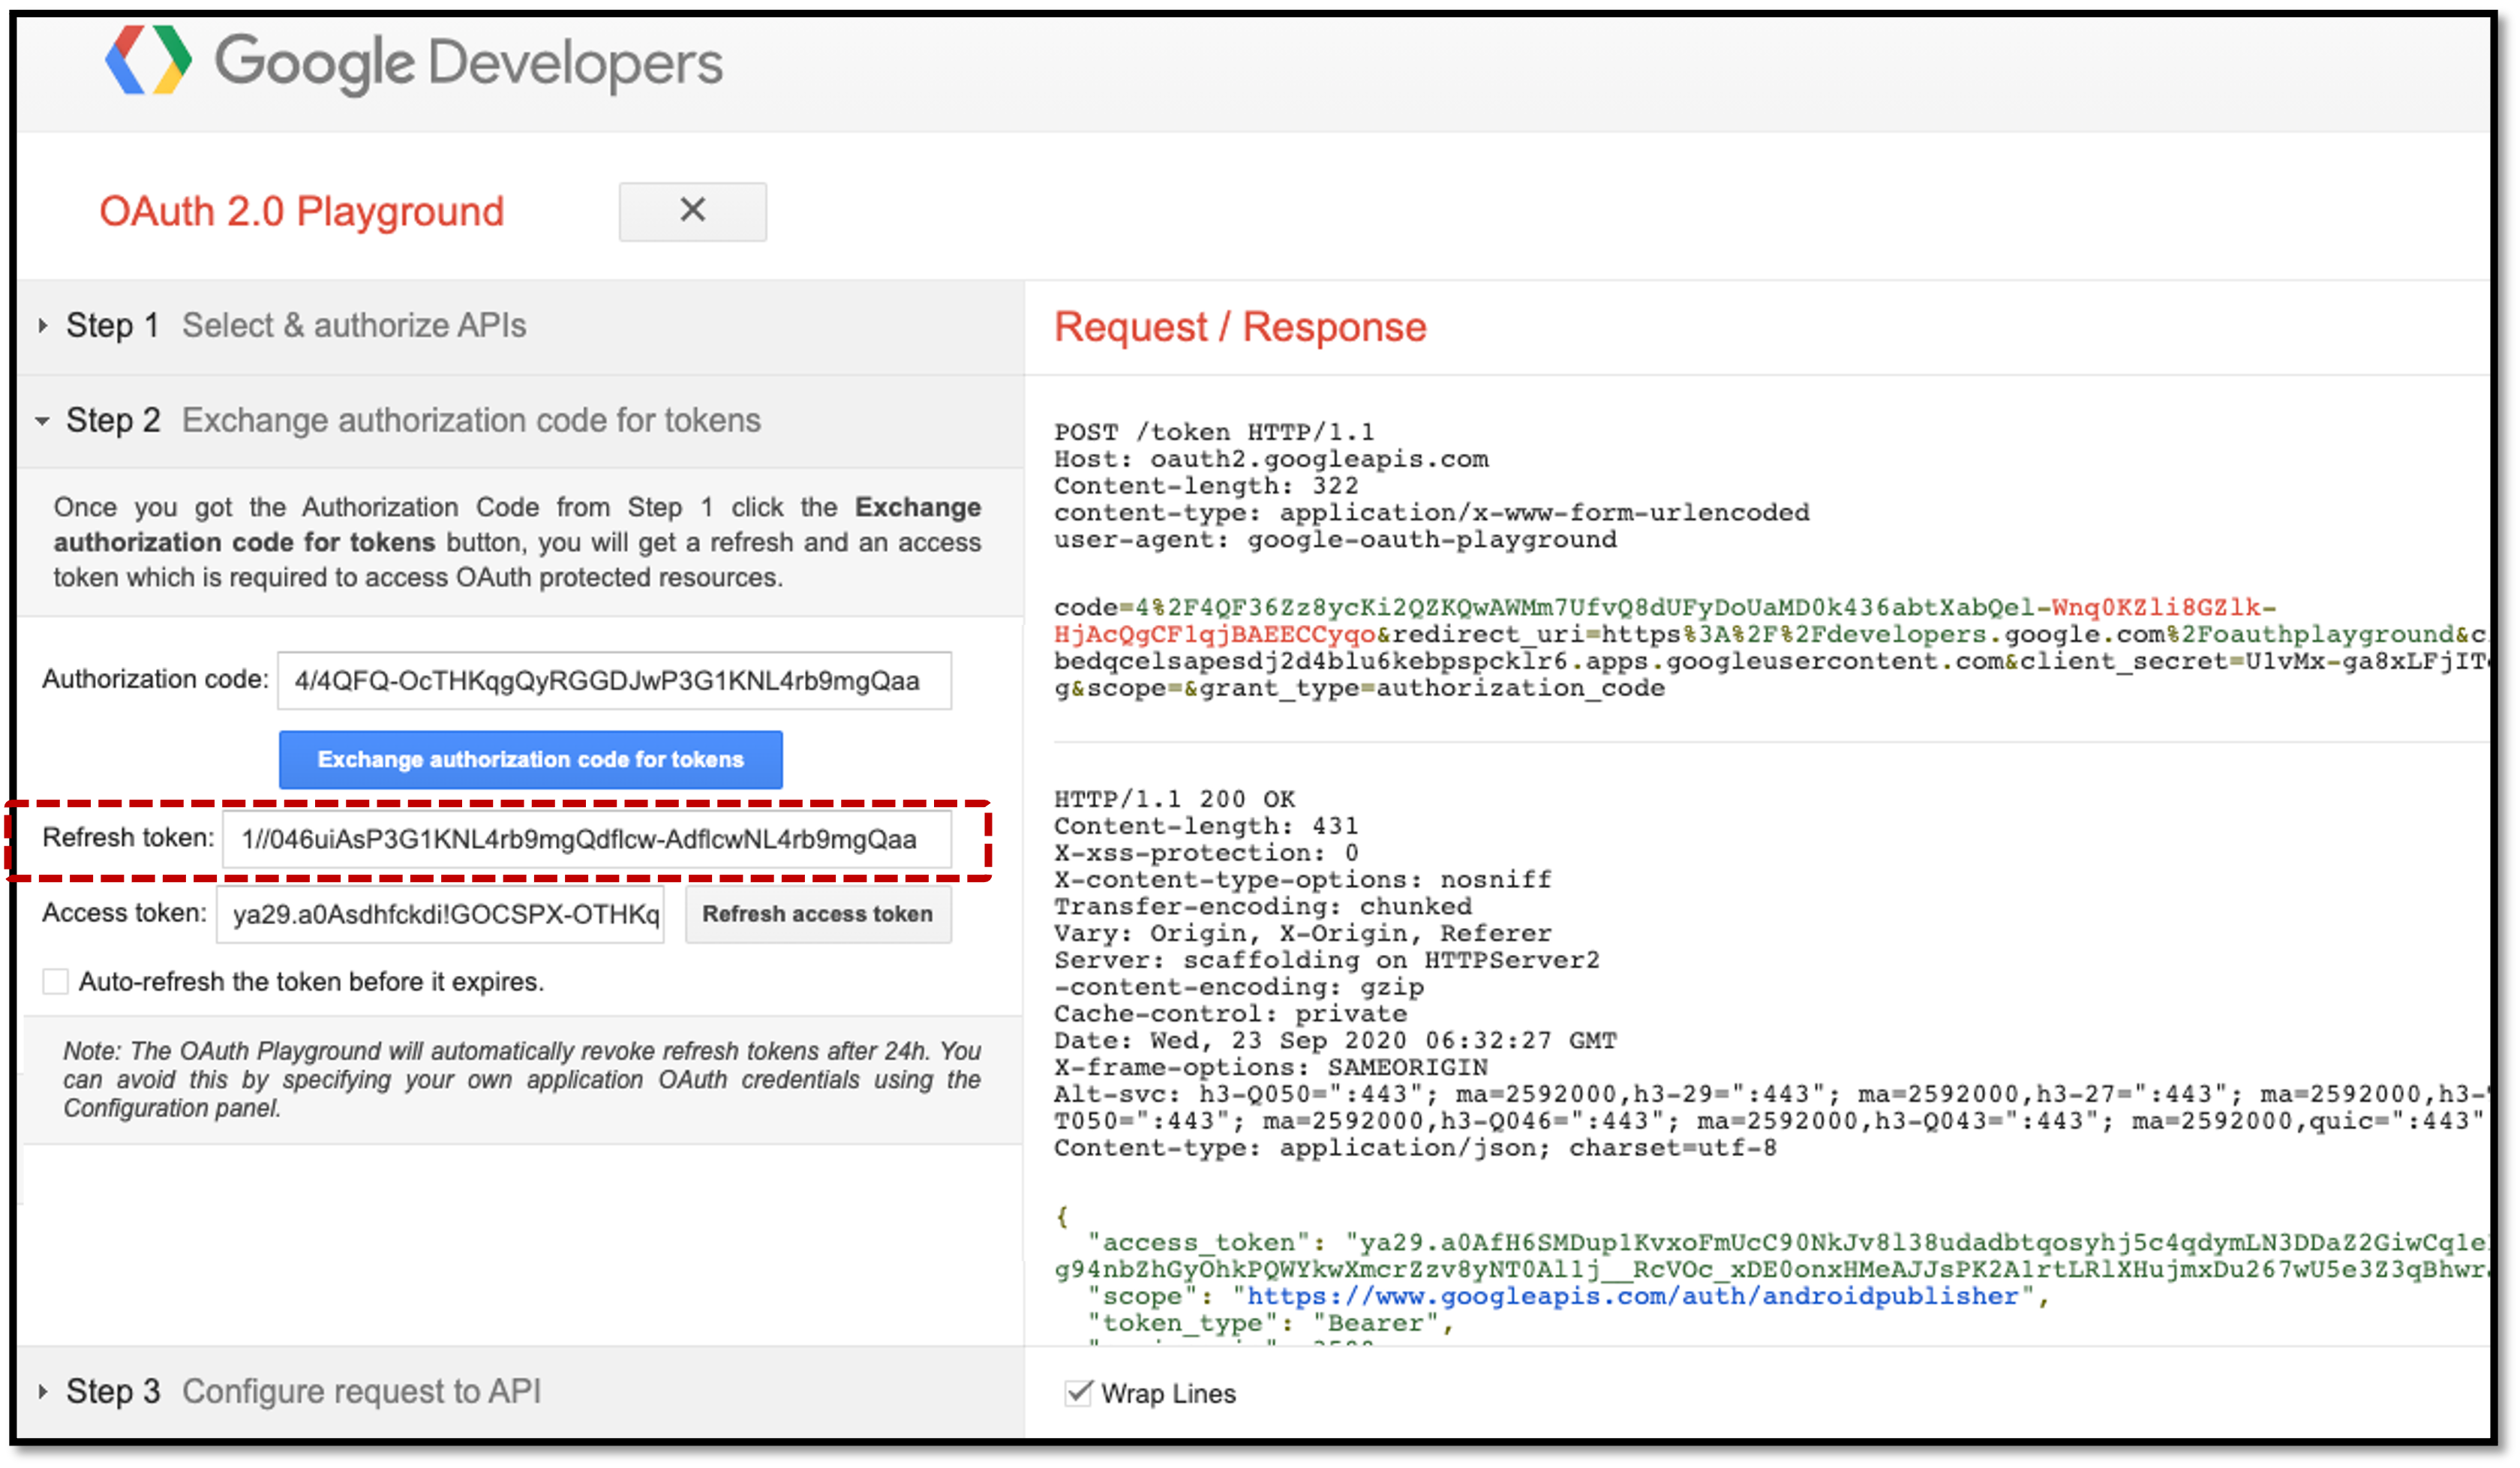
- After authentication is complete and the screen switches to
Step 2, click theExchange authorization code for tokensbutton. You can check theRefresh tokenvalue in the response area.
4. Entering Information in Stove Partners Billing Settings
Enter the following 3 values issued in the steps above into IAP Information by Market in Stove Partners.