- Last Updated

Push
Understanding
A push notification is a message that delivers news to a user's device screen even when the game isn't open. STOVE provides push sending on iOS, Android, and Fire OS.
There are two sending methods: sending or scheduling directly in STOVE Partners (web console), or sending via API from the game server.
You can send to an entire market, world, or country, or selectively to a group grouped by member ID.
Coverage
The push service supports the following 3 messaging services.
| Service | Target device | Description |
|---|---|---|
| FCM | Android | Firebase Cloud Messaging |
| APNS | iOS | Apple Push Notification Service |
| ADM | Fire OS(Amazon) | Amazon Device Messaging |
Push Sending Methods
When sending push directly from the server, the following two methods are supported.
| Sending method | Description |
|---|---|
| Individual send | Sends an individual push to a specific member |
| Group send | Sends a bulk push to a specific game or market |
When Member_no vs guid is used
ㅁ The STOVE platform identifies users by Member_no (numeric).
ㅁ Some games use guid as the identifier; in that case, the guid value is passed in the Member_no field.
Push Configuration Structure
The push service is organized into the following 3 stages.
| Stage | Category | Details |
|---|---|---|
| Stage 1 | Partners and console setup | Issue push authentication keys per market (Google/Apple) and register them in Partners |
| Stage 2 | SDK integration | Configure push reception per platform (Android/iOS/Unity/Unreal) and apply the SDK |
| Stage 3 | Server integration (optional) | REST API integration when you need to send push directly from the game server |
Global Push Policy
Outside Korea, there's no consent step for marketing/nighttime push reception at sign-up, so push can be sent without separate consent.
Don't provide nighttime-push ON/OFF to global users
ㅁ Global users don't support nighttime-push ON/OFF.
ㅁ Don't show a nighttime-push ON/OFF toggle in the game settings.
Integration Guide
Integration Preparation
| Category | Item | Description |
|---|---|---|
| Market | Per-market push setup | Configure the push environment and issue certificates per each market's official guide |
| Client | Apply the STOVE SDK | Apply the per-OS SDK for push reception |
| Partners | Register the Push Key for sending | Register the per-market Push Key in STOVE Partners |
| API AccessToken | Issue the API AccessToken | A token for communicating with the STOVE API server Issued through the publishing technical contact |
Basic Integration Structure
Push integration proceeds in the order ① prepare market authentication keys → ② register in Partners → ③ integrate the SDK.
- Per-market authentication keys
The authentication items to issue differ by market.
Market Required authentication items Notes Android (FCM) service account key (.json private key) Uses FCM HTTP v1 based on the Firebase Admin SDK. iOS (APNS) Private Key (.p8), Key ID, Team ID, Topic (bundle ID) From iOS 13, only token authentication (TOKEN) is supported. Fire OS (ADM) Amazon Device Messaging authentication info For Fire OS devices released via the Amazon Appstore.
FCM sending method notice
Android (FCM) push sending uses the FCM HTTP v1 method.
- Push-registration policy
- Push registration is handled automatically inside the SDK on login, sign-up, token renewal, or account-link completion. No separate API call is needed.
- If the game supports multiple worlds, push is sent only to the last-accessed world.
- Default push-reception value for global users New global users sign up without a consent step, so both daytime and nighttime push-reception defaults are ON.
Just remember this
ㅁ Right after sign-up the reception value is unset, so call the push-settings lookup API at an appropriate time such as the game lobby to set it to ON.
ㅁ Global users can't turn off nighttime push, so don't show a nighttime-push ON/OFF toggle in the game settings.
ㅁ Country info can be checked via the sign-up country value or the GDS access-country value.
Development
SDK Integration
Per-platform Initial Setup
To use the push feature, you must first finish the build/code setup for each platform.
- Android setup
These are the sequential setup steps for using Android (Google FCM) push.
- 1. google-services.json
- Select your project in the Firebase Console.
- Download
google-services.jsonfrom the app settings.
- Download
- Copy it to the app's top directory.
- 2. build.gradlegroovy
repositories {
    google()
    jcenter()
    maven {
        // The repository location changed from SDK 2.6.1.
        url "https://externalnexus.iam0.com/repository/mvp"
        // Add the option below when using Android Gradle Plugin 7.0 or higher
        allowInsecureProtocol = true
    }
    mavenCentral()
}

dependencies {
    implementation 'com.stove:push-firebase:2.5.1'
}

apply plugin: 'com.google.gms.google-services'
From Push 2.4.0, to use Google push (FCM) you must apply
push-firebaseinstead ofpush.
- 3. AndroidManifest.xml (channel/icon settings)
The 4 values below are optional, but setting
Small IconandLarge Iconis recommended. Channel Name: if not set, it defaults to 'Stove'.Channel Description: if not set, it defaults to null.Small Icon: if not set, it defaults toapplication.icon.Large Icon: if not set, it defaults to null.xml<?xml version="1.0" encoding="utf-8"?> <manifest> <application> <meta-data android:name="com.stove.push.small_icon" android:resource="@drawable/{setYourSmallIcon}" /> <meta-data android:name="com.stove.push.large_icon" android:resource="@drawable/{setYourLargeIcon}" /> <meta-data android:name="com.stove.push.channel_name" android:value="@string/{setYourChannelName}" /> <meta-data android:name="com.stove.push.channel_description" android:value="@string/{setYourChannelDescription}" /> </application> </manifest>- 4. Showing push while the app is running
If you don't setforeground_notification_enabled, push messages won't be shown while the game is running.xml<manifest> <application> <meta-data android:name="com.stove.push.foreground_notification_enabled" android:value="true" /> </application> </manifest>
- 5. Manual control of push-permission requests (
Firebase 2.5.2 / Amazon 2.5.1 / Huawei 2.5.1or higher) Adding the setting below skips the SDK's automatic permission request, letting the app handle it separately at the desired time.xml<manifest> <application> <meta-data android:name="com.stove.push.request_permission_disabled" android:value="true" /> </application> </manifest>
- 1. google-services.json
- Android — receiving push messages while the app is running
When you receive a push message while the app is running, you can show a UI suited to the app. The received data is delivered with the following keys.
T: TitleM: MessageI: ImageUrlL: LinkUrlE: Extra
private void SetMessageDelegate()
{
    Push.SetMessageDelegate((Dictionary<string, string> dictionary) =>
    {

    });
}
- Android — handling push-message clicks
From
Push 2.3.1, to handle clicks on push messages received by the app, you must callPush.handleIntentin theActivity'sonCreateandonNewIntent.
override fun onCreate(savedInstanceState: Bundle?) {
    super.onCreate(savedInstanceState)
    // ...
    Push.handleIntent(applicationContext, intent)
    // ...
}

override fun onNewIntent(intent: Intent?) {
    super.onNewIntent(intent)
    // ...
    Push.handleIntent(applicationContext, intent)
    // ...
}
- iOS setup
- 1. Adding Xcode Capabilities
- Click the add button on the Build Settings → Capabilities screen
- Search for Push Notifications and add it
- Confirm that Push Notifications is active
- 2. Rich push notifications For rich-push-notification setup, see the Rich Push Notifications guide.
- 3. Passing the registration token
Pass the device token to the SDK in the
AppDelegate.
objectivec- (void)application:(UIApplication *)application didRegisterForRemoteNotificationsWithDeviceToken:(NSData *)deviceToken { [[SGSPushNotificationCenter currentPushNotificationCenter] application:application didRegisterForRemoteNotificationsWithDeviceToken:deviceToken]; }- 4. Showing push while the app is running — registering
SGSPushNotificationCenterDelegate
objectivec- (BOOL)application:(UIApplication *)application didFinishLaunchingWithOptions:(NSDictionary *)launchOptions { [[SGSPushNotificationCenter currentPushNotificationCenter] setDelegate:self]; }
These are foreground push-notification display options. Combine the options you need and pass them tocompletionHandler.Option Description Supported version UNNotificationPresentationOptionBannerShows the notification as a top-of-screen banner (auto-dismissed after a while) iOS 14+ UNNotificationPresentationOptionListStacks it in the Notification Center for later viewing iOS 14+ UNNotificationPresentationOptionSoundPlays a sound when the notification arrives iOS 10+ UNNotificationPresentationOptionAlertCombines Banner+List(deprecated in iOS 14+; use only for below-14 support)iOS 10+ - Usage example — banner + sound
objectivec- (void)willPresentNotification:(UNNotification *)notification withCompletionHandler:(void (^)(UNNotificationPresentationOptions options))completionHandler { if (@available(iOS 14.0, *)) { completionHandler(UNNotificationPresentationOptionBanner | UNNotificationPresentationOptionSound); } else { completionHandler(UNNotificationPresentationOptionAlert | UNNotificationPresentationOptionSound); } }- Usage example — banner + sound + Notification Center
objectivec- (void)willPresentNotification:(UNNotification *)notification withCompletionHandler:(void (^)(UNNotificationPresentationOptions options))completionHandler { if (@available(iOS 14.0, *)) { completionHandler(UNNotificationPresentationOptionBanner | UNNotificationPresentationOptionSound | UNNotificationPresentationOptionList); } else { completionHandler(UNNotificationPresentationOptionAlert | UNNotificationPresentationOptionSound); } } - 1. Adding Xcode Capabilities
- Unity setup
- Android setup — converting google-services.json → google_services.xml
- Download generate_xml_from_google_services_json.py
- Run the command below in a terminal
generate_xml_from_google_services_json.py -i {google-services.json path} -o {output file path} -p {yourPackageName}
Example:
/Users/user/Desktop/generate_xml_from_google_services_json.py -i /Users/user/Desktop/google-services.json -o /Users/user/Desktop/google_services.xml -p com.stove.mvp
- Copy the converted file to the
Plugins/Android/res/valuesfolder
iOS setup — push options while the app is running (info.plist)
The SDK plugin handles foreground push settings internally. In the game, you can change the behavior by adding the keys below to info.plist.
| Key | Type | Default | Description |
|---|---|---|---|
ForegroundPushEnabled | Boolean | YES | Whether foreground push is used. If set to NO, push isn't shown while the app is running |
EnablePushListOptions | Boolean | YES | Whether to stack push in the Notification Center. If set to NO, it can't be viewed in the Notification Center after the banner disappears |
If neither key exists in
info.plist, both operate at the defaultYES. If you'll use the defaults as-is, no extra addition is needed.
Configuration example:
- Disable foreground push:
<key>ForegroundPushEnabled</key><false/> - Disable Notification Center:
<key>EnablePushListOptions</key><false/>
Unreal setup
Android setup — converting google-services.json → google_services.xml
- Download generate_xml_from_google_services_json.py
- Run the command below in a terminal
generate_xml_from_google_services_json.py -i {google-services.json path} -o {output file path} -p {yourPackageName}
- Copy the converted file to the
Source/StoveSDKfolder
iOS Capabilities setup
Works only in custom engine builds.
Enabling Menu → Edit → Project Settings → iOS → Enable Remote Notifications Support sets up Capabilities automatically at build time.
iOS — push options while the app is running (info.plist)
You can change the behavior by adding the same ForegroundPushEnabled / EnablePushListOptions keys as Unity to info.plist.
How to set: Unreal Editor → Edit → Plugins → iOS → Extra PList Data → add the key-value at the bottom of Additional Info plist.
Configuration example:
- Disable foreground push:
<key>ForegroundPushEnabled</key><false/> - Disable Notification Center:
<key>EnablePushListOptions</key><false/>
Push Registration
Push registration happens automatically on login, sign-up, token renewal, or account-link completion. No separate API call is needed.
- If the game supports multiple worlds, push is sent only to the last-accessed world.
ErrorCodes
| Domain | ErrorCode | Description | Action |
|---|---|---|---|
| com.stove.success | 0 | Success | — |
| com.stove.server | 1000 | WRONG_API_USAGE | Push registration is handled automatically inside the SDK, so a direct call isn't needed. If there's code calling it separately, remove it, and re-check the automatic-registration points (login/register/token-renewal/account-link completion callbacks). |
| com.stove.server | 2000 | SERVICE_ERROR | A temporary server error, so retry after a while. If it recurs, delegate to OperationUI.HandleResult(result, ...), and if it persists, contact the STOVE operations team with logs. |
| com.stove.base.network | 10001 | NoConnectionError | Guide the user to check the device's network connection and retry after connecting. |
| com.stove.base.network | 10002 | TimeoutError | Retry after the network stabilizes. If it recurs, delegate to OperationUI.HandleResult(result, ...) so the SDK shows a guidance screen. |
Looking Up Push Settings
Looks up the current user's push settings (daytime/nighttime notifications).
private void FetchPushSettings()
{
    Push.FetchPushSettings((Result result, PushSettings pushSettings) =>
    {
        if (result.IsSuccessful)
        {
            bool EnabledDay = (bool)pushSettings.EnabledDay;
            bool EnabledNight = (bool)pushSettings.EnabledNight;
        }
    });
}
ErrorCodes
| Domain | ErrorCode | Description | Action |
|---|---|---|---|
| com.stove.success | 0 | Success | — |
| com.stove.server | 11236 | Error : Access token is wrong. | Re-fetch Auth.accessToken and call again with the latest token. If the same error persists, guide the user into the login flow to get a reissued token. |
| com.stove.server | 12002 | Error : Data access exception. | A temporary data-lookup error, so retry shortly. If it recurs, delegate to OperationUI.HandleResult(result, ...), and if it persists, contact the STOVE operations team with logs. |
| com.stove.base.network | 10001 | NoConnectionError | Guide the user to check the device's network connection and retry after connecting. |
| com.stove.base.network | 10002 | TimeoutError | Retry after the network stabilizes. If it recurs, delegate to OperationUI.HandleResult(result, ...) so the SDK shows a guidance screen. |
Push Reception Settings
Push reception On/Off and nighttime push On/Off all call a single API, Push.updatePushSettings(context, settings, listener), passing only different enabledDay / enabledNight values of PushSettings. Since the response callback returns the same Result and PushSettings in all cases, error handling shares the single ErrorCodes table below.
| Case | enabledDay | enabledNight |
|---|---|---|
| Push notification On | true | null (no change) |
| Push notification Off | false | false (nighttime must be turned Off too) |
| Nighttime push On | null (no change) | true |
| Nighttime push Off | null (no change) | false |
When push notification is Off, turn nighttime push Off too
When you turn daytime push Off, also pass enabledNight as false so nighttime push doesn't stay active on its own.
Push notification On
Pass PushSettings(enabledDay = true, enabledNight = null) to enable daytime push notifications.
public void UpdatePushSettings()
{
    PushSettings settings = new PushSettings(true, null);
    Push.UpdatePushSettings(settings, (Result result, PushSettings pushSettings) =>
    {
        if(result.IsSuccessful)
        {
            bool EnabledDay = (bool)pushSettings.EnabledDay;
            bool EnabledNight = (bool)pushSettings.EnabledNight;
        }
    });
}
Push notification Off
When you turn push notifications Off, you must turn nighttime push Off too.
public void UpdatePushSettings()
{
    PushSettings settings = new PushSettings(false, false);
    Push.UpdatePushSettings(settings, (Result result, PushSettings pushSettings) =>
    {
        if(result.IsSuccessful)
        {
            bool EnabledDay = (bool)pushSettings.EnabledDay;
            bool EnabledNight = (bool)pushSettings.EnabledNight;
        }
    });
}
Nighttime push On
If push notifications are Off, you can't turn nighttime push On. Turn push notifications On first, then call it.
Note for global users
For global users, the nighttime-push ON/OFF feature isn't supported. Make sure not to show a nighttime-push toggle on the in-game push-settings screen.
public void UpdatePushSettings()
{
    PushSettings settings = new PushSettings(null, true);
    Push.UpdatePushSettings(settings, (Result result, PushSettings pushSettings) =>
    {
        if(result.IsSuccessful)
        {
            bool EnabledDay = (bool)pushSettings.EnabledDay;
            bool EnabledNight = (bool)pushSettings.EnabledNight;
        }
    });
}
Nighttime push Off
Turns off only nighttime push while keeping the daytime push setting.
public void UpdatePushSettings()
{
    PushSettings settings = new PushSettings(null, false);
    Push.UpdatePushSettings(settings, (Result result, PushSettings pushSettings) =>
    {
        if(result.IsSuccessful)
        {
            bool EnabledDay = (bool)pushSettings.EnabledDay;
            bool EnabledNight = (bool)pushSettings.EnabledNight;
        }
    });
}
ErrorCodes
| Domain | ErrorCode | Description | Action |
|---|---|---|---|
| com.stove.success | 0 | Success | — |
| com.stove.server | 11236 | Error : Access token is wrong. | Re-fetch Auth.accessToken and call again with the latest token. If the same error persists, guide the user into the login flow to get a reissued token. |
| com.stove.server | 12002 | Error : Data access exception. | A temporary data-lookup error, so retry shortly. If it recurs, delegate to OperationUI.HandleResult(result, ...), and if it persists, contact the STOVE operations team with logs. |
| com.stove.base.network | 10001 | NoConnectionError | Guide the user to check the device's network connection and retry after connecting. |
| com.stove.base.network | 10002 | TimeoutError | Retry after the network stabilizes. If it recurs, delegate to OperationUI.HandleResult(result, ...) so the SDK shows a guidance screen. |
Rich Push Notifications (iOS)
This explains how to set up iOS rich push (Notification Service Extension) including title, subtitle, body, and image.
Notice
- Available on iOS 10 or higher. Below iOS 10, it's shown as a regular push notification.
- You can find information about rich push notifications in the Apple developer docs.
- CocoaPods setup is required before using PushExtension. See Setting up CocoaPods.
Xcode Project Setup
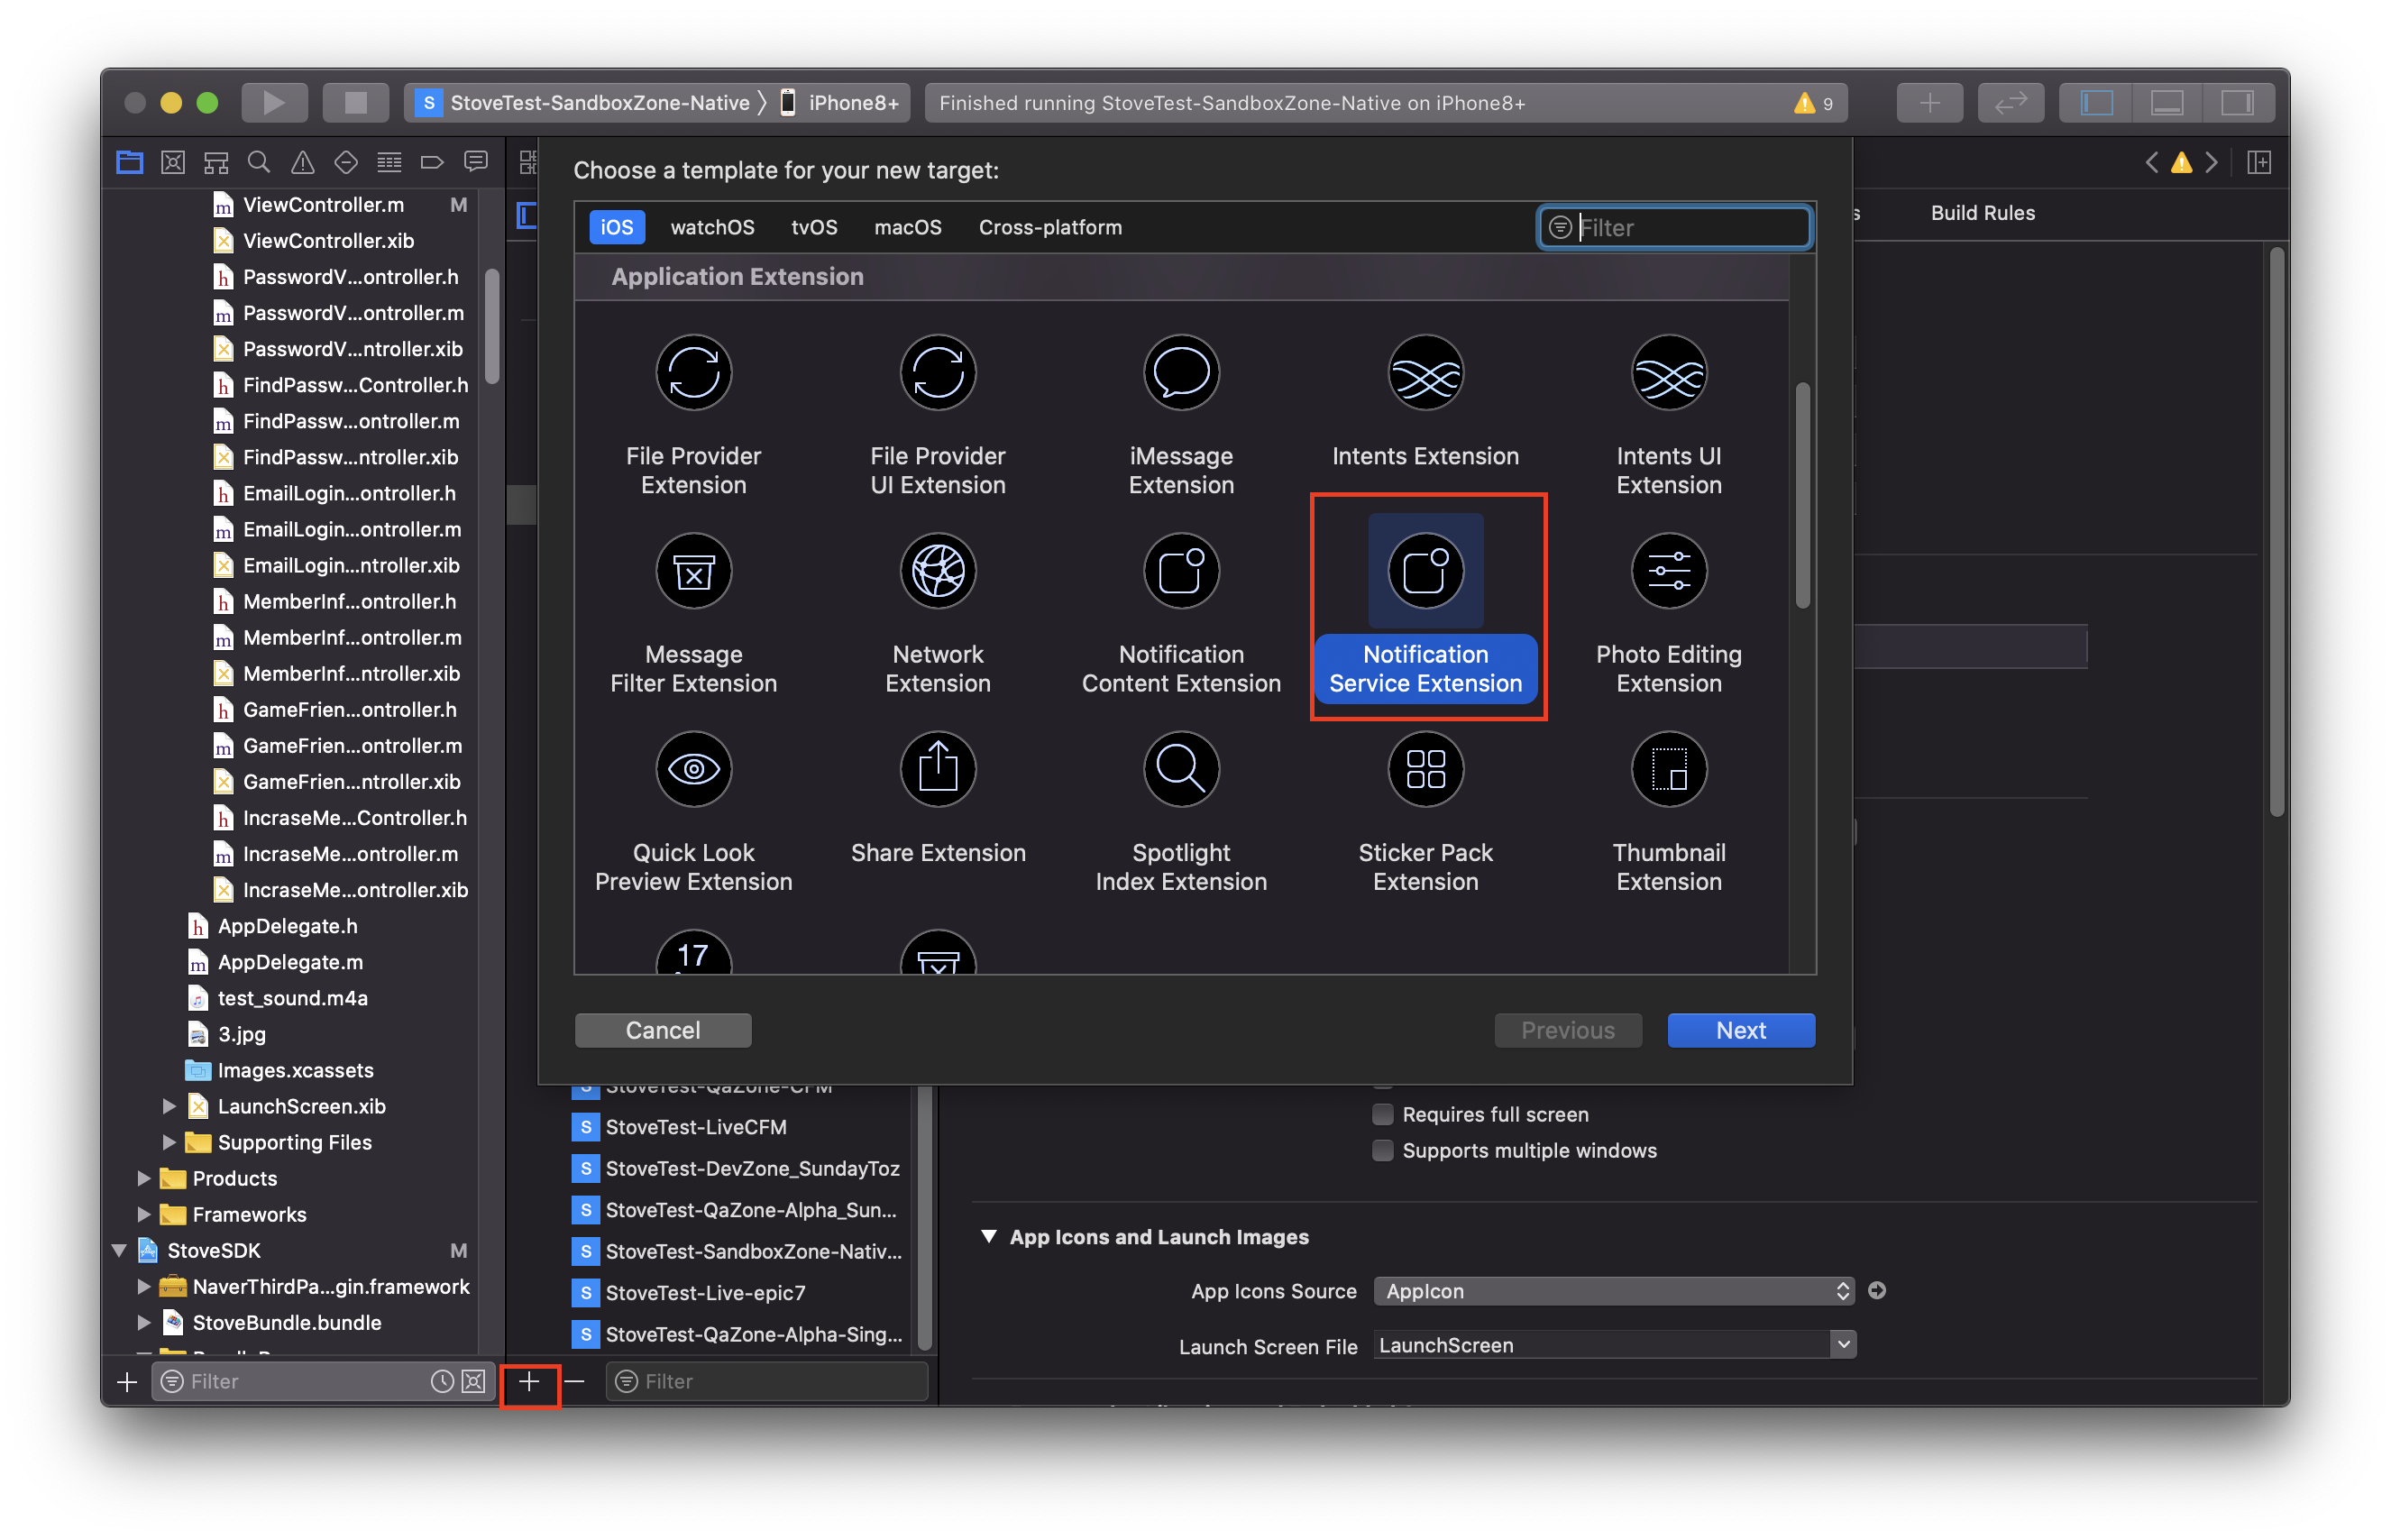
- 1. Add a Notification Service Extension Target
- In the Xcode Project, click the + button, then on the add-target screen select Notification Service Extension and click Next.
- 2. Product Name and Embed settings
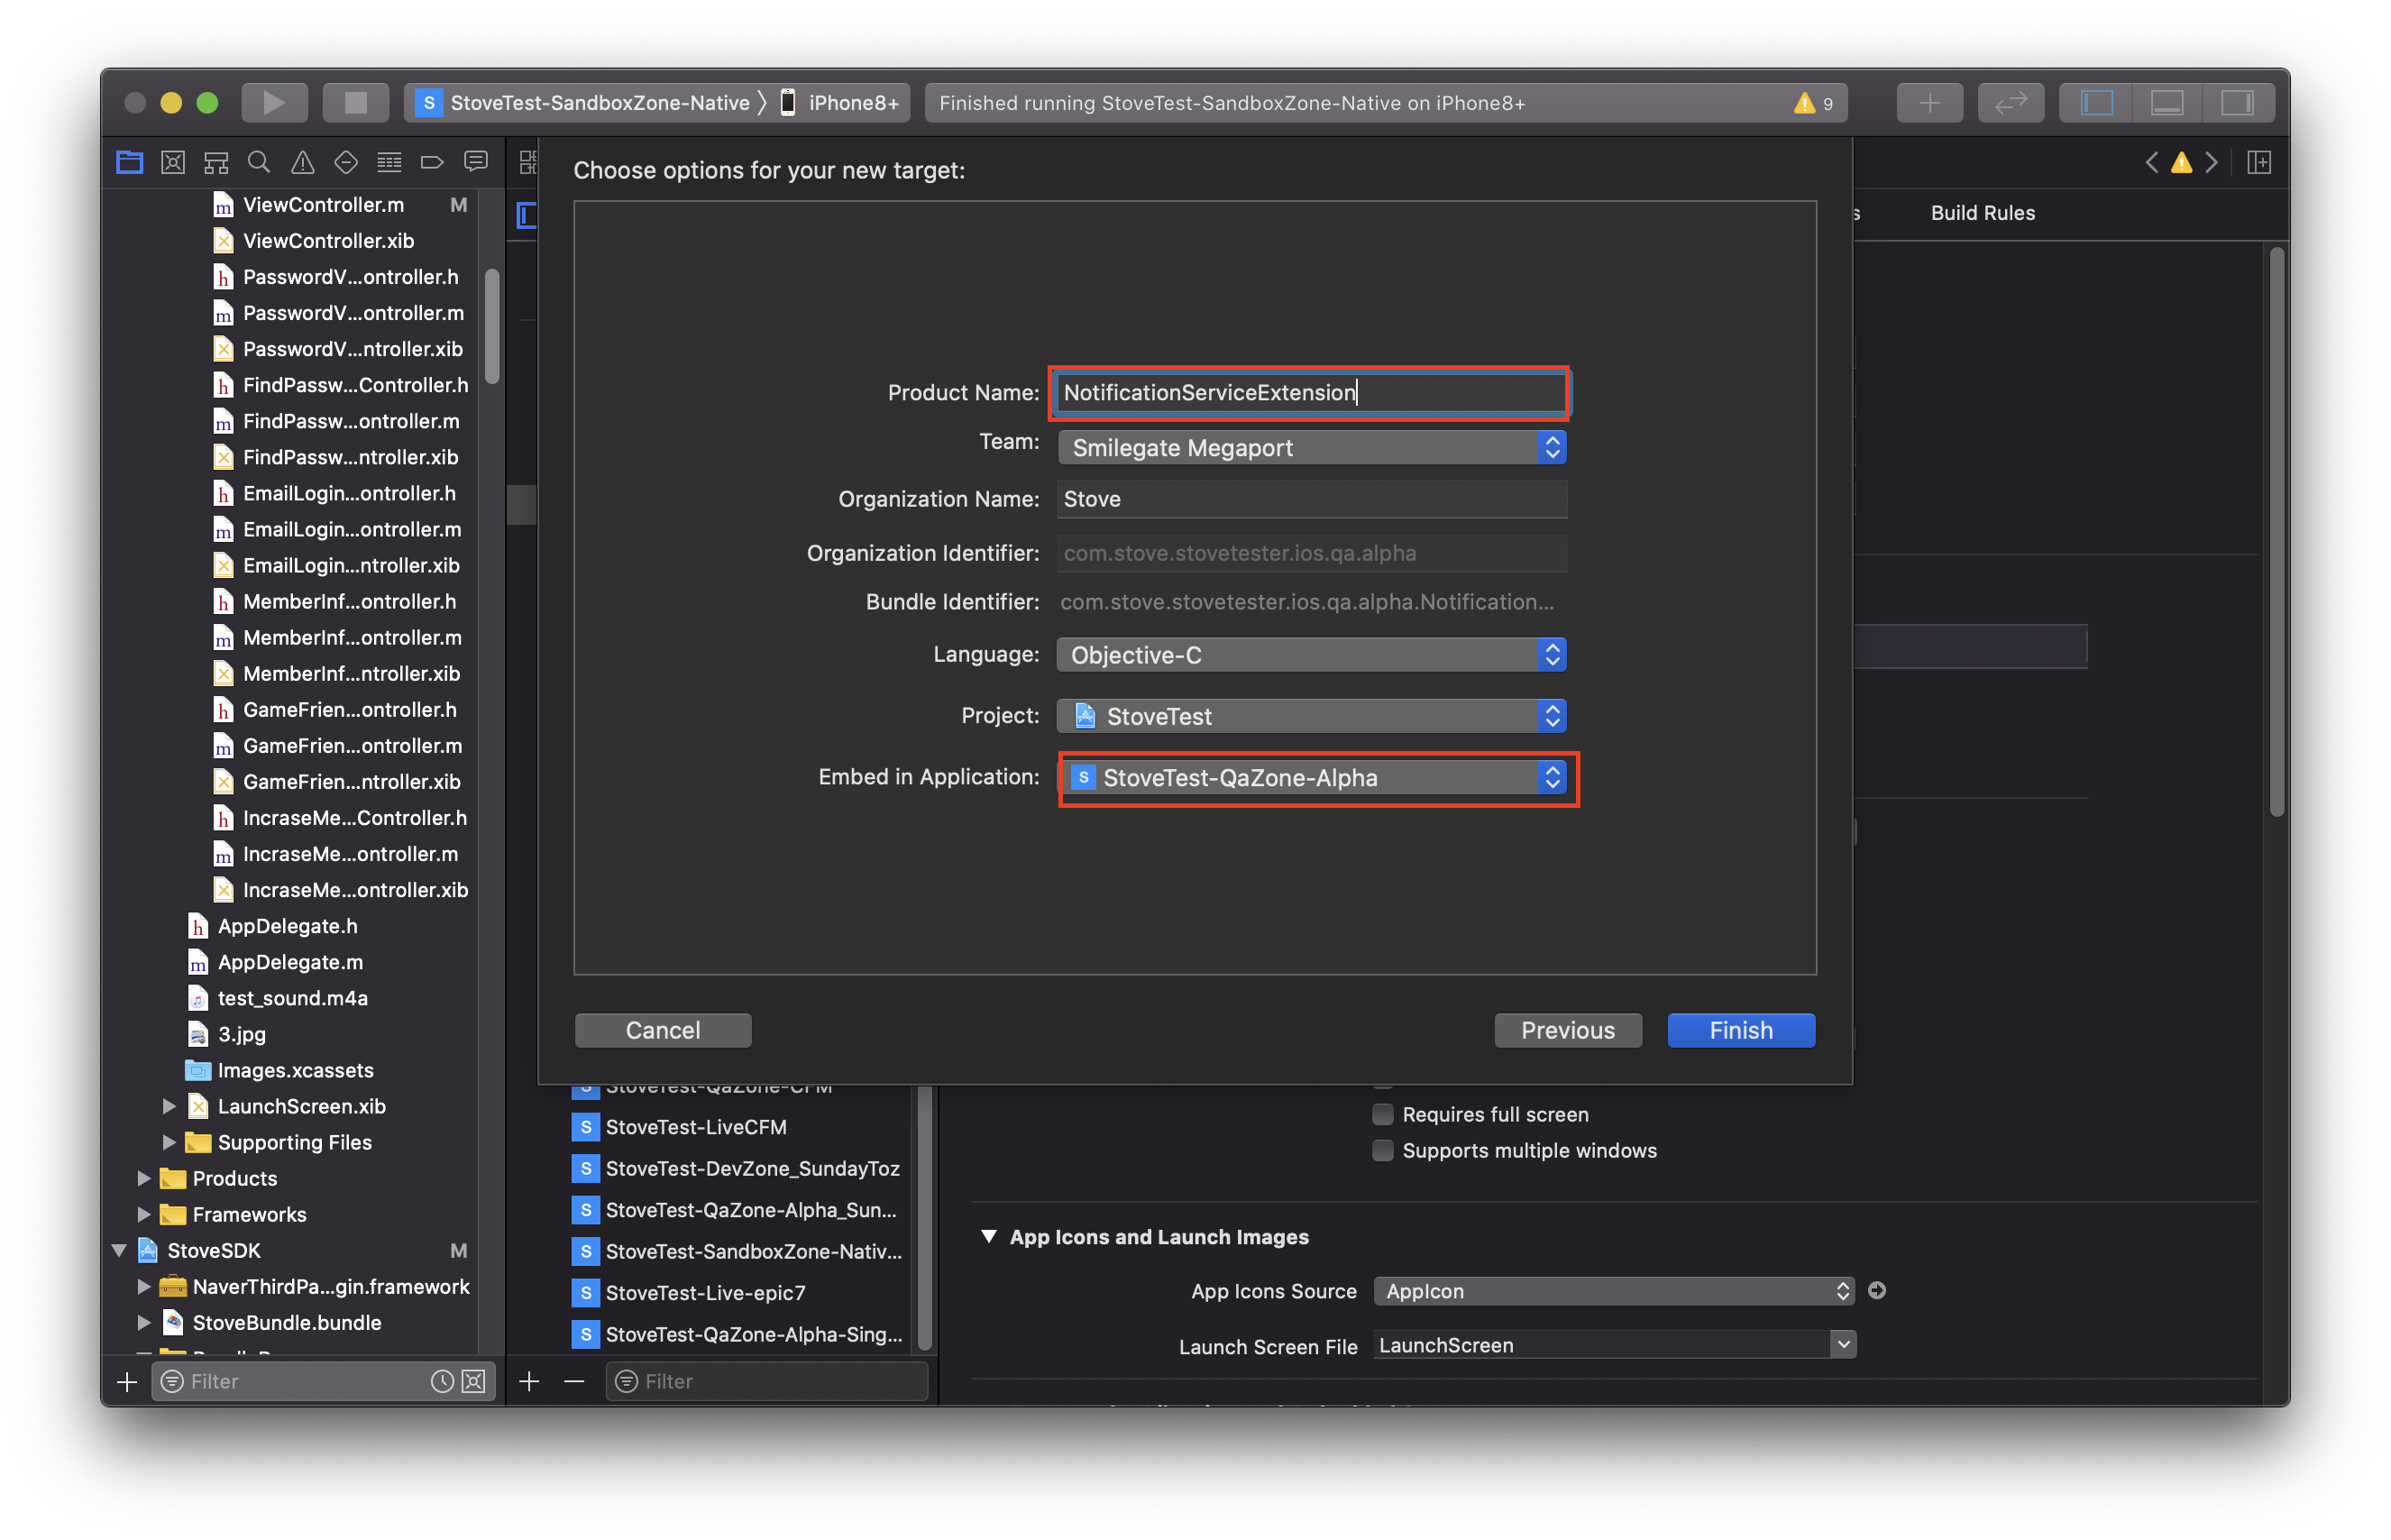
- Set the Product Name to
NotificationServiceExtension, set Embed in Application to the current game Project Target, then click Finish.
- Set the Product Name to
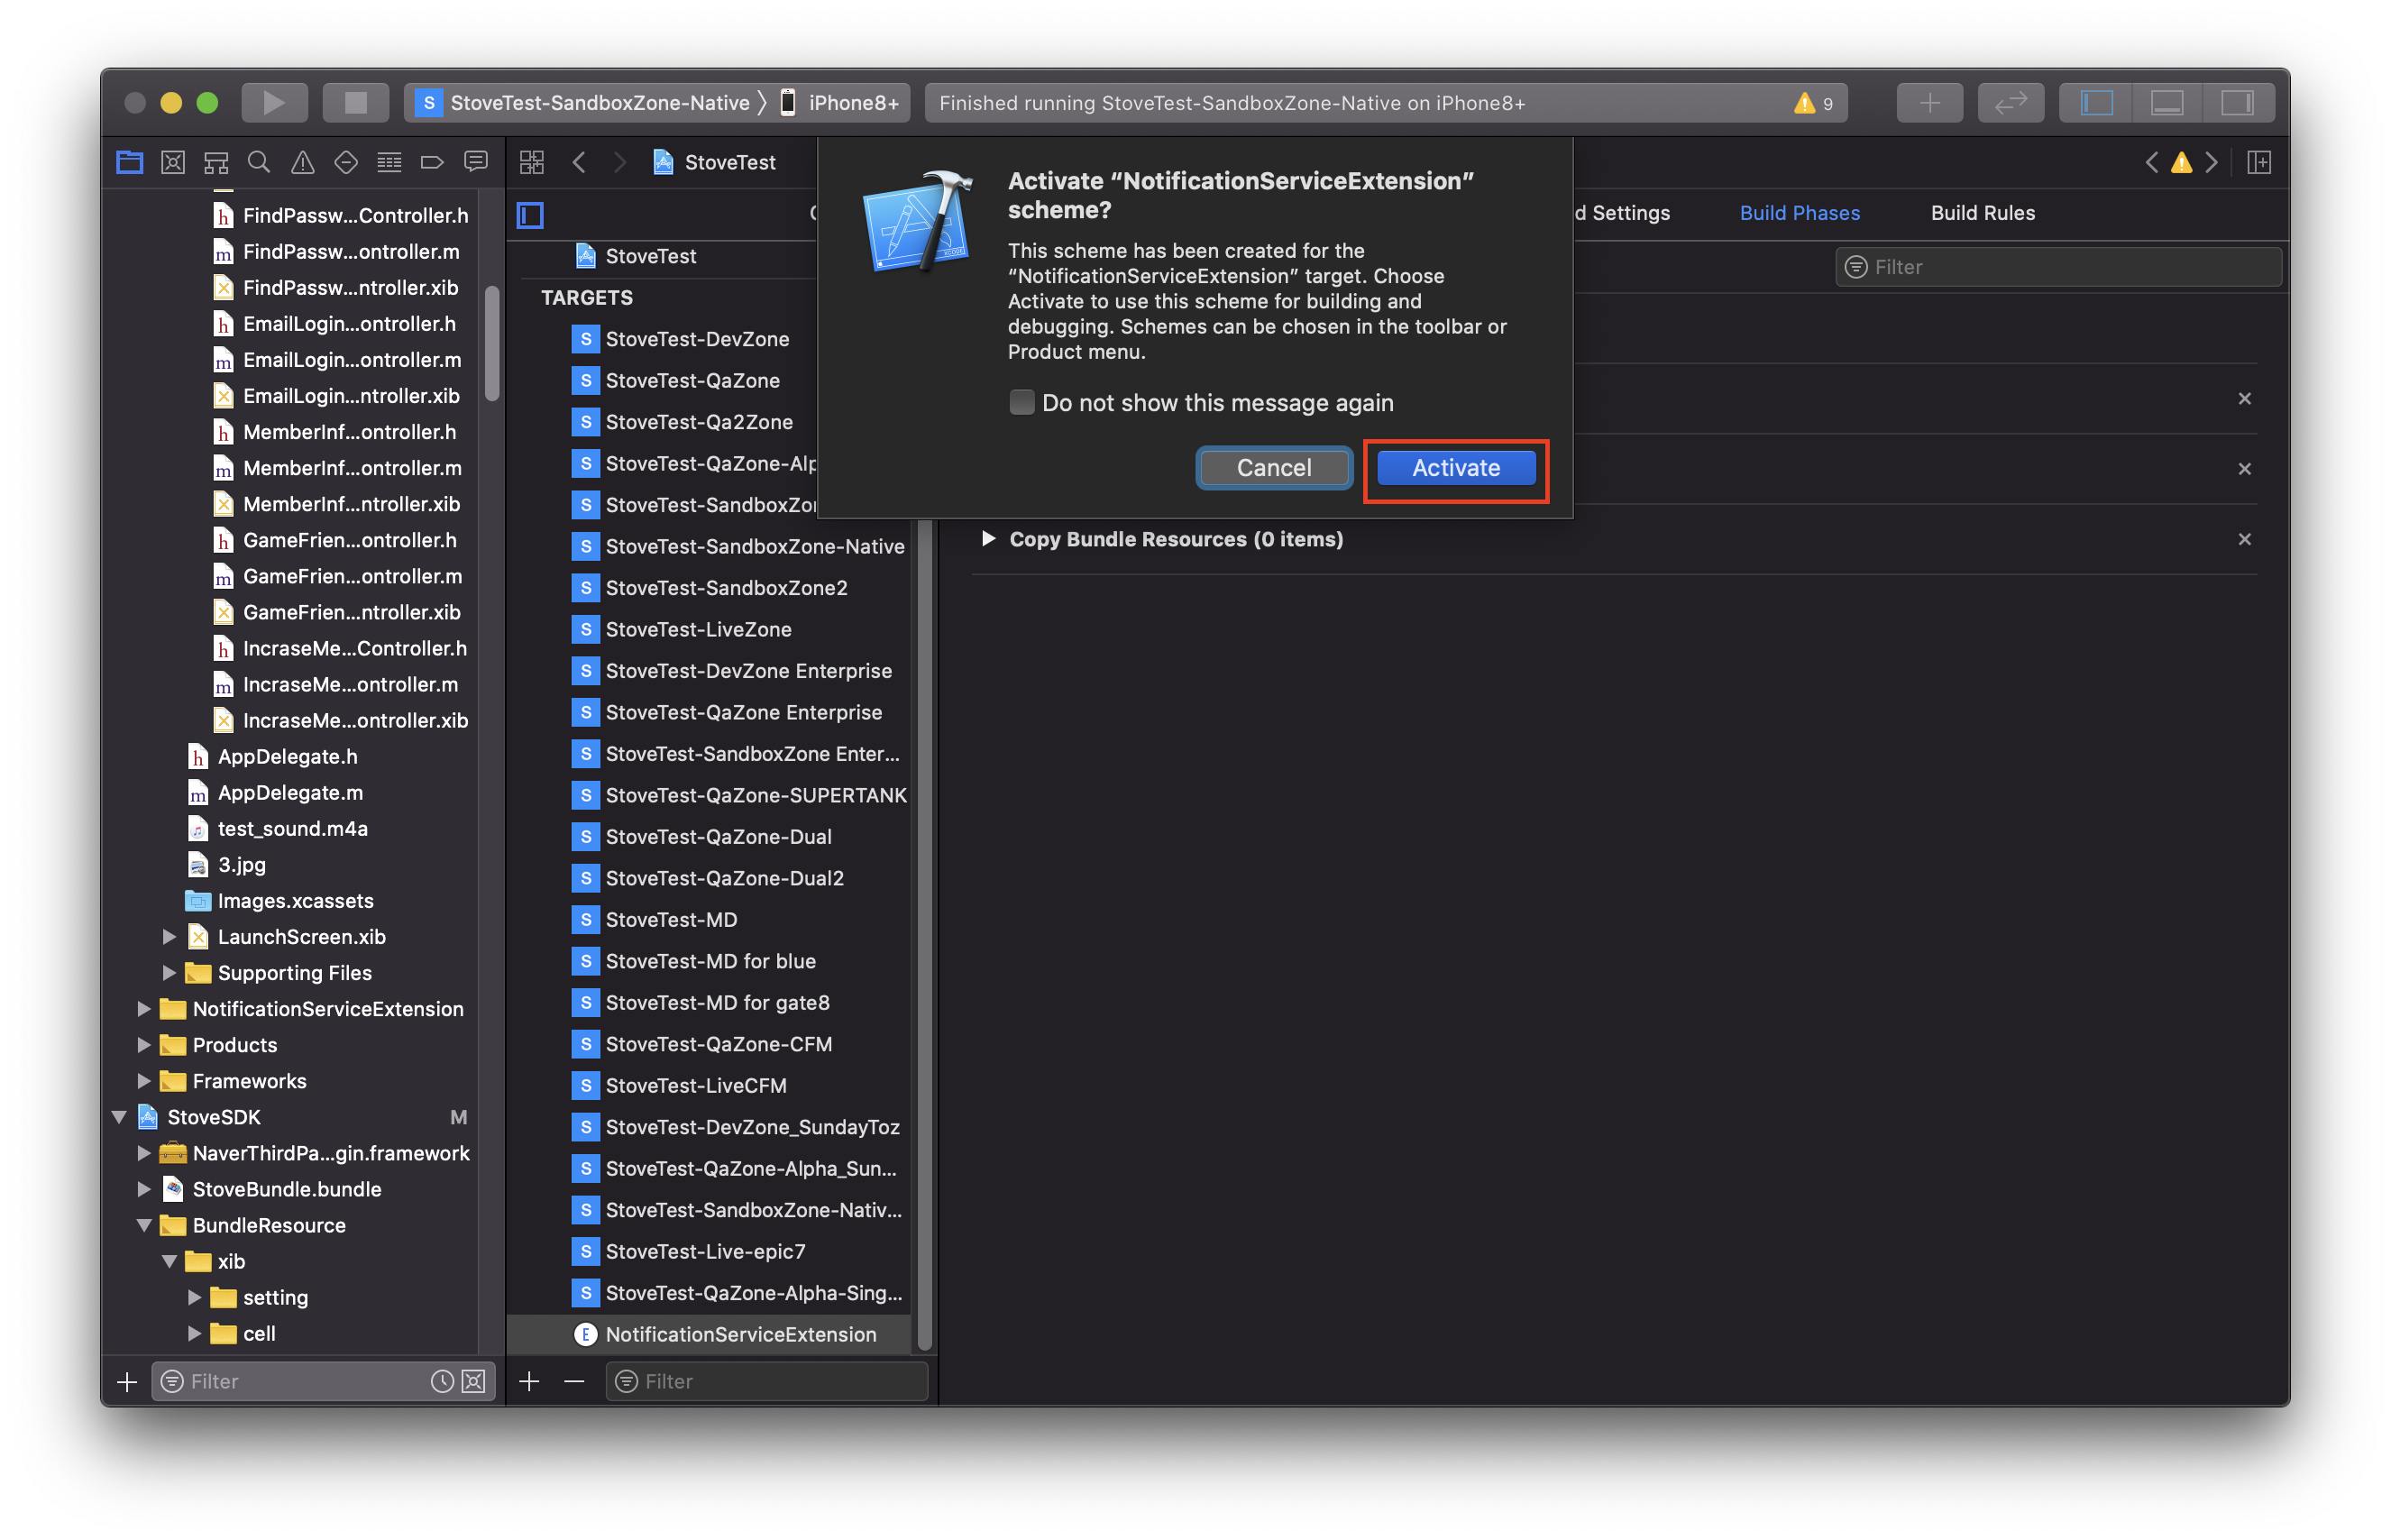
- 3. Add a scheme
- When the pop-up asking whether to add a scheme appears, click Activate.
- 4. Verify the generated files
- Check that the
NotificationServiceExtensiongroup and theNotificationService.h,Notification.m, andInfo.plistfiles were created in the Project, and thatNotificationServiceExtensionwas added to the Project Target.
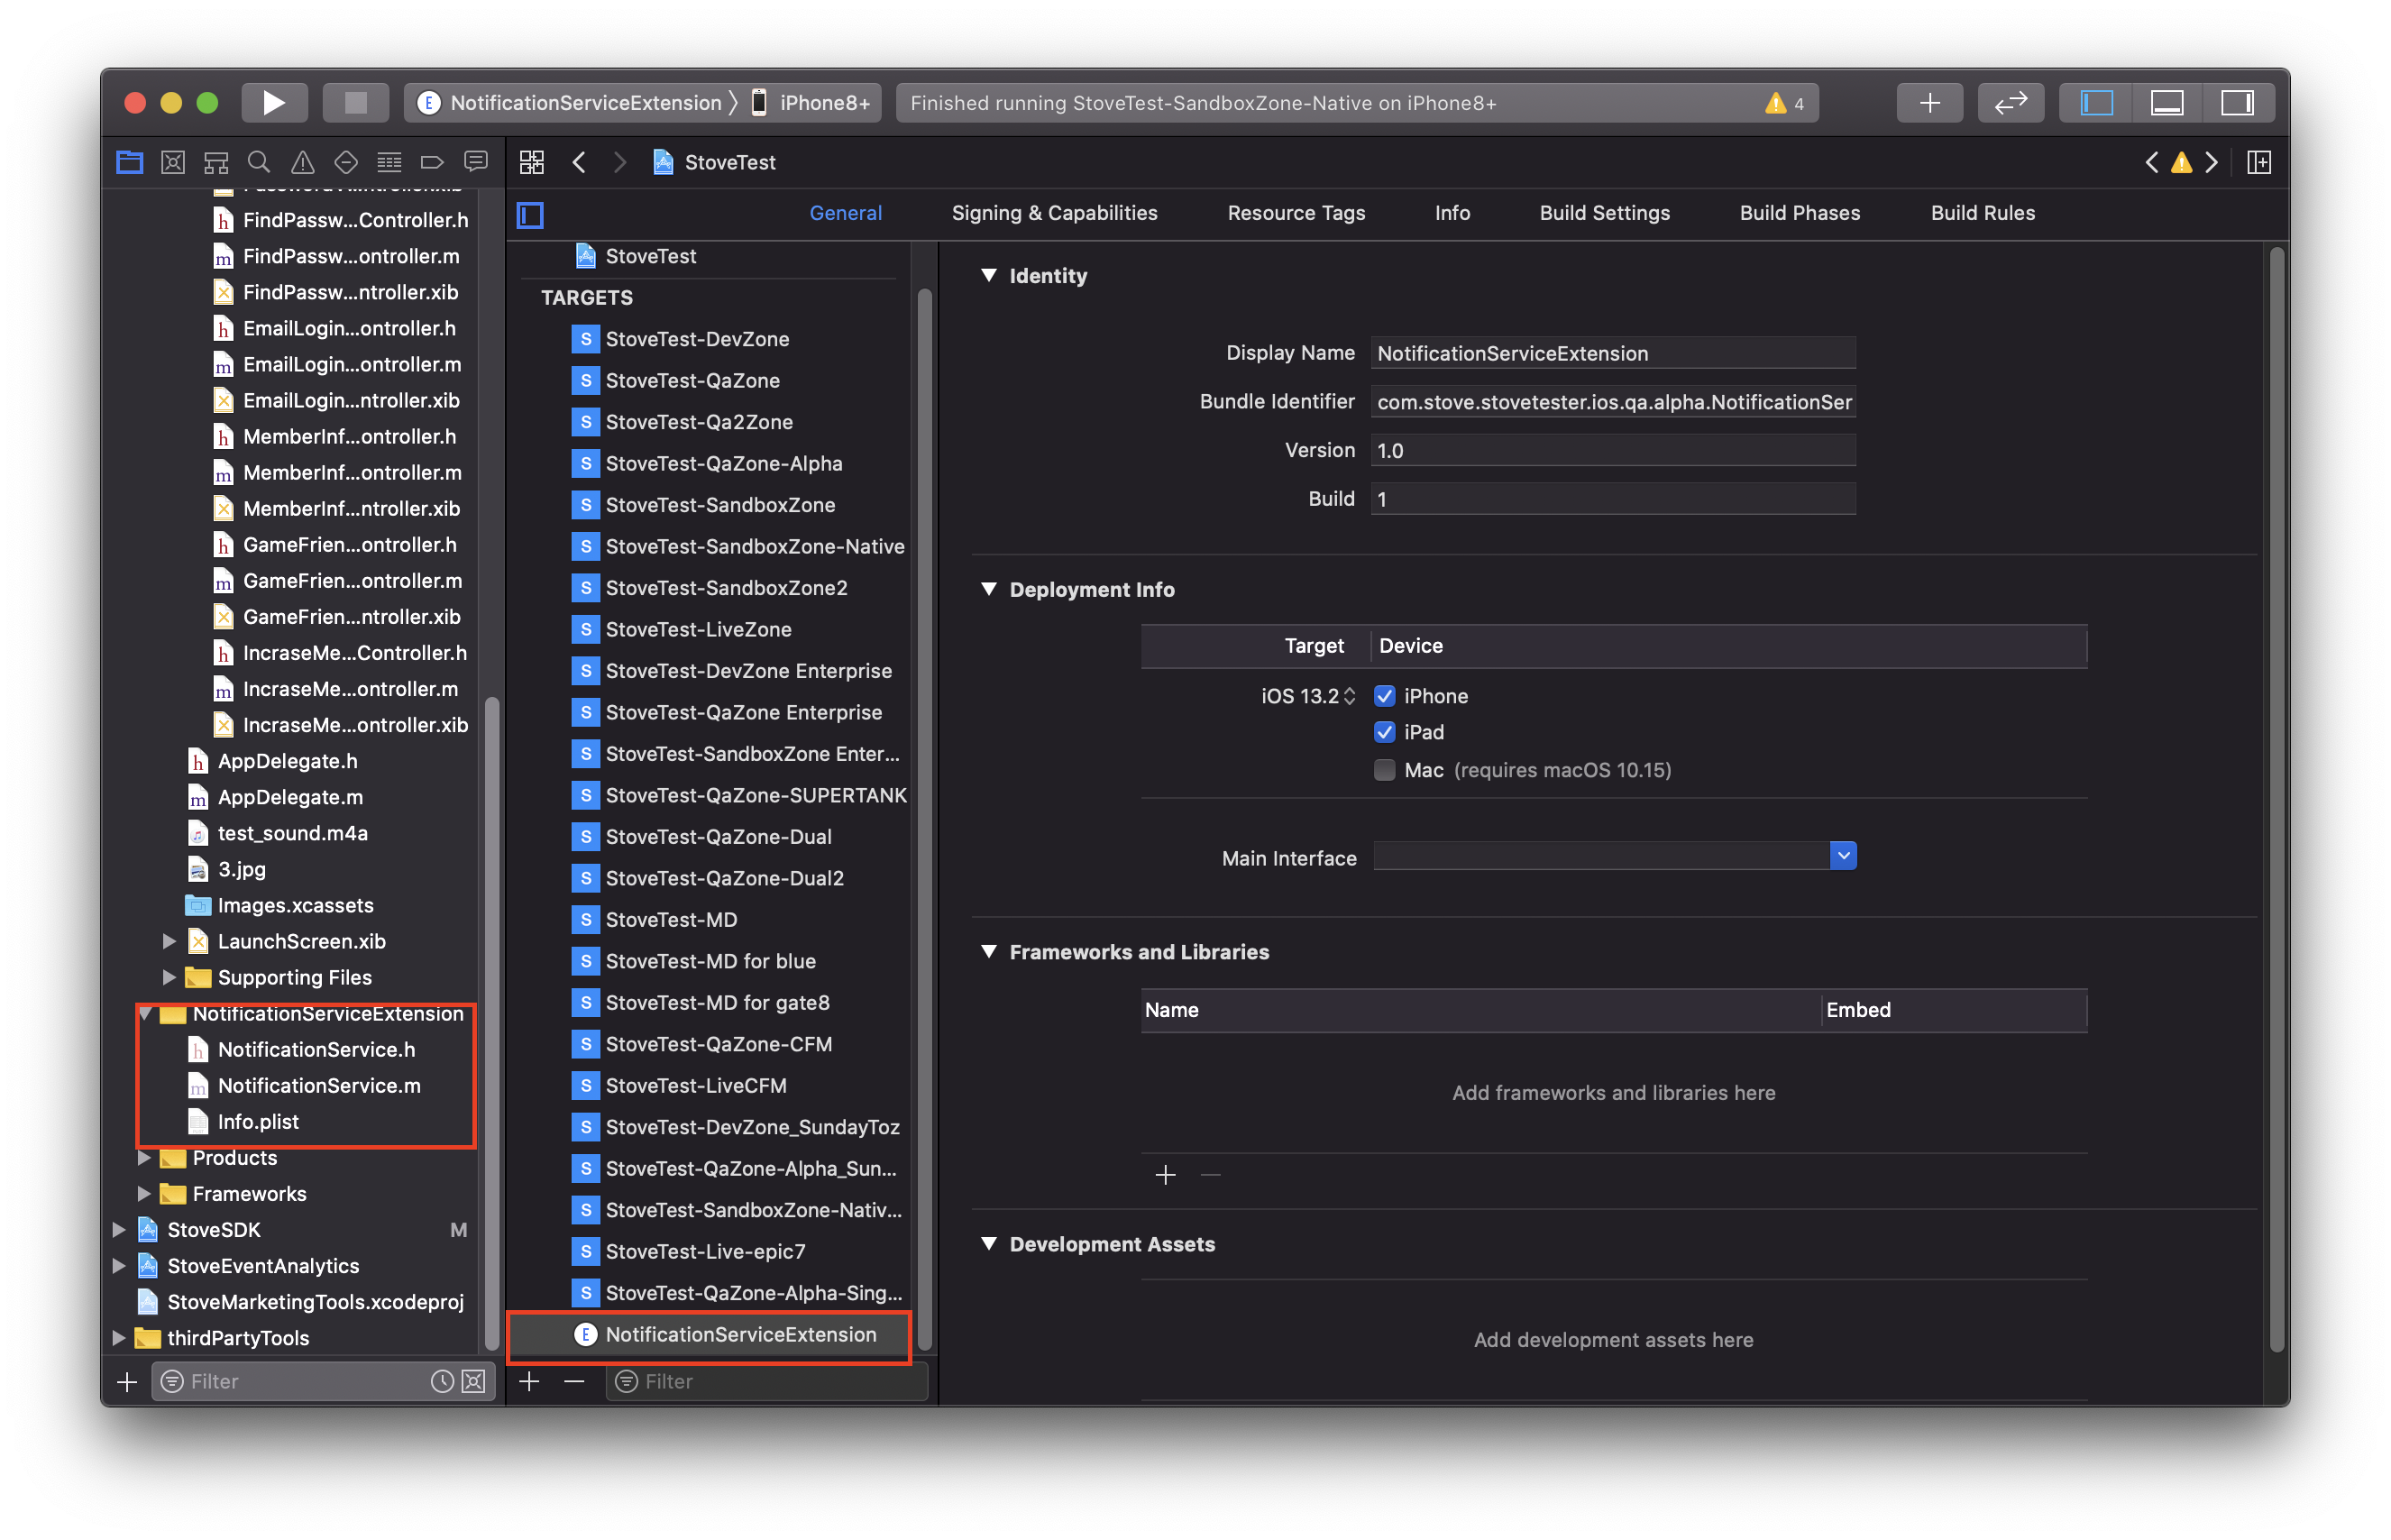
- Check that the
- 5. Change the Deployment Target
- Select
NotificationServiceExtensionin the Project Target and change the Target version in General → Deployment Info to iOS 10.0. (Match the minimum supported version)
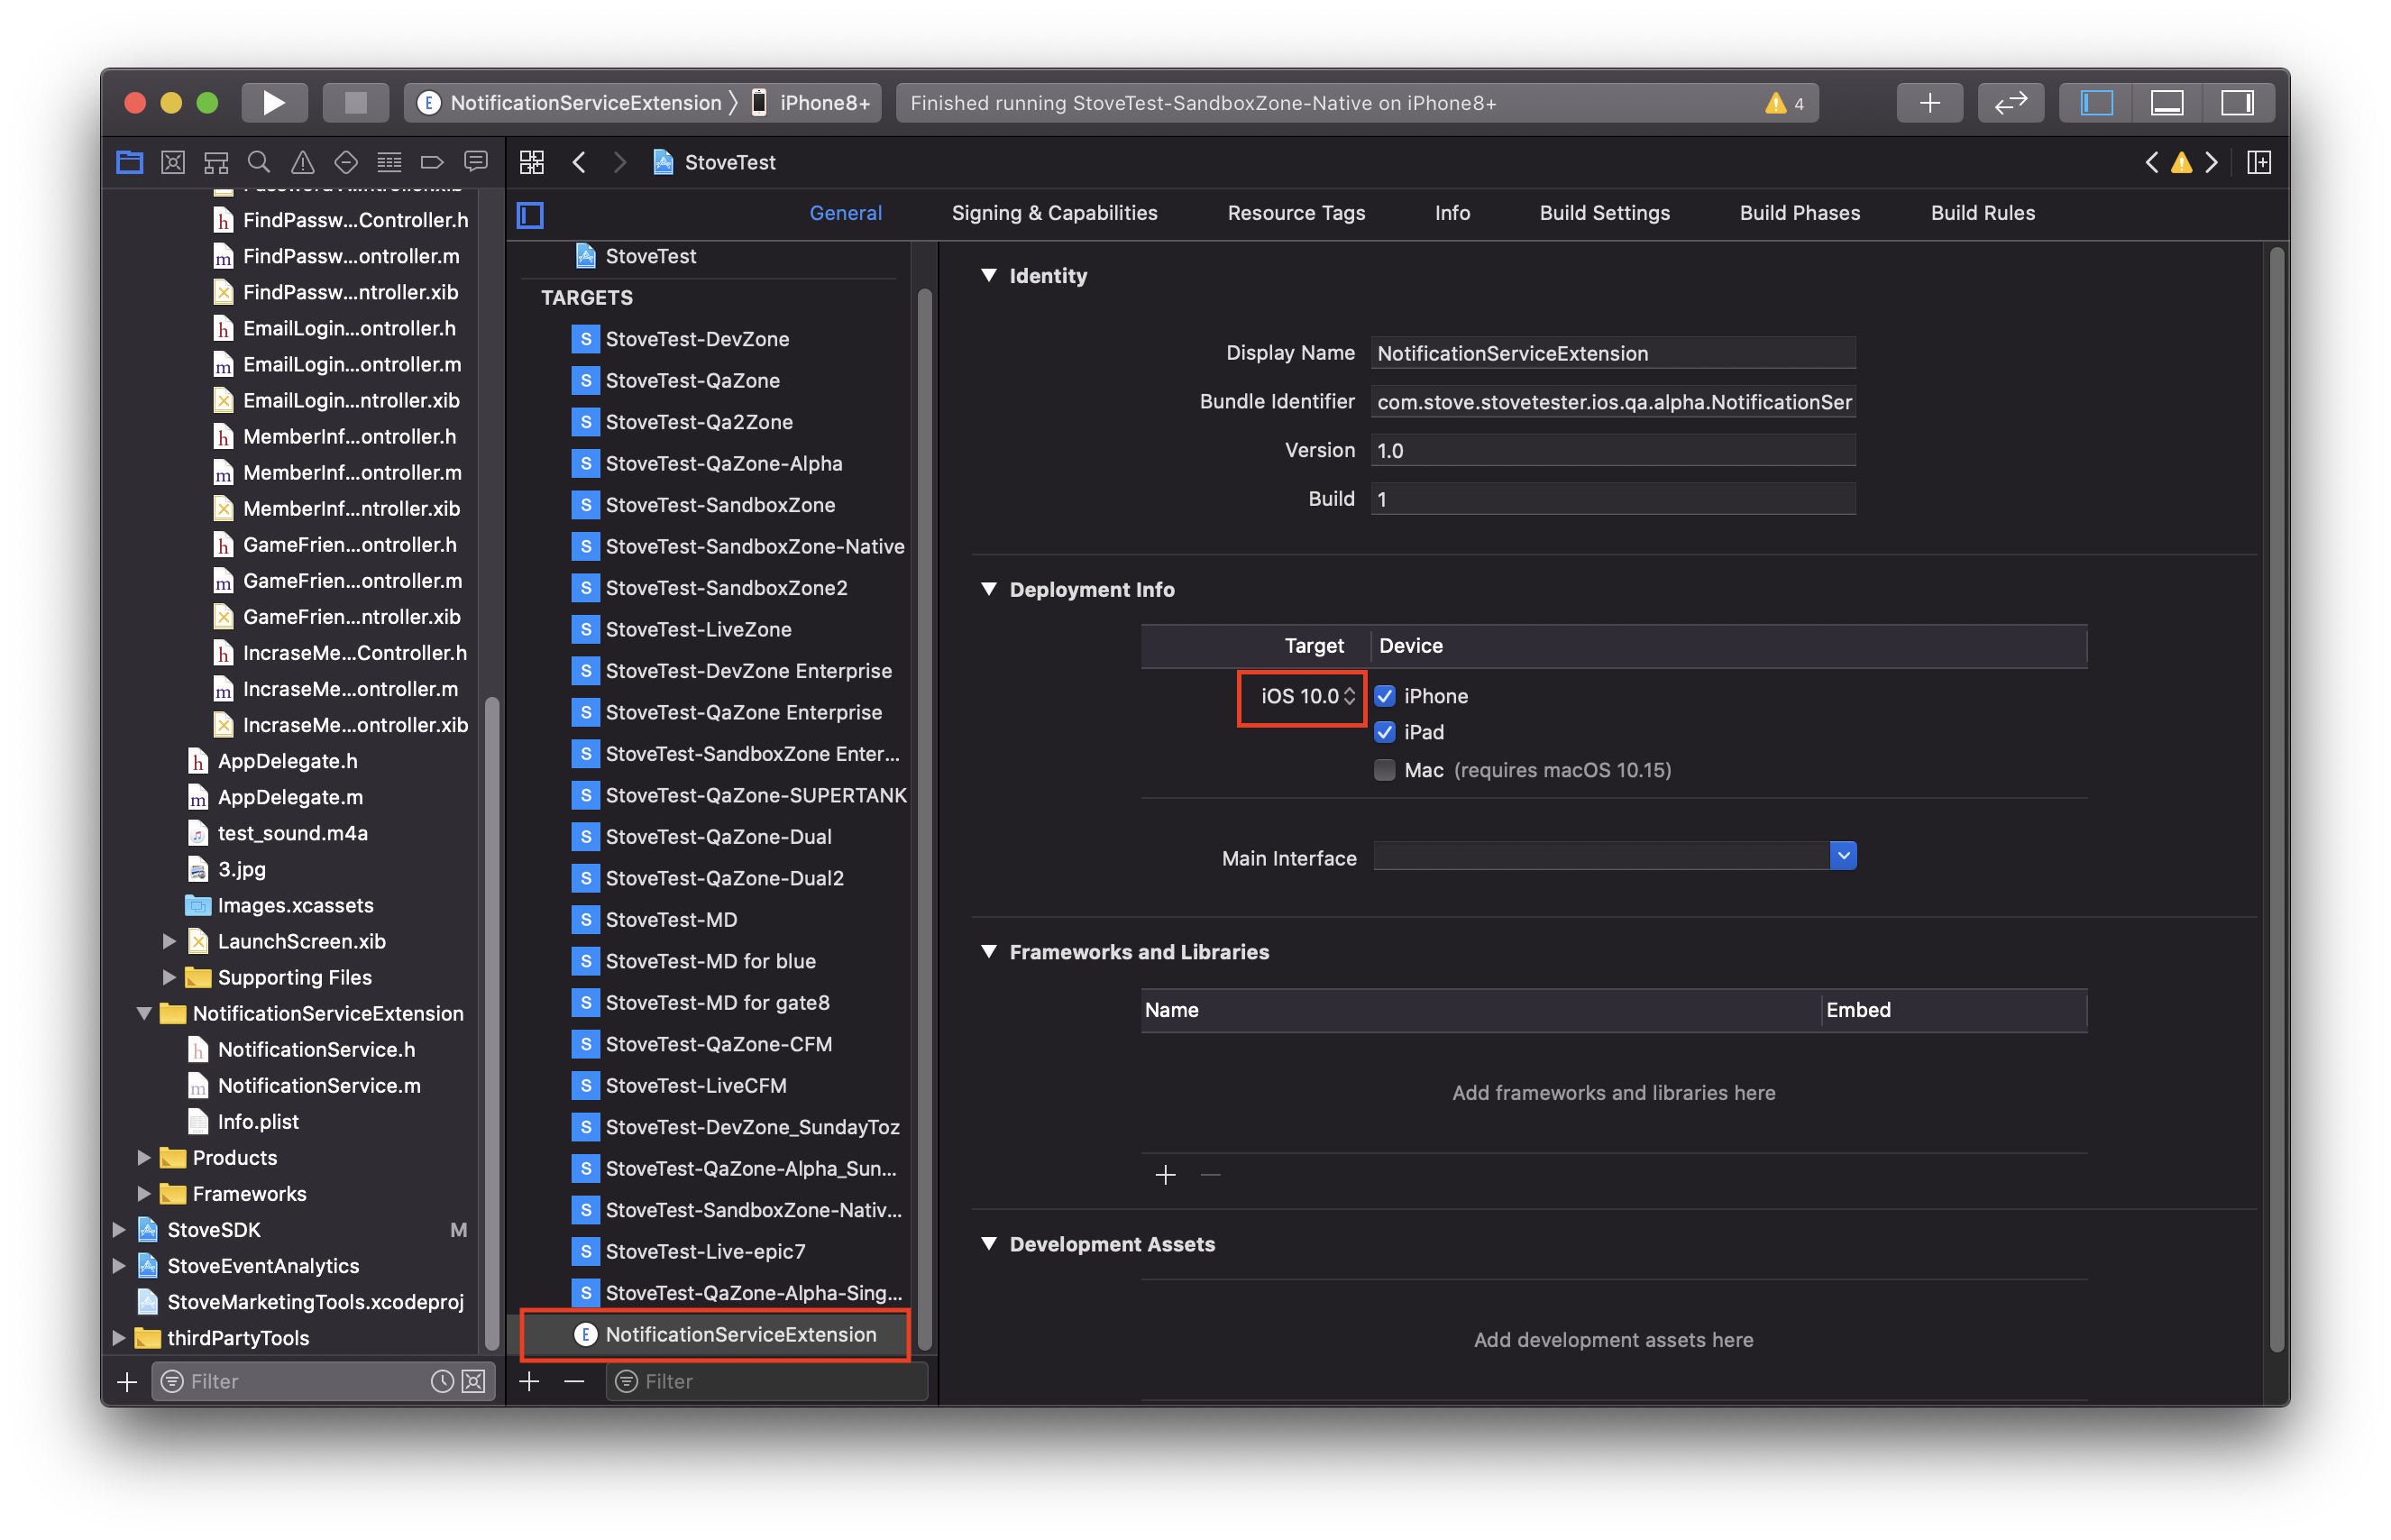
- Select
- 6. Check Architectures
- Select
NotificationServiceExtensionin the Project Target and check that the Architectures item in Build Settings is set to Standard architectures.
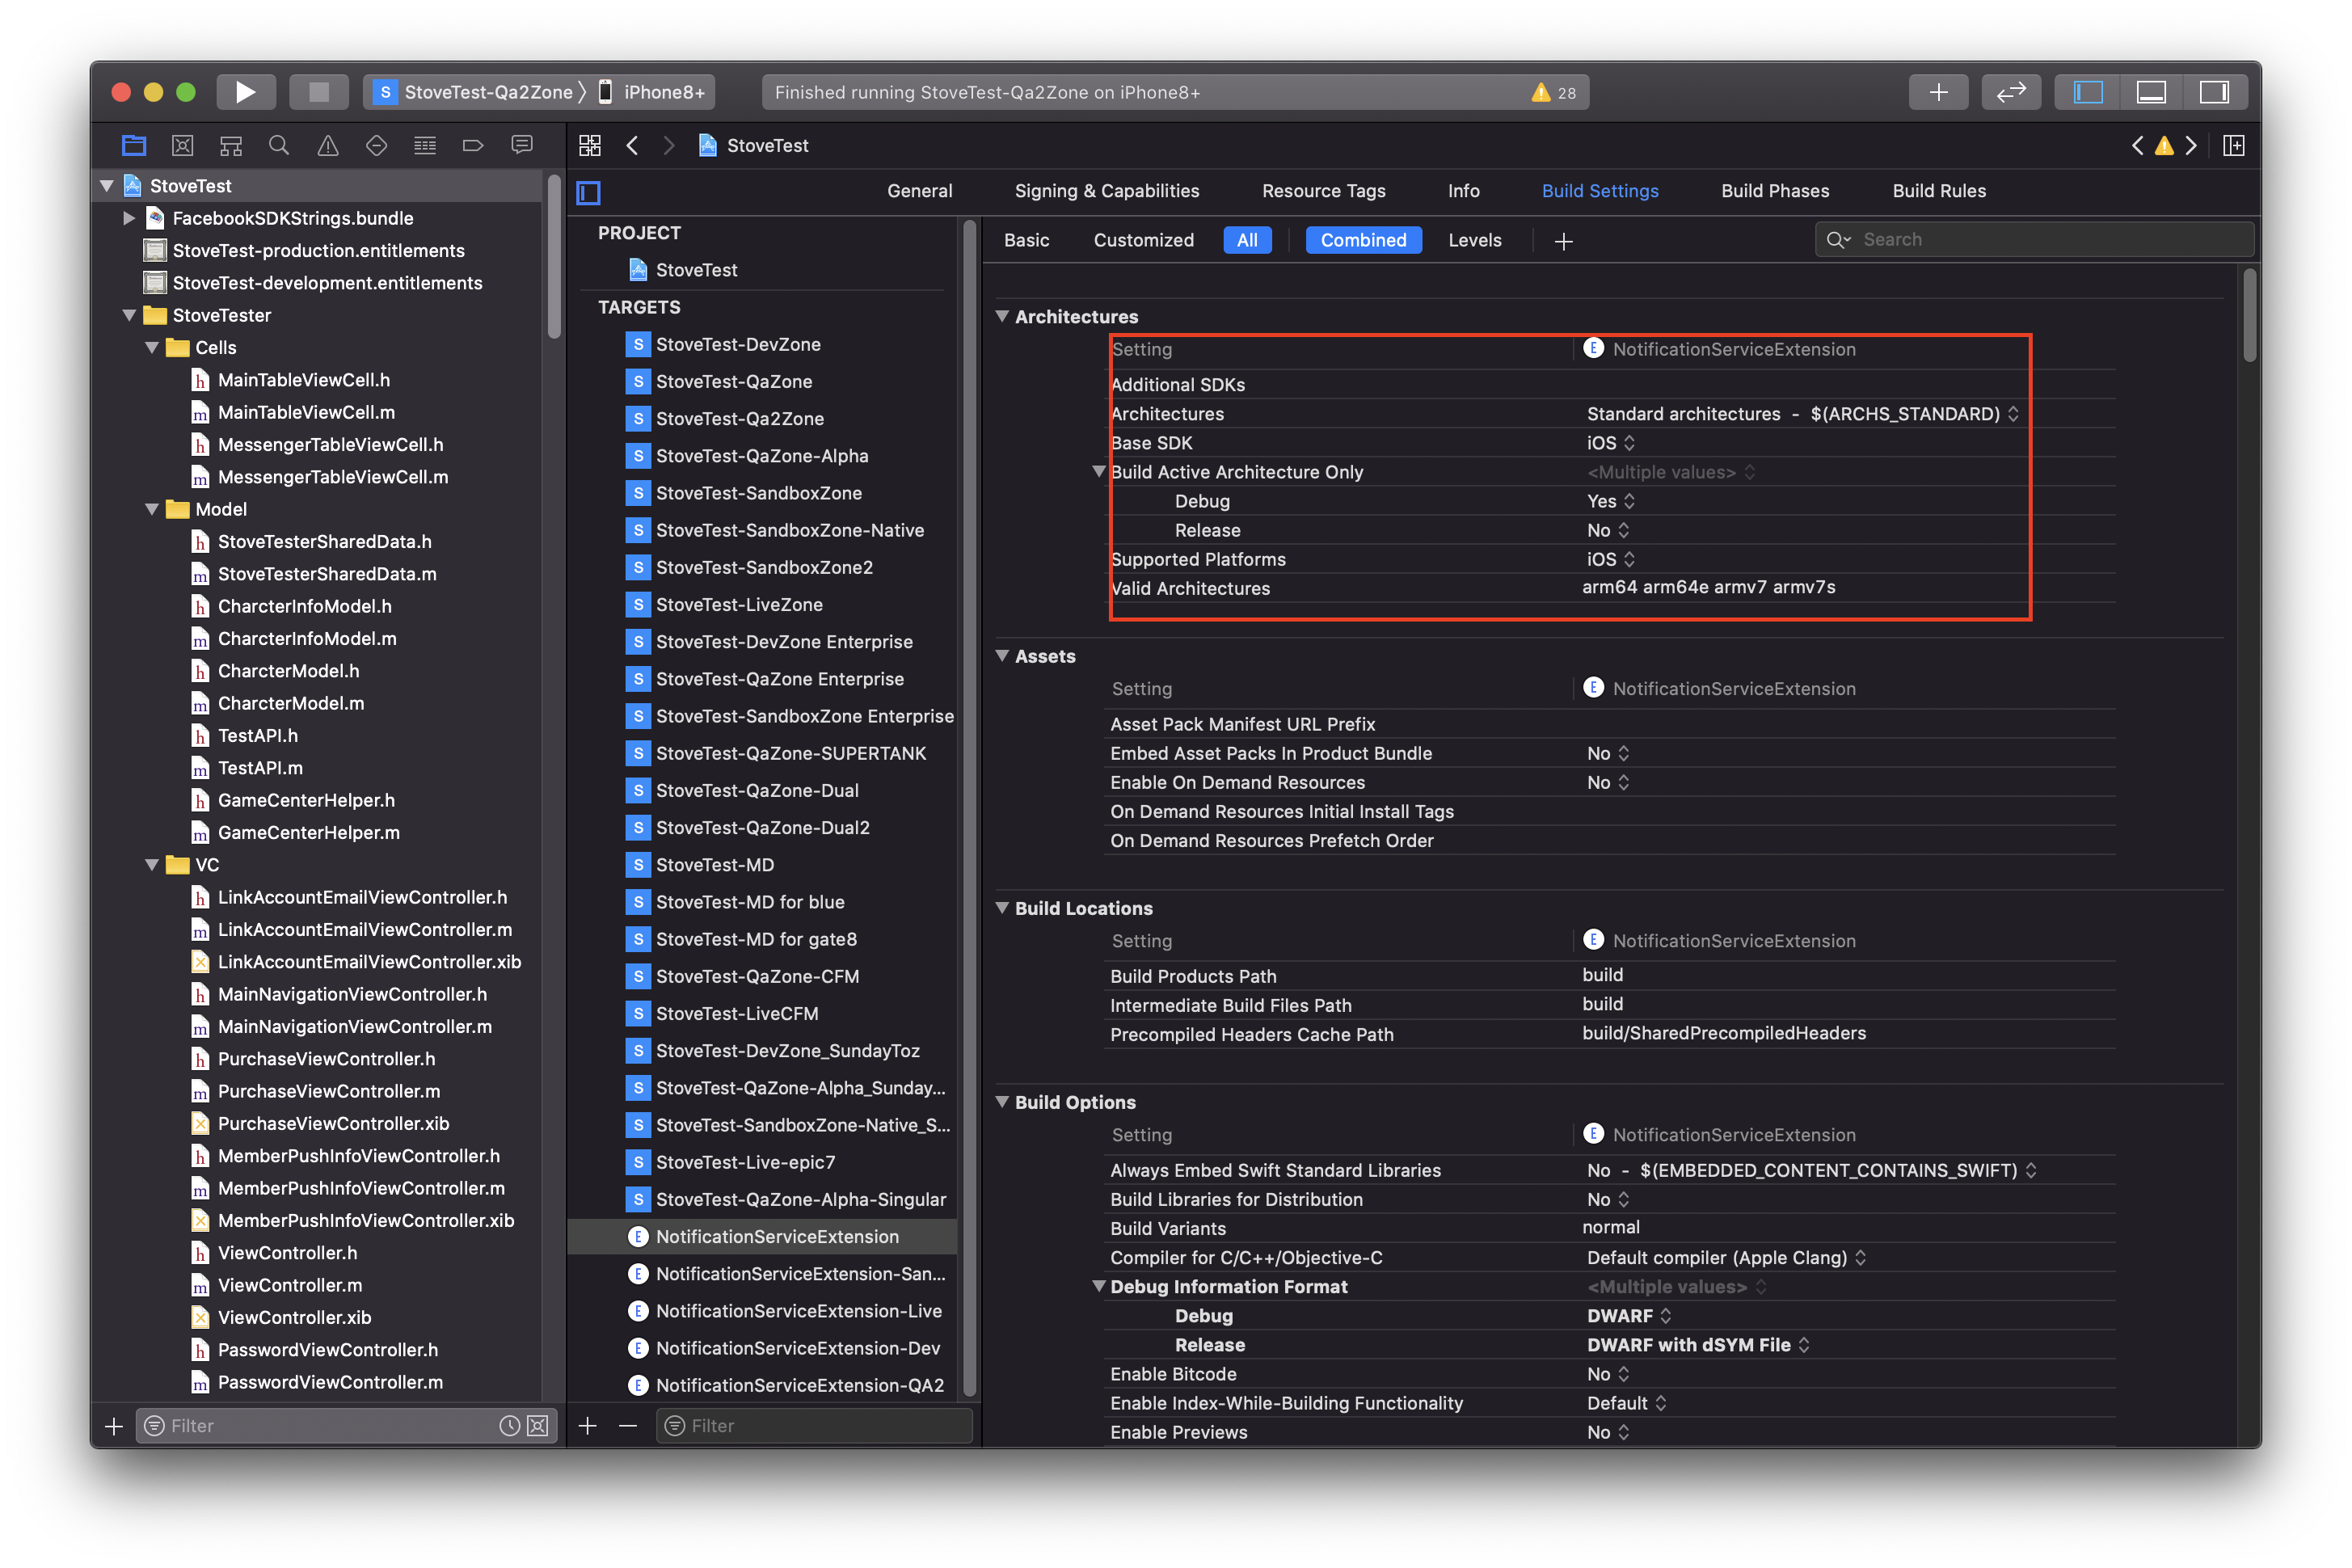
- Select
- 7. Capability setup
- Capability setup is needed to check rich-push metrics.
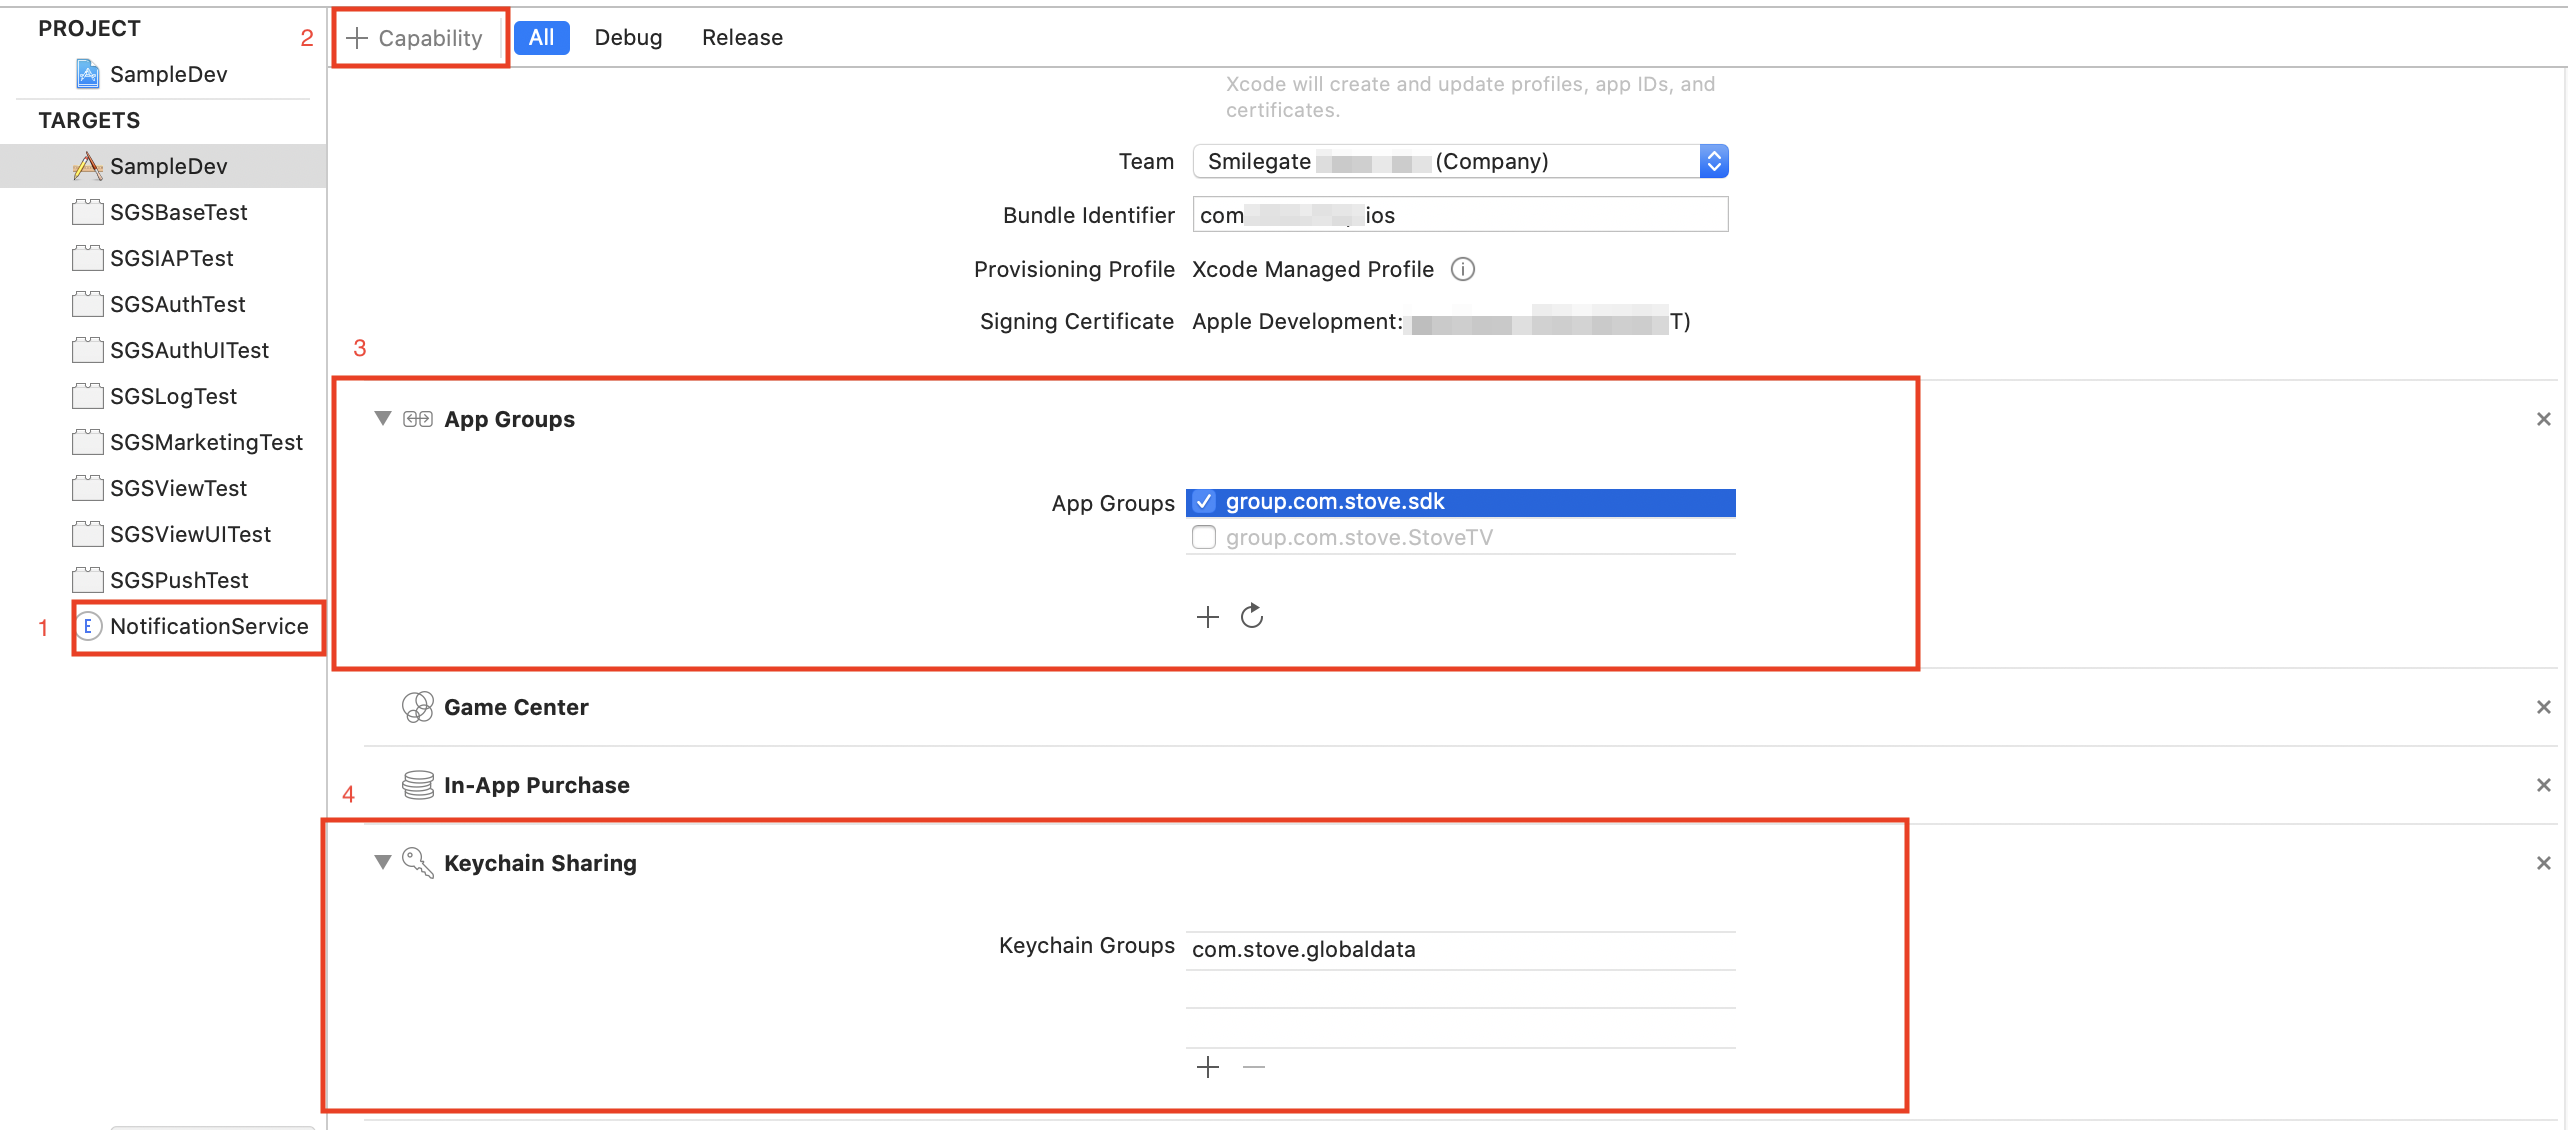
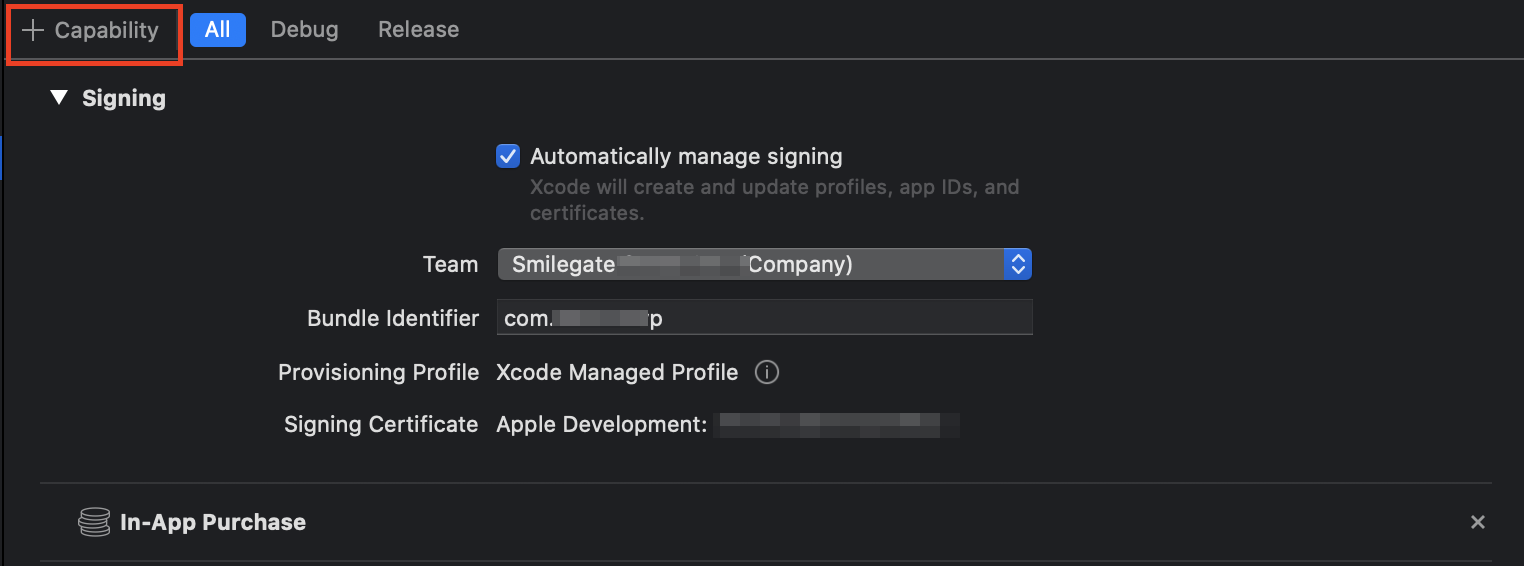
- 8. Add the App Groups Capability
- Click the add button on the Build Settings → Capabilities screen.
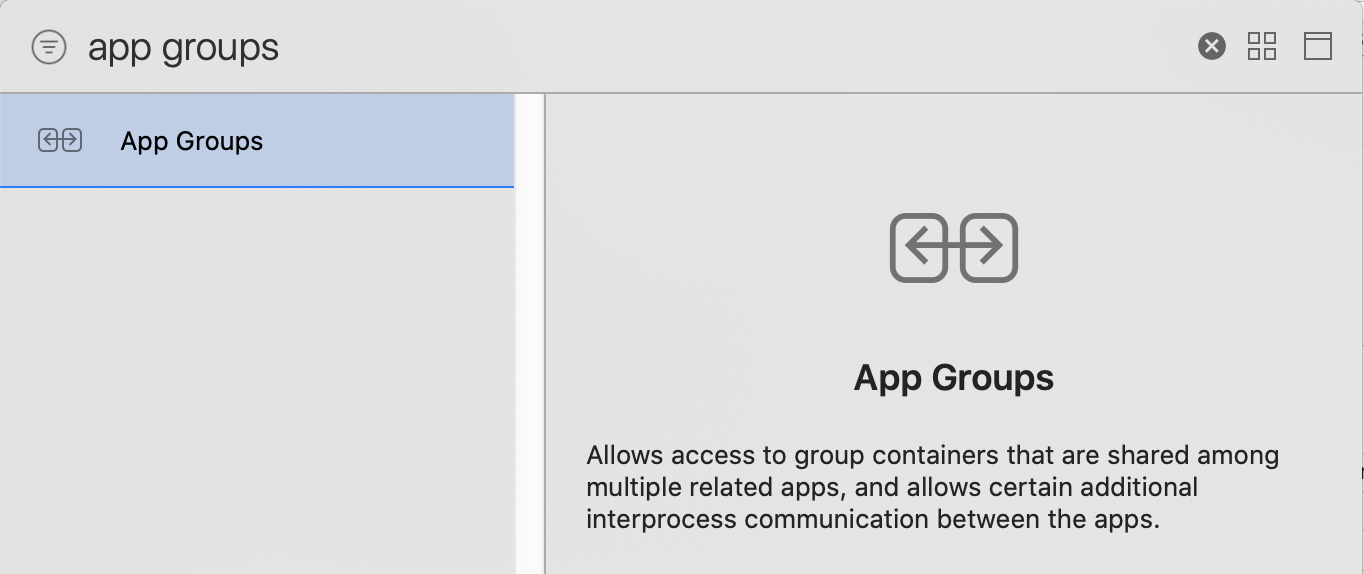
- Search for App Groups.
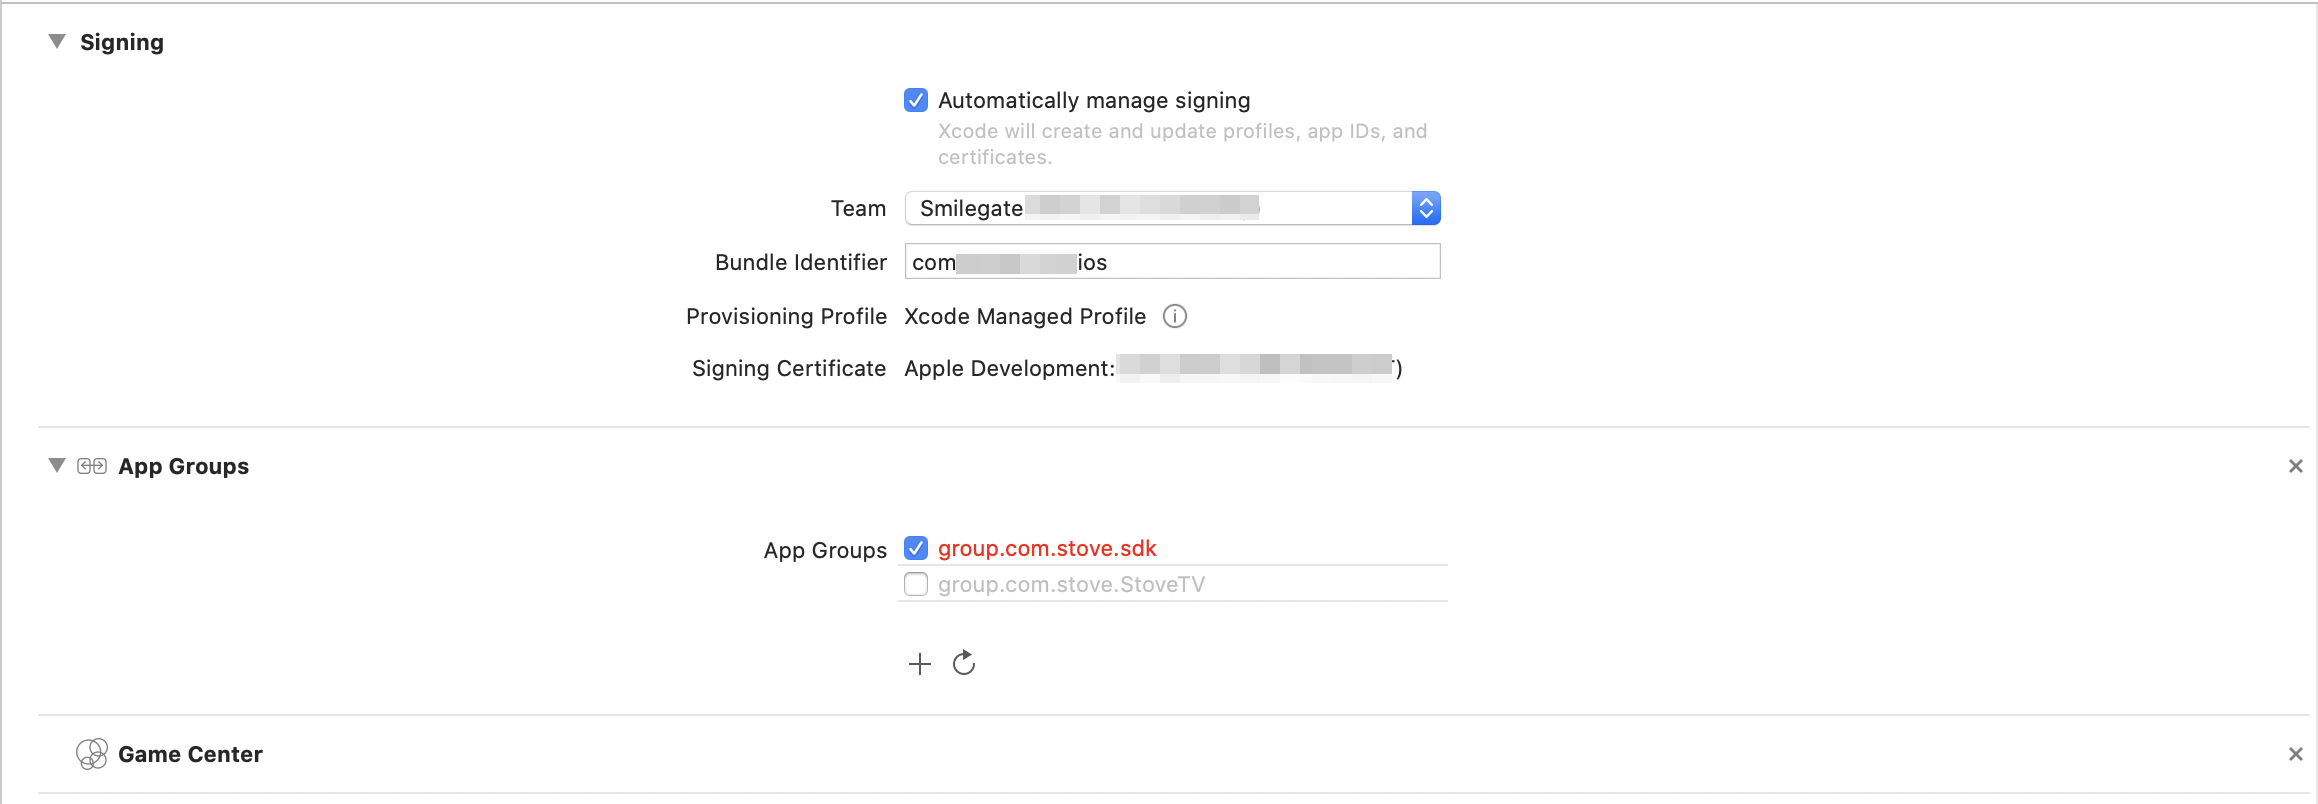
- Check that App Groups was added. Set App Groups in the format
group.+ Bundle Identifier. (e.g.,group.com.stove.sdk)
- 9. Write the NotificationService.m code
- Open the
NotificationService.mfile in theNotificationServiceExtensiongroup (see step 4) inside the Project and write it as below.
- Open the
#import "NotificationService.h"
#import <SGSPushExtension/SGSPushExtension.h>

@interface NotificationService ()

@property (nonatomic, strong) void (^contentHandler)(UNNotificationContent *contentToDeliver);
@property (nonatomic, strong) UNMutableNotificationContent *bestAttemptContent;

@end

@implementation NotificationService

- (void)didReceiveNotificationRequest:(UNNotificationRequest *)request withContentHandler:(void (^)(UNNotificationContent * _Nonnull))contentHandler {
    self.contentHandler = contentHandler;
    self.bestAttemptContent = [request.content mutableCopy];

    [NotificationServiceExtension didReceive:request withContentHandler:contentHandler];
}

- (void)serviceExtensionTimeWillExpire {
    // Called just before the extension will be terminated by the system.
    // Use this as an opportunity to deliver your "best attempt" at modified content, otherwise the original push payload will be used.
    self.contentHandler(self.bestAttemptContent);
}

@end
Creating a Release Provisioning Profile
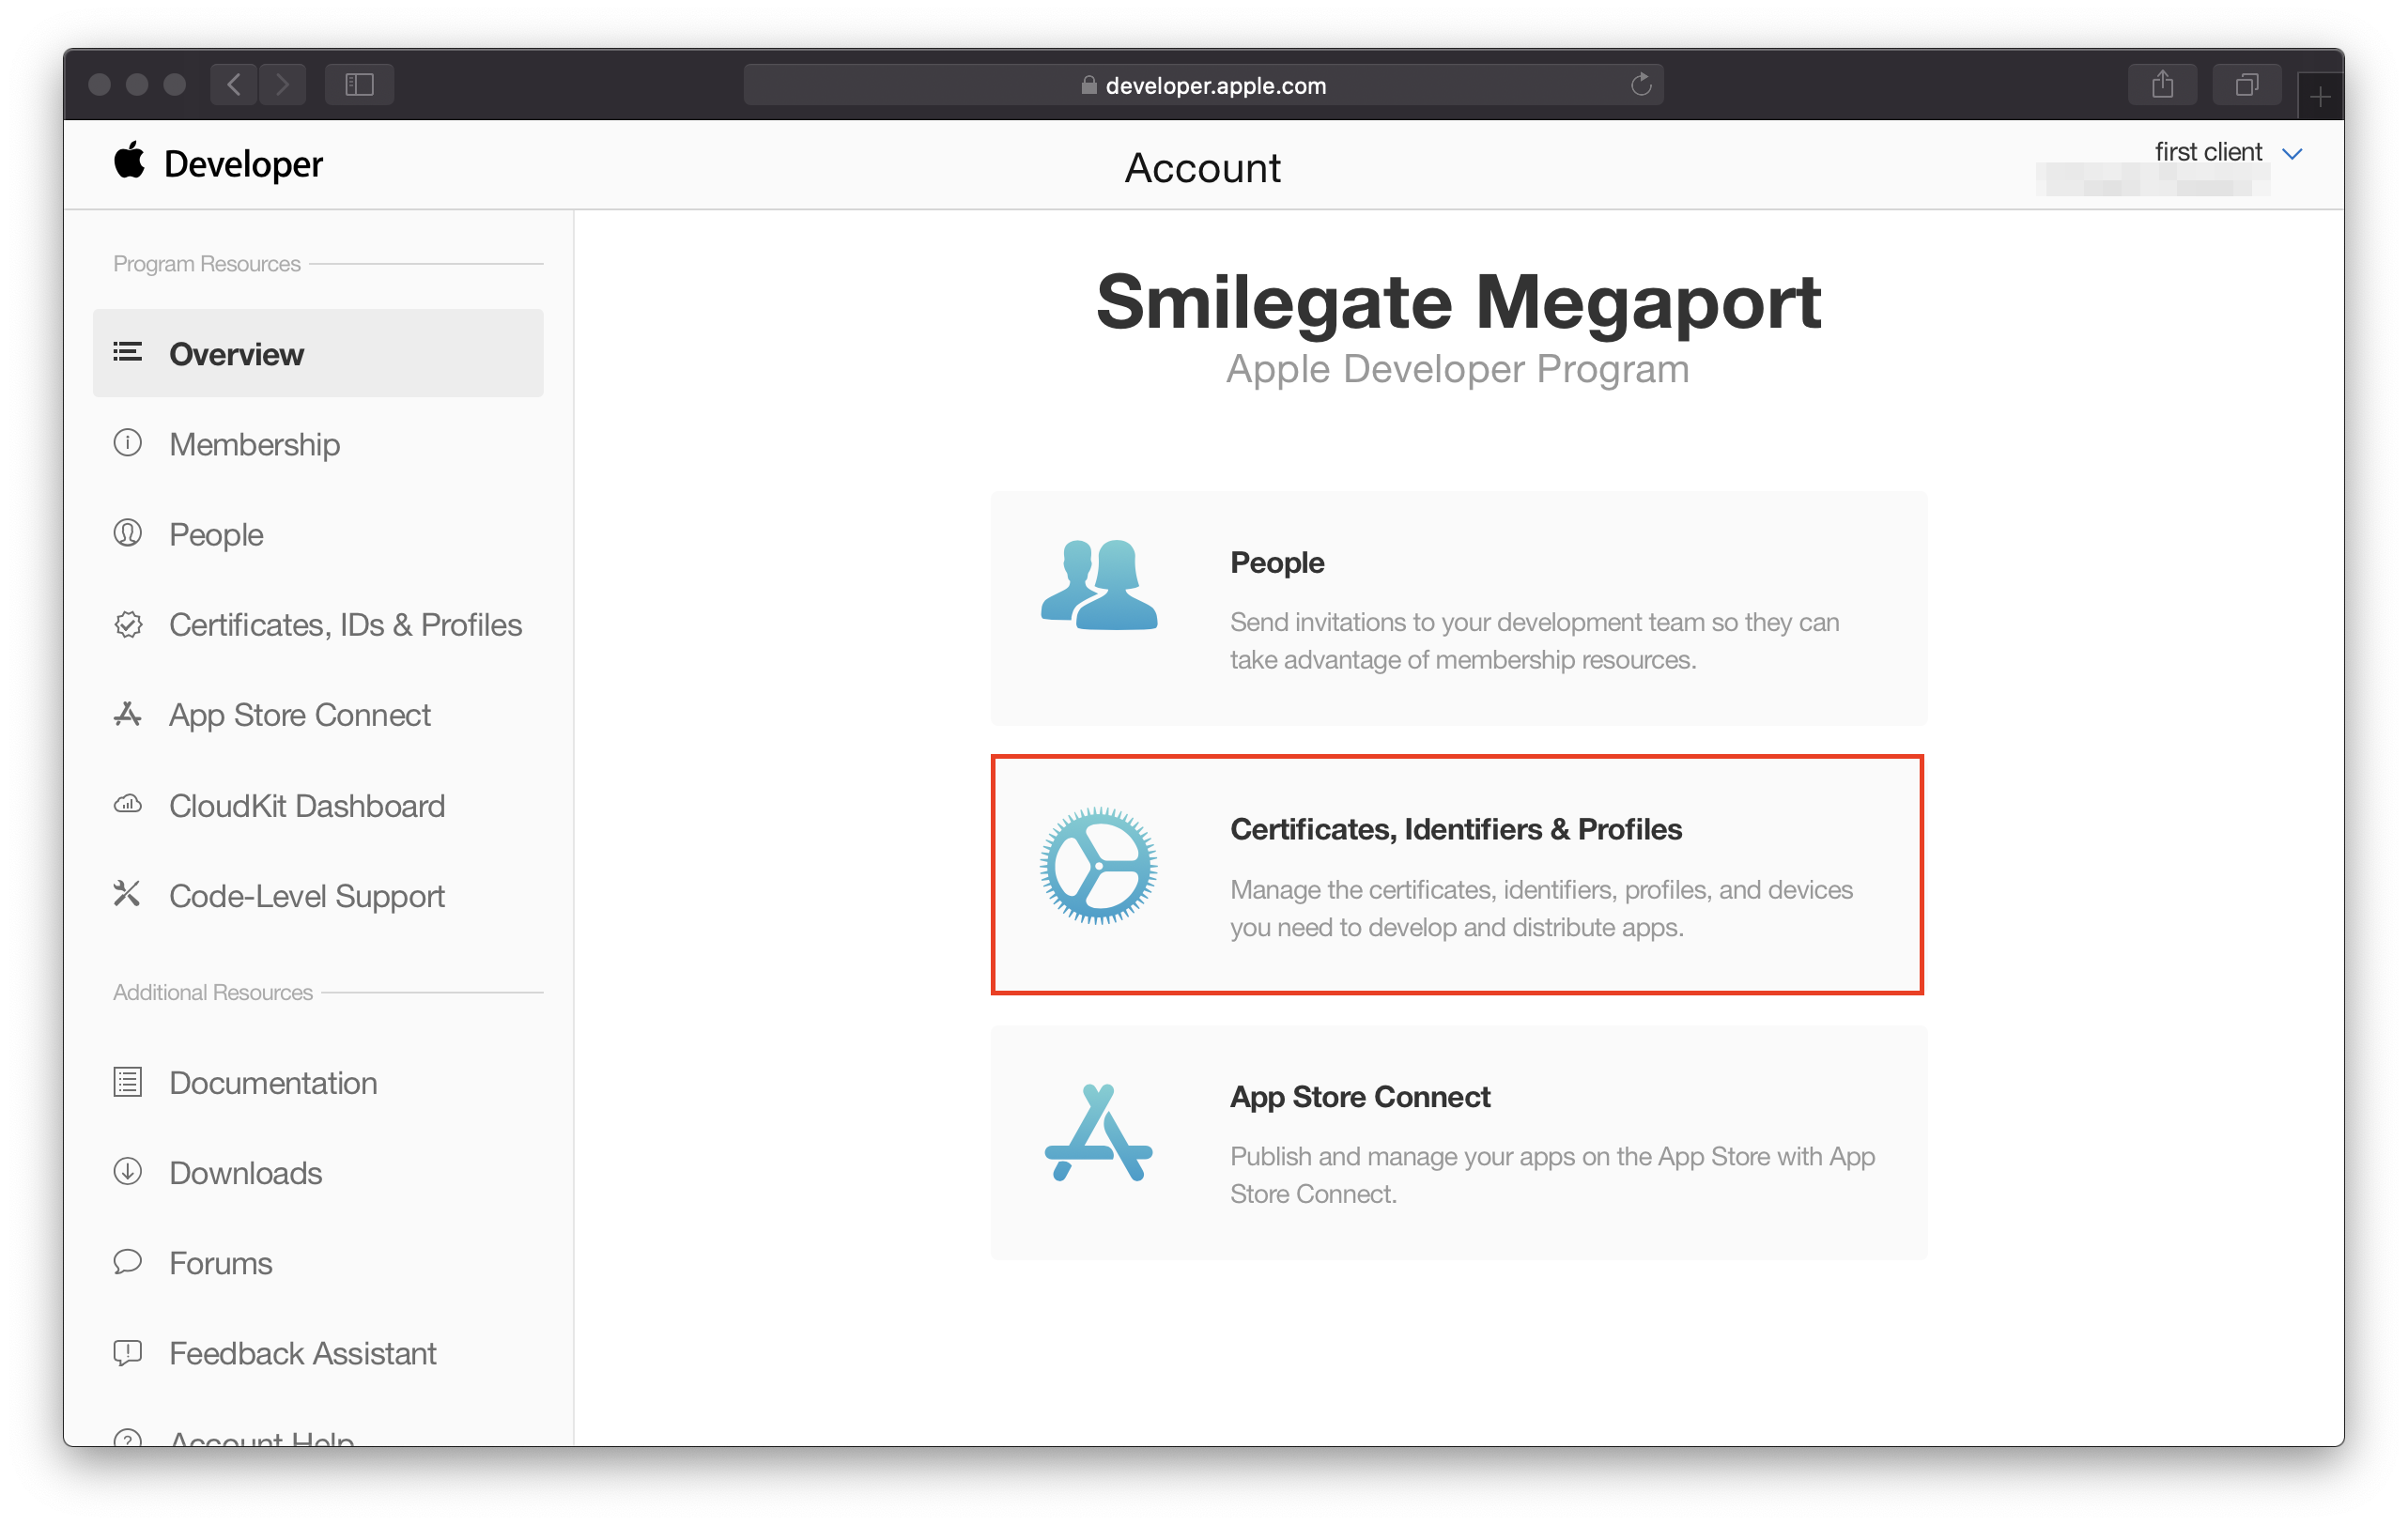
- 1. Access the Apple Developer Console
- 2. Start registering an Identifier
- Select Identifiers in the left menu, then select Identifiers +.
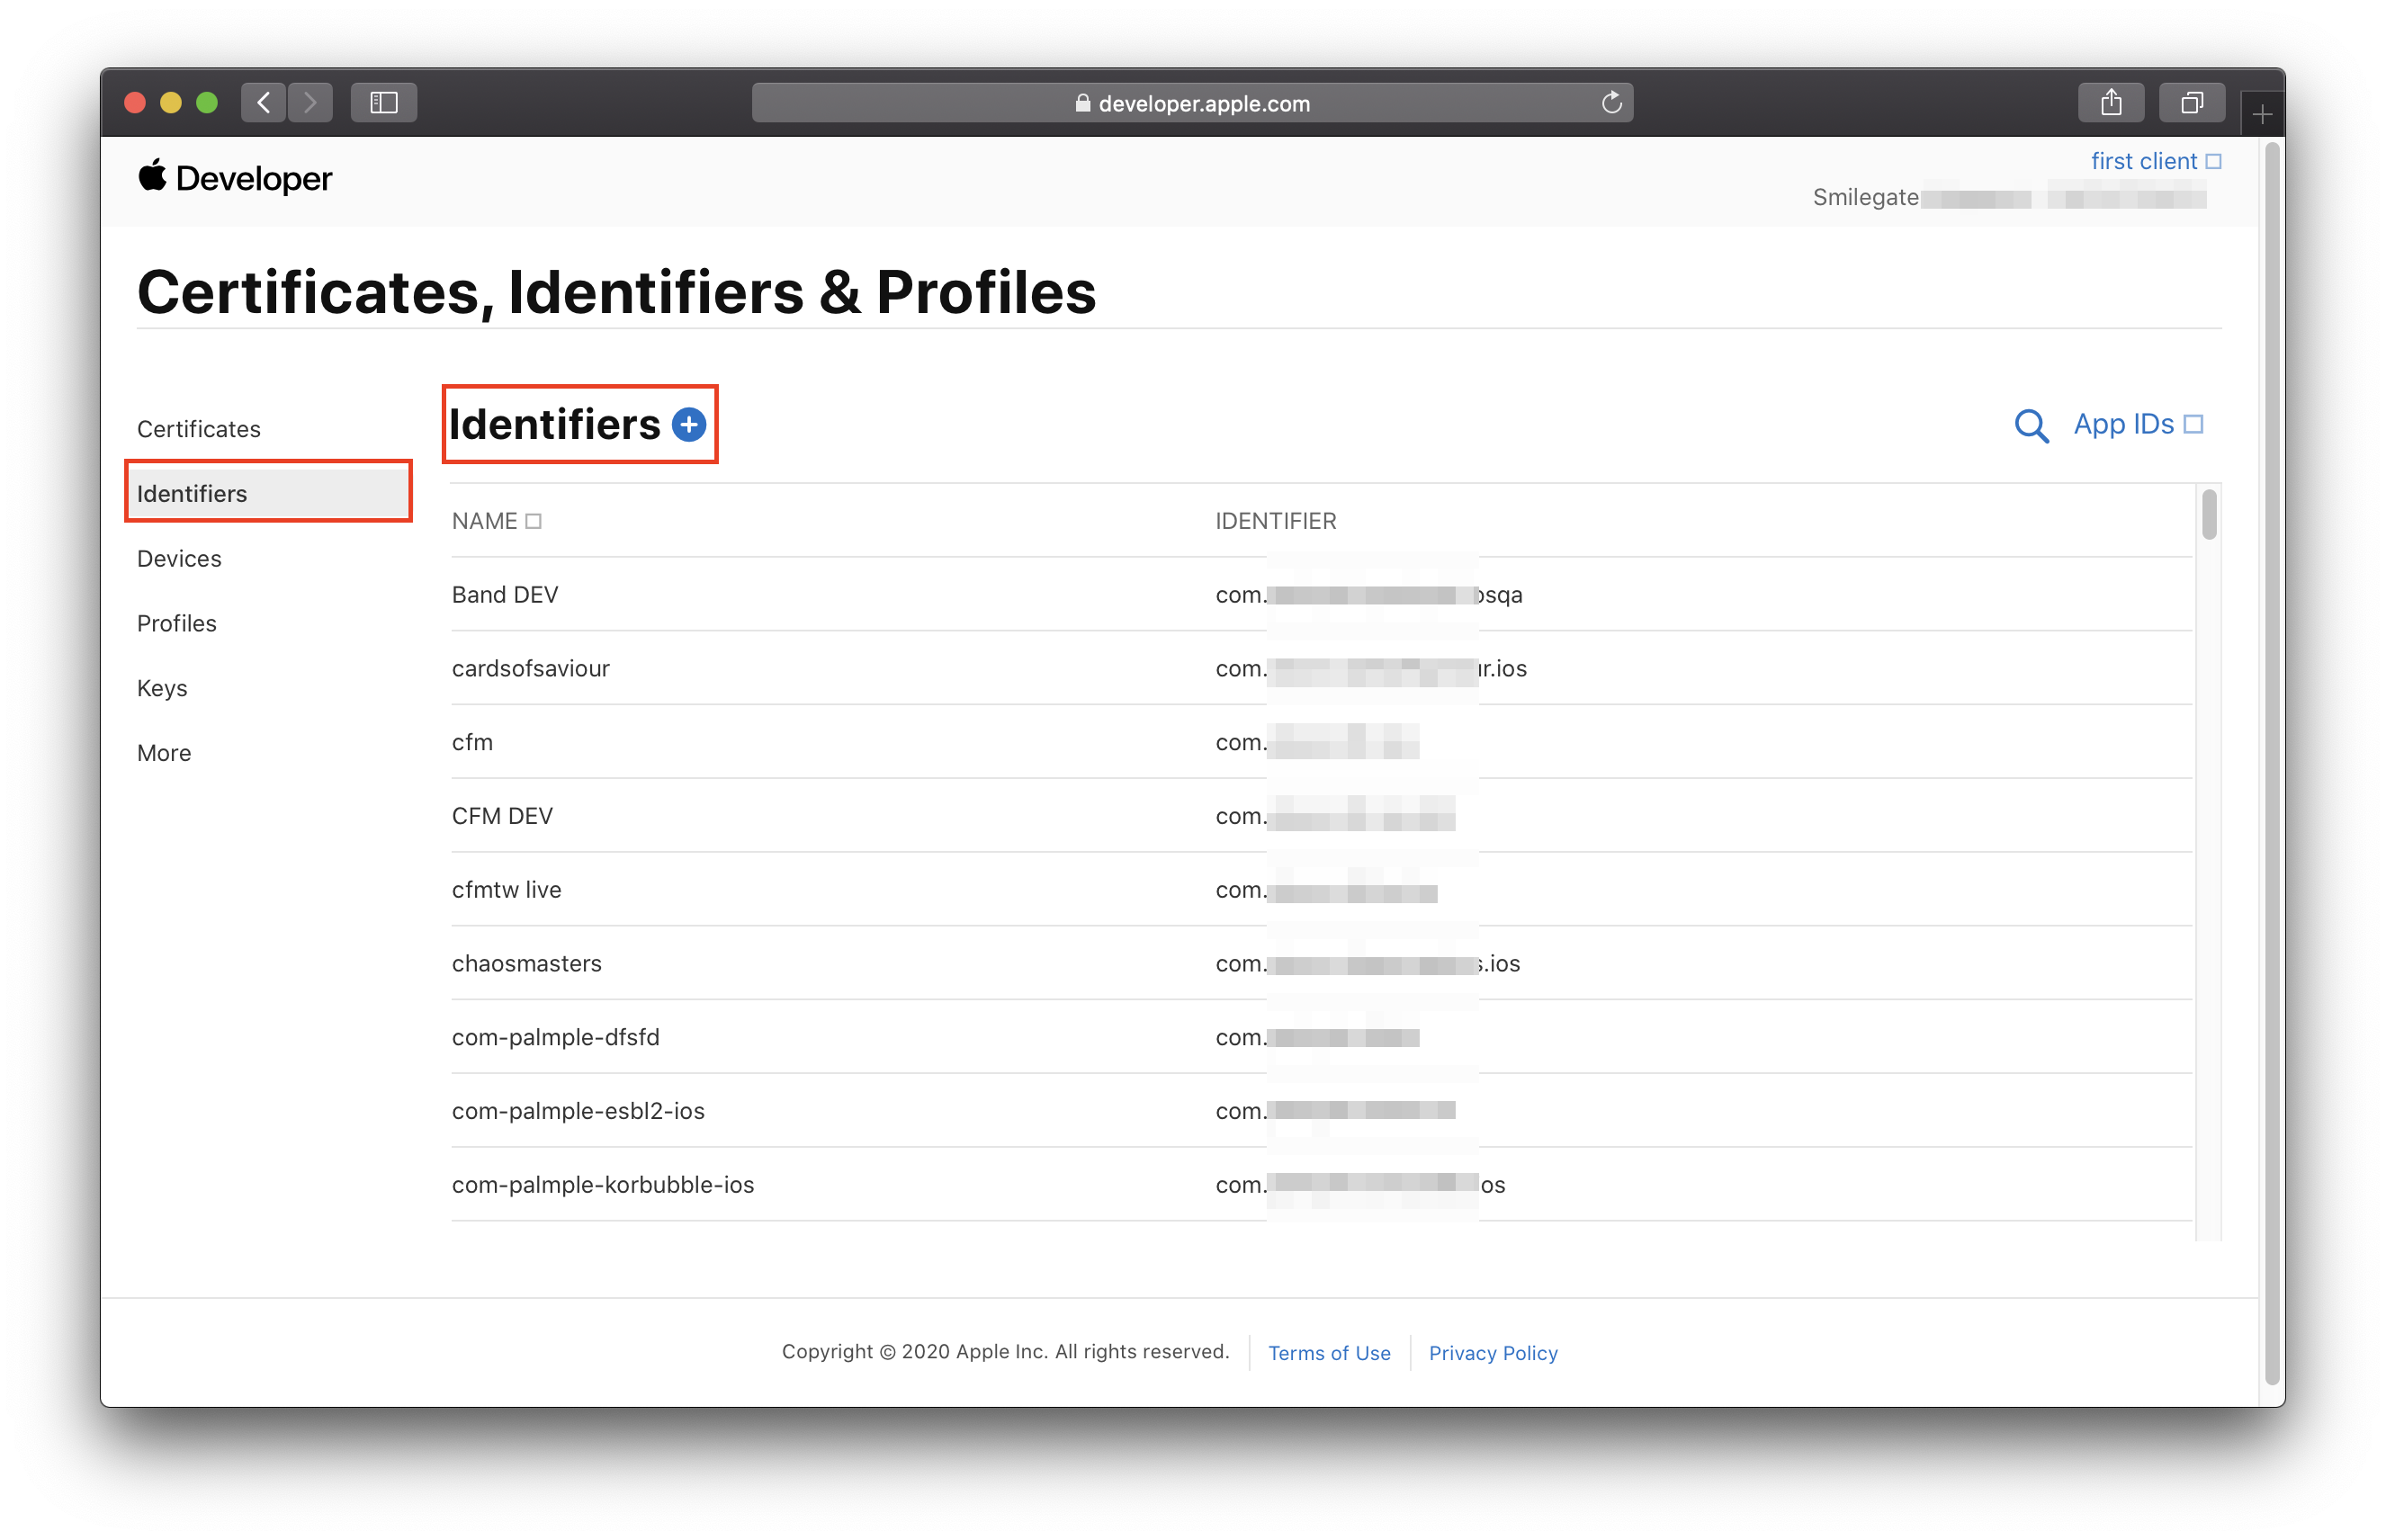
- 3. Select App IDs
- Select App IDs and click Continue.
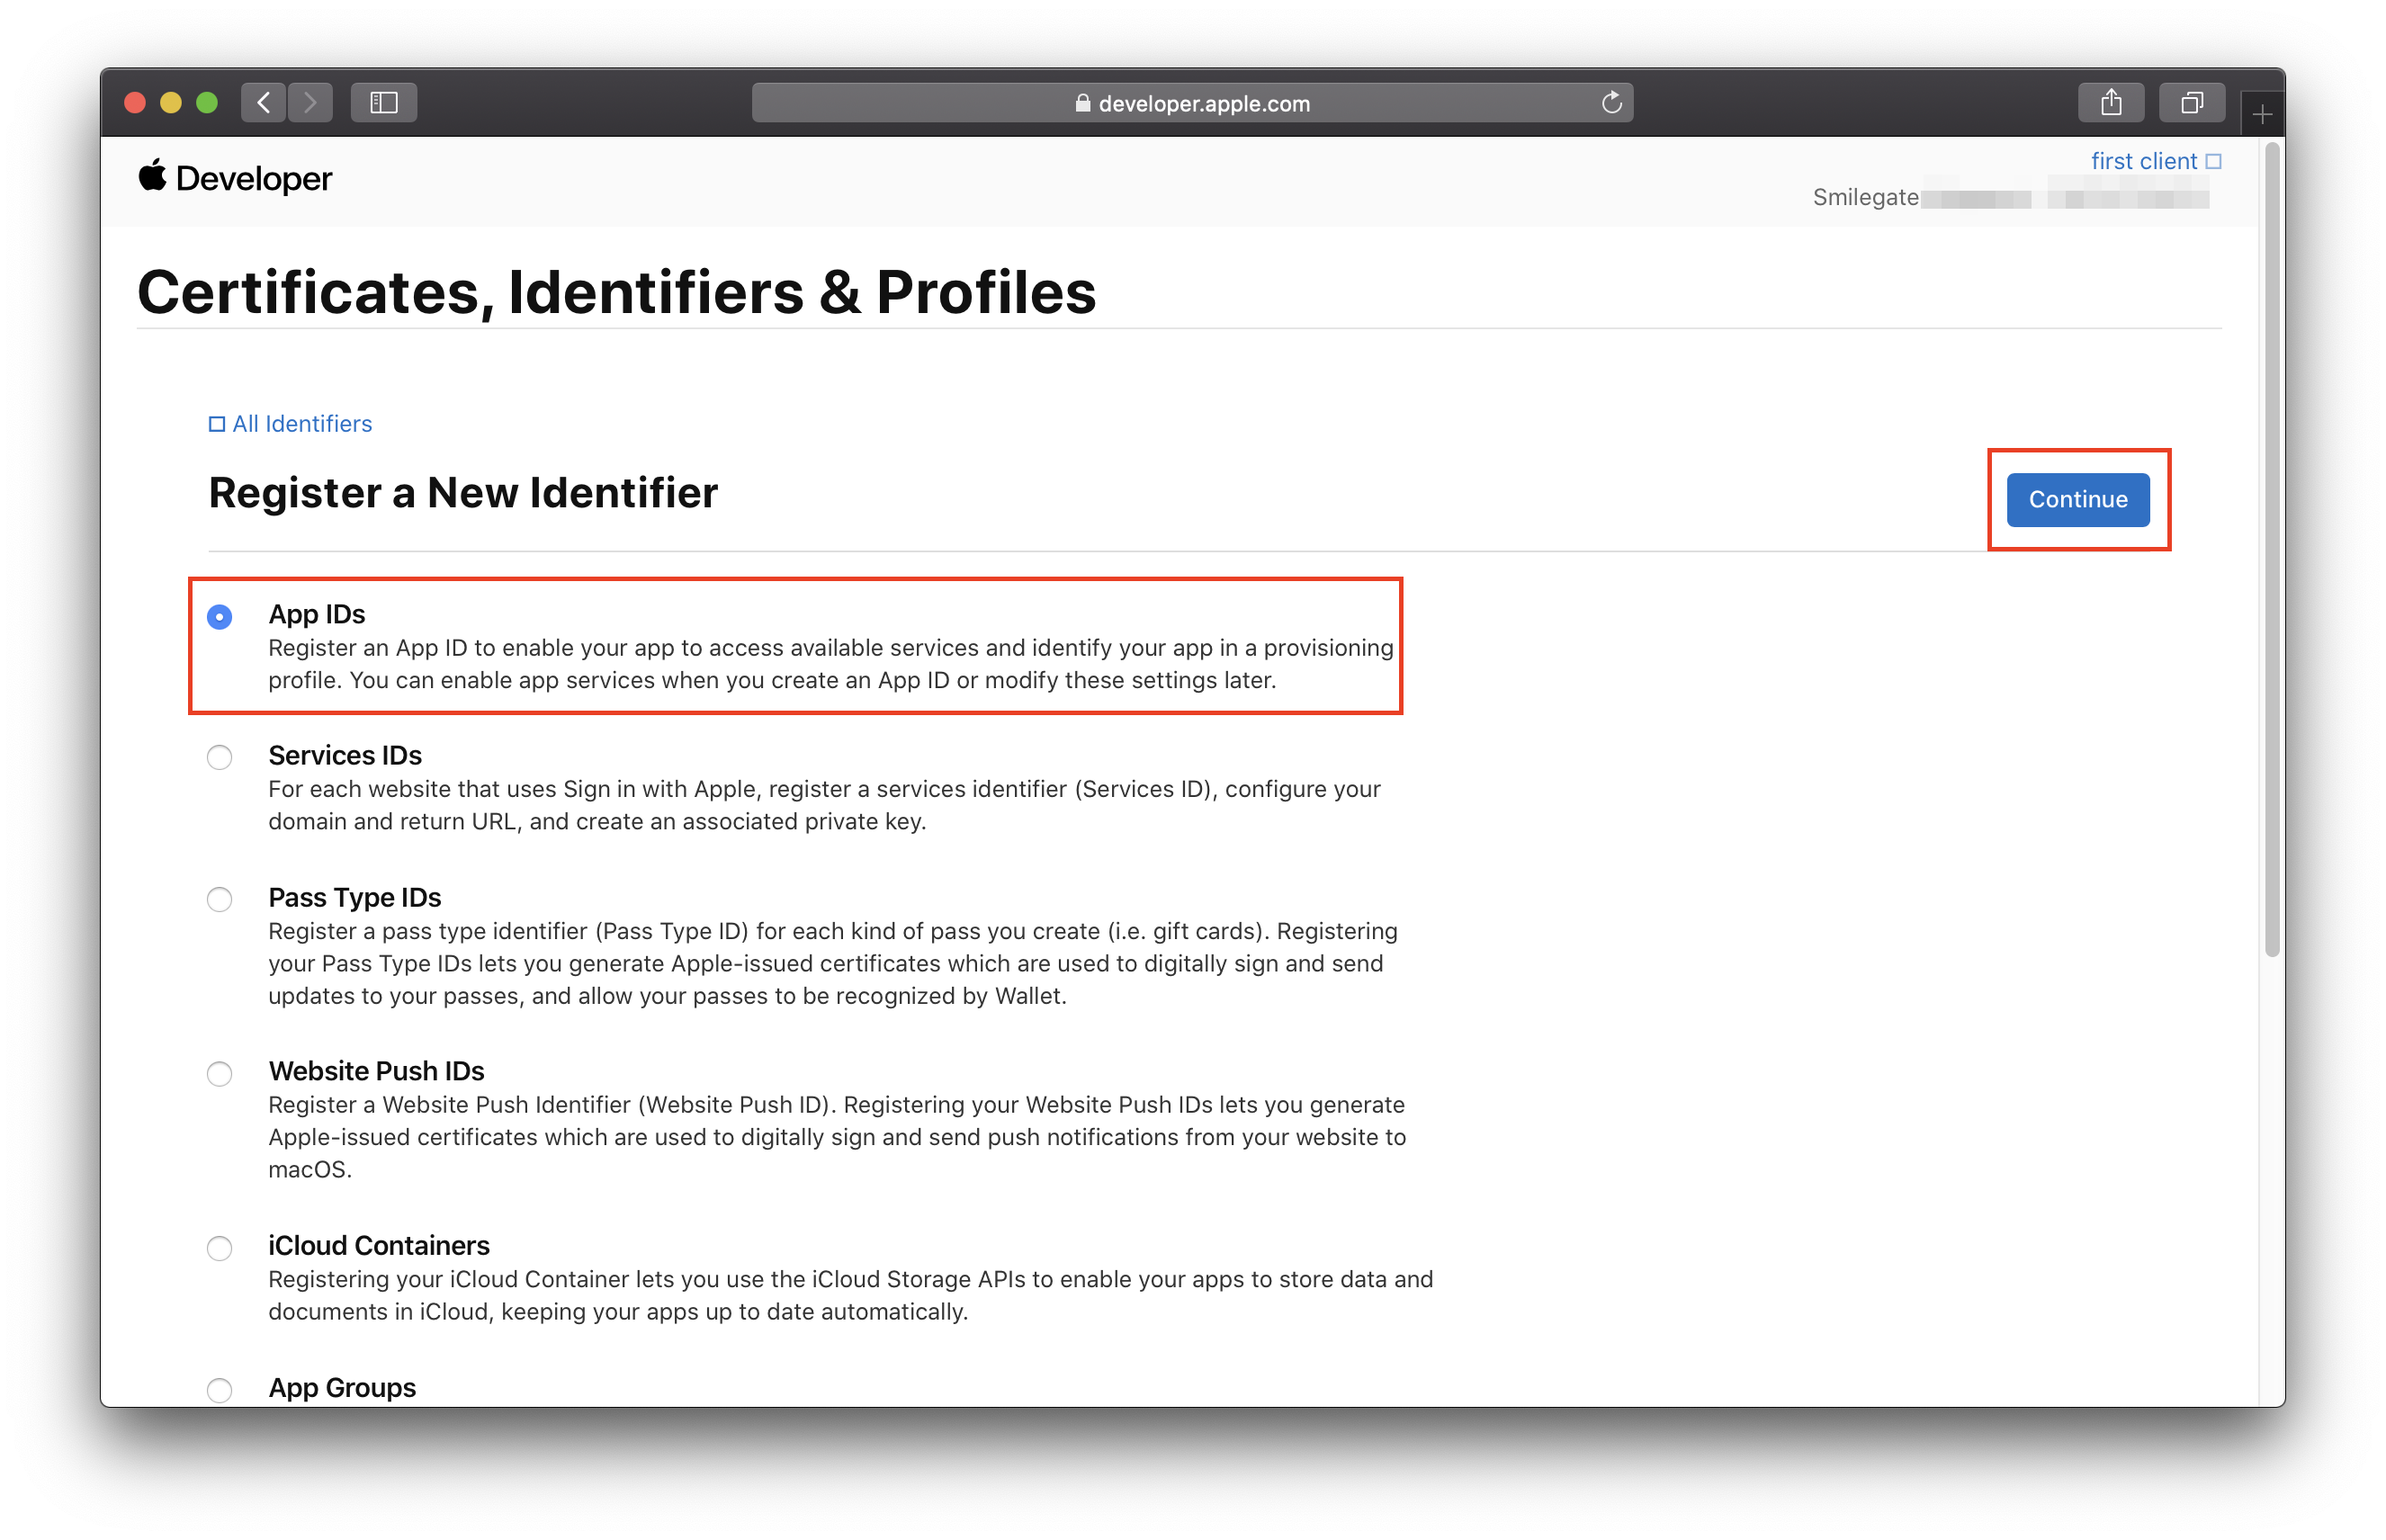
- 4. Enter the Bundle ID
- Enter a Description, paste the game Bundle ID +
.NotificationServiceExtensioninto Bundle ID, then click Continue. - Bundle ID example:
com.stove.xxx.NotificationServiceExtension
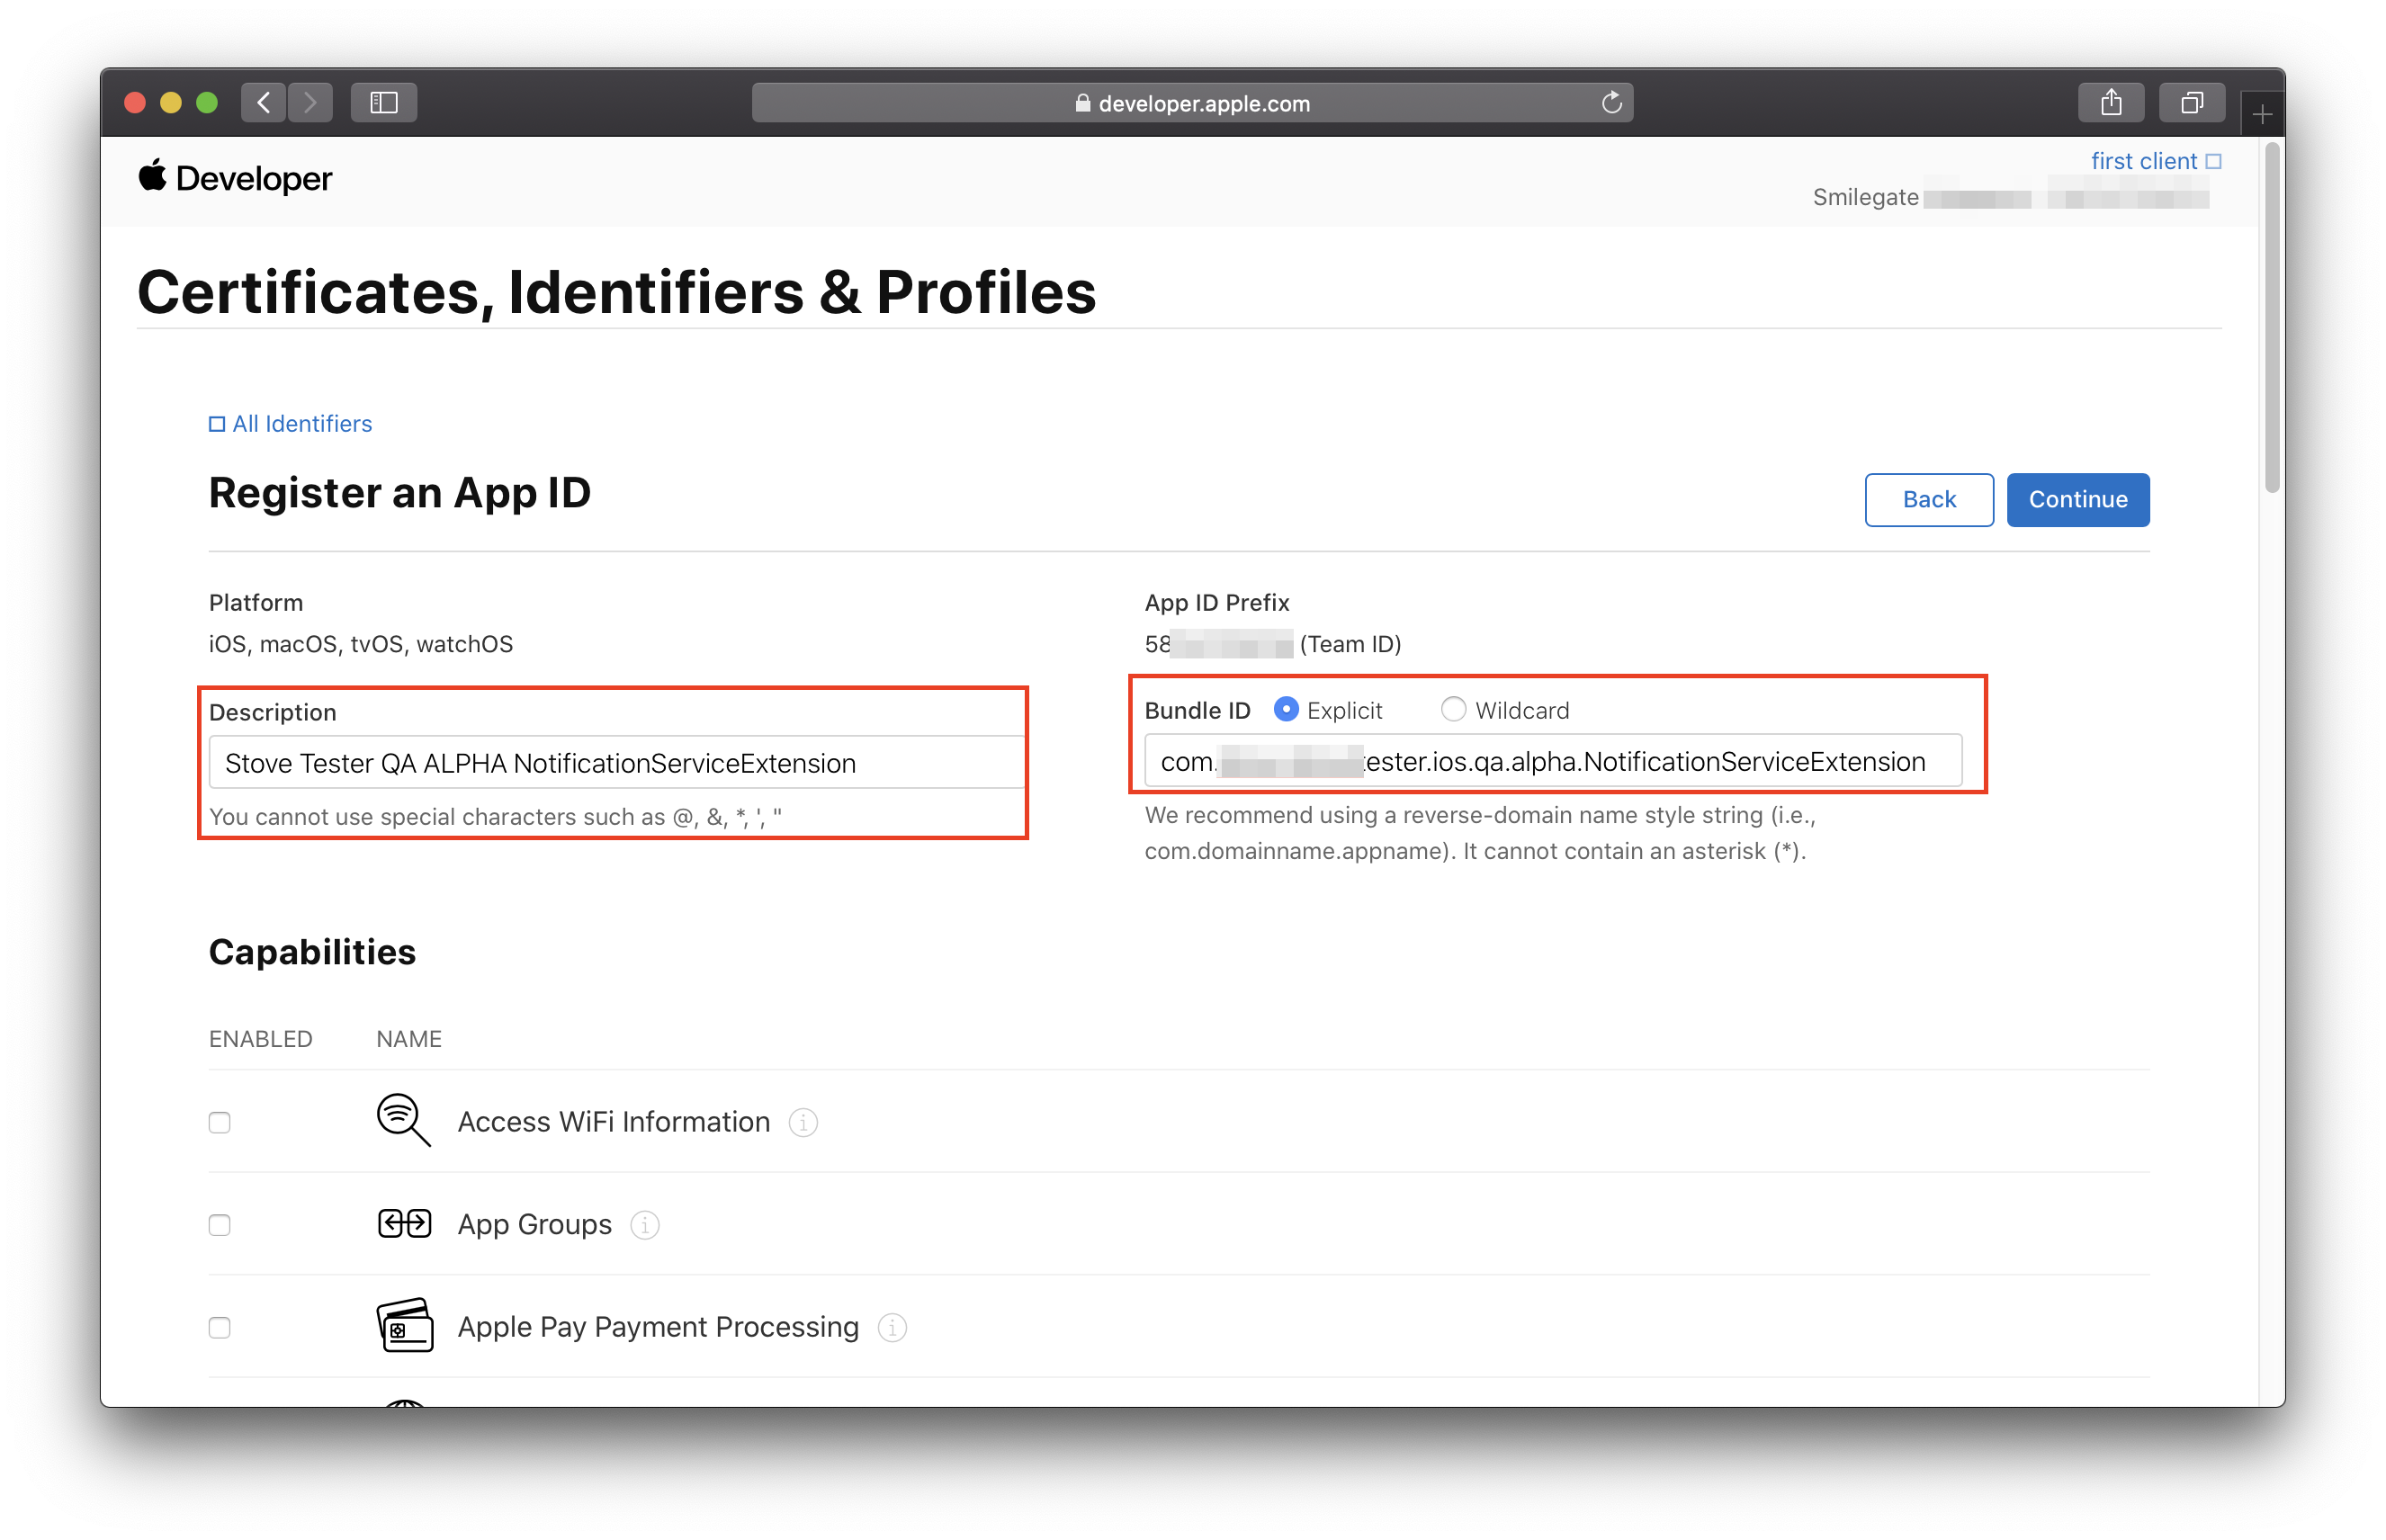
- Enter a Description, paste the game Bundle ID +
- 5. Complete registration
- Click Register to finish registration.
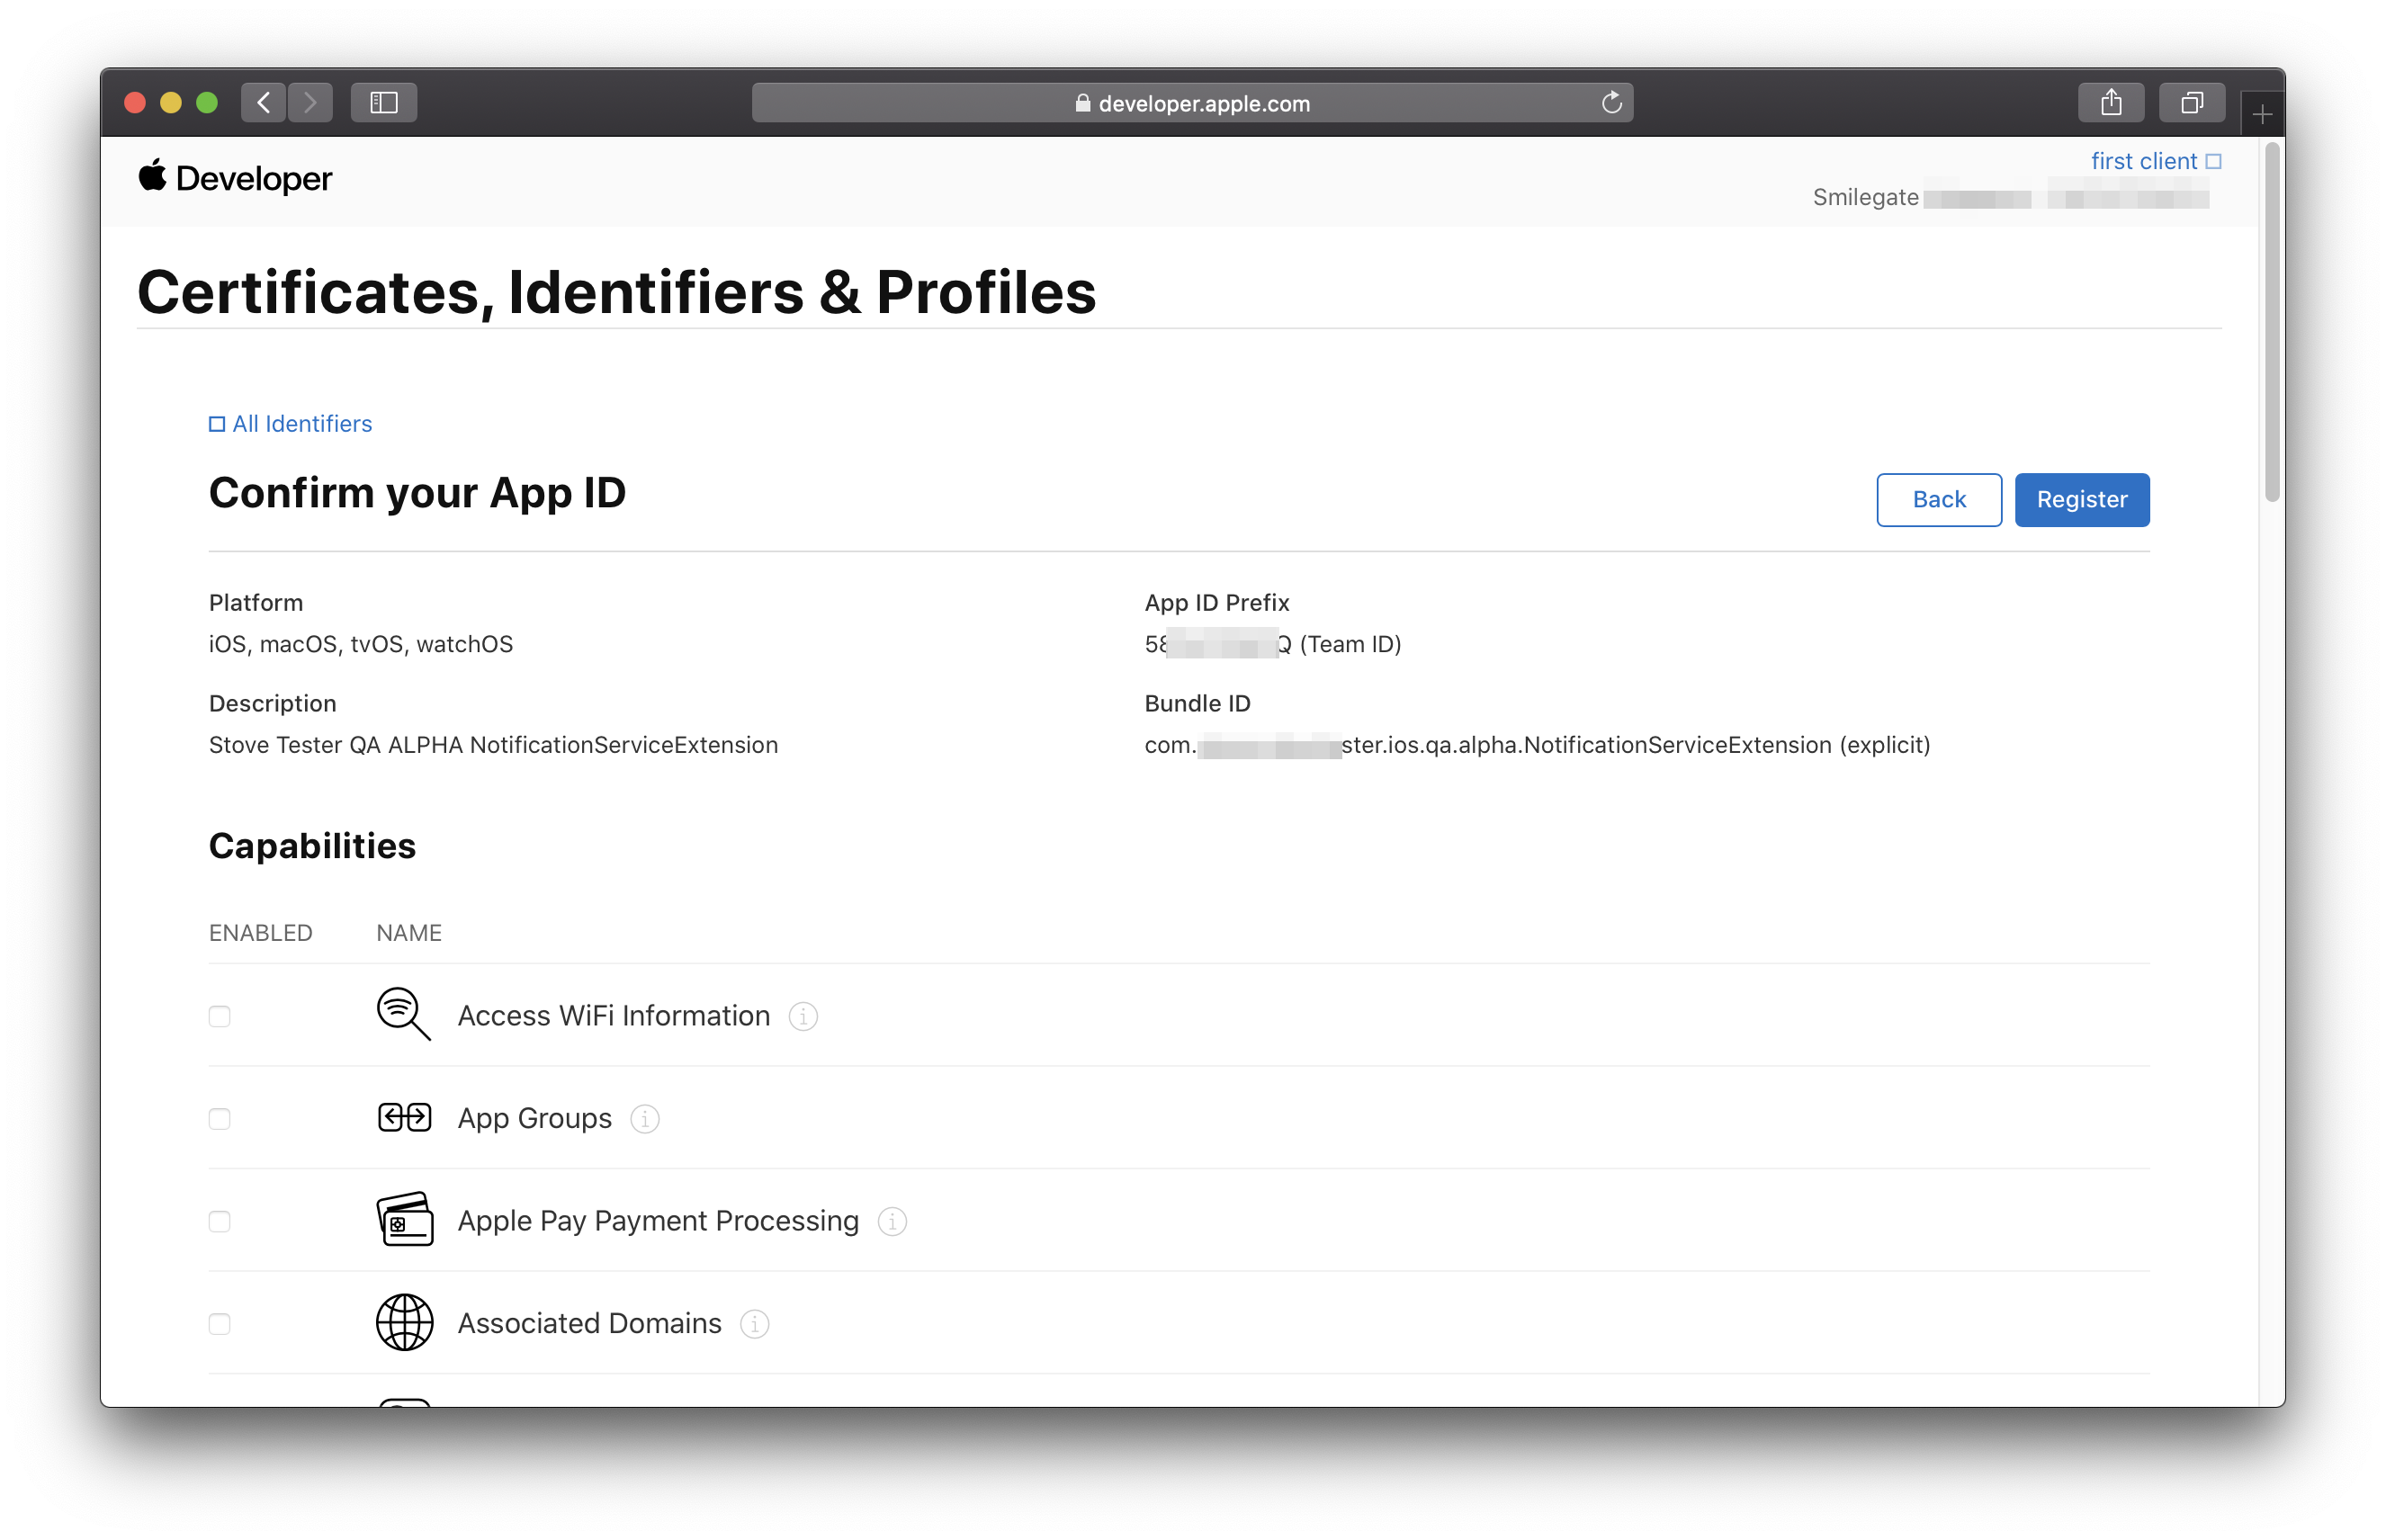
- 6. Verify the Identifier registration
- Return to the Identifiers screen and check that the ID you just created is registered.
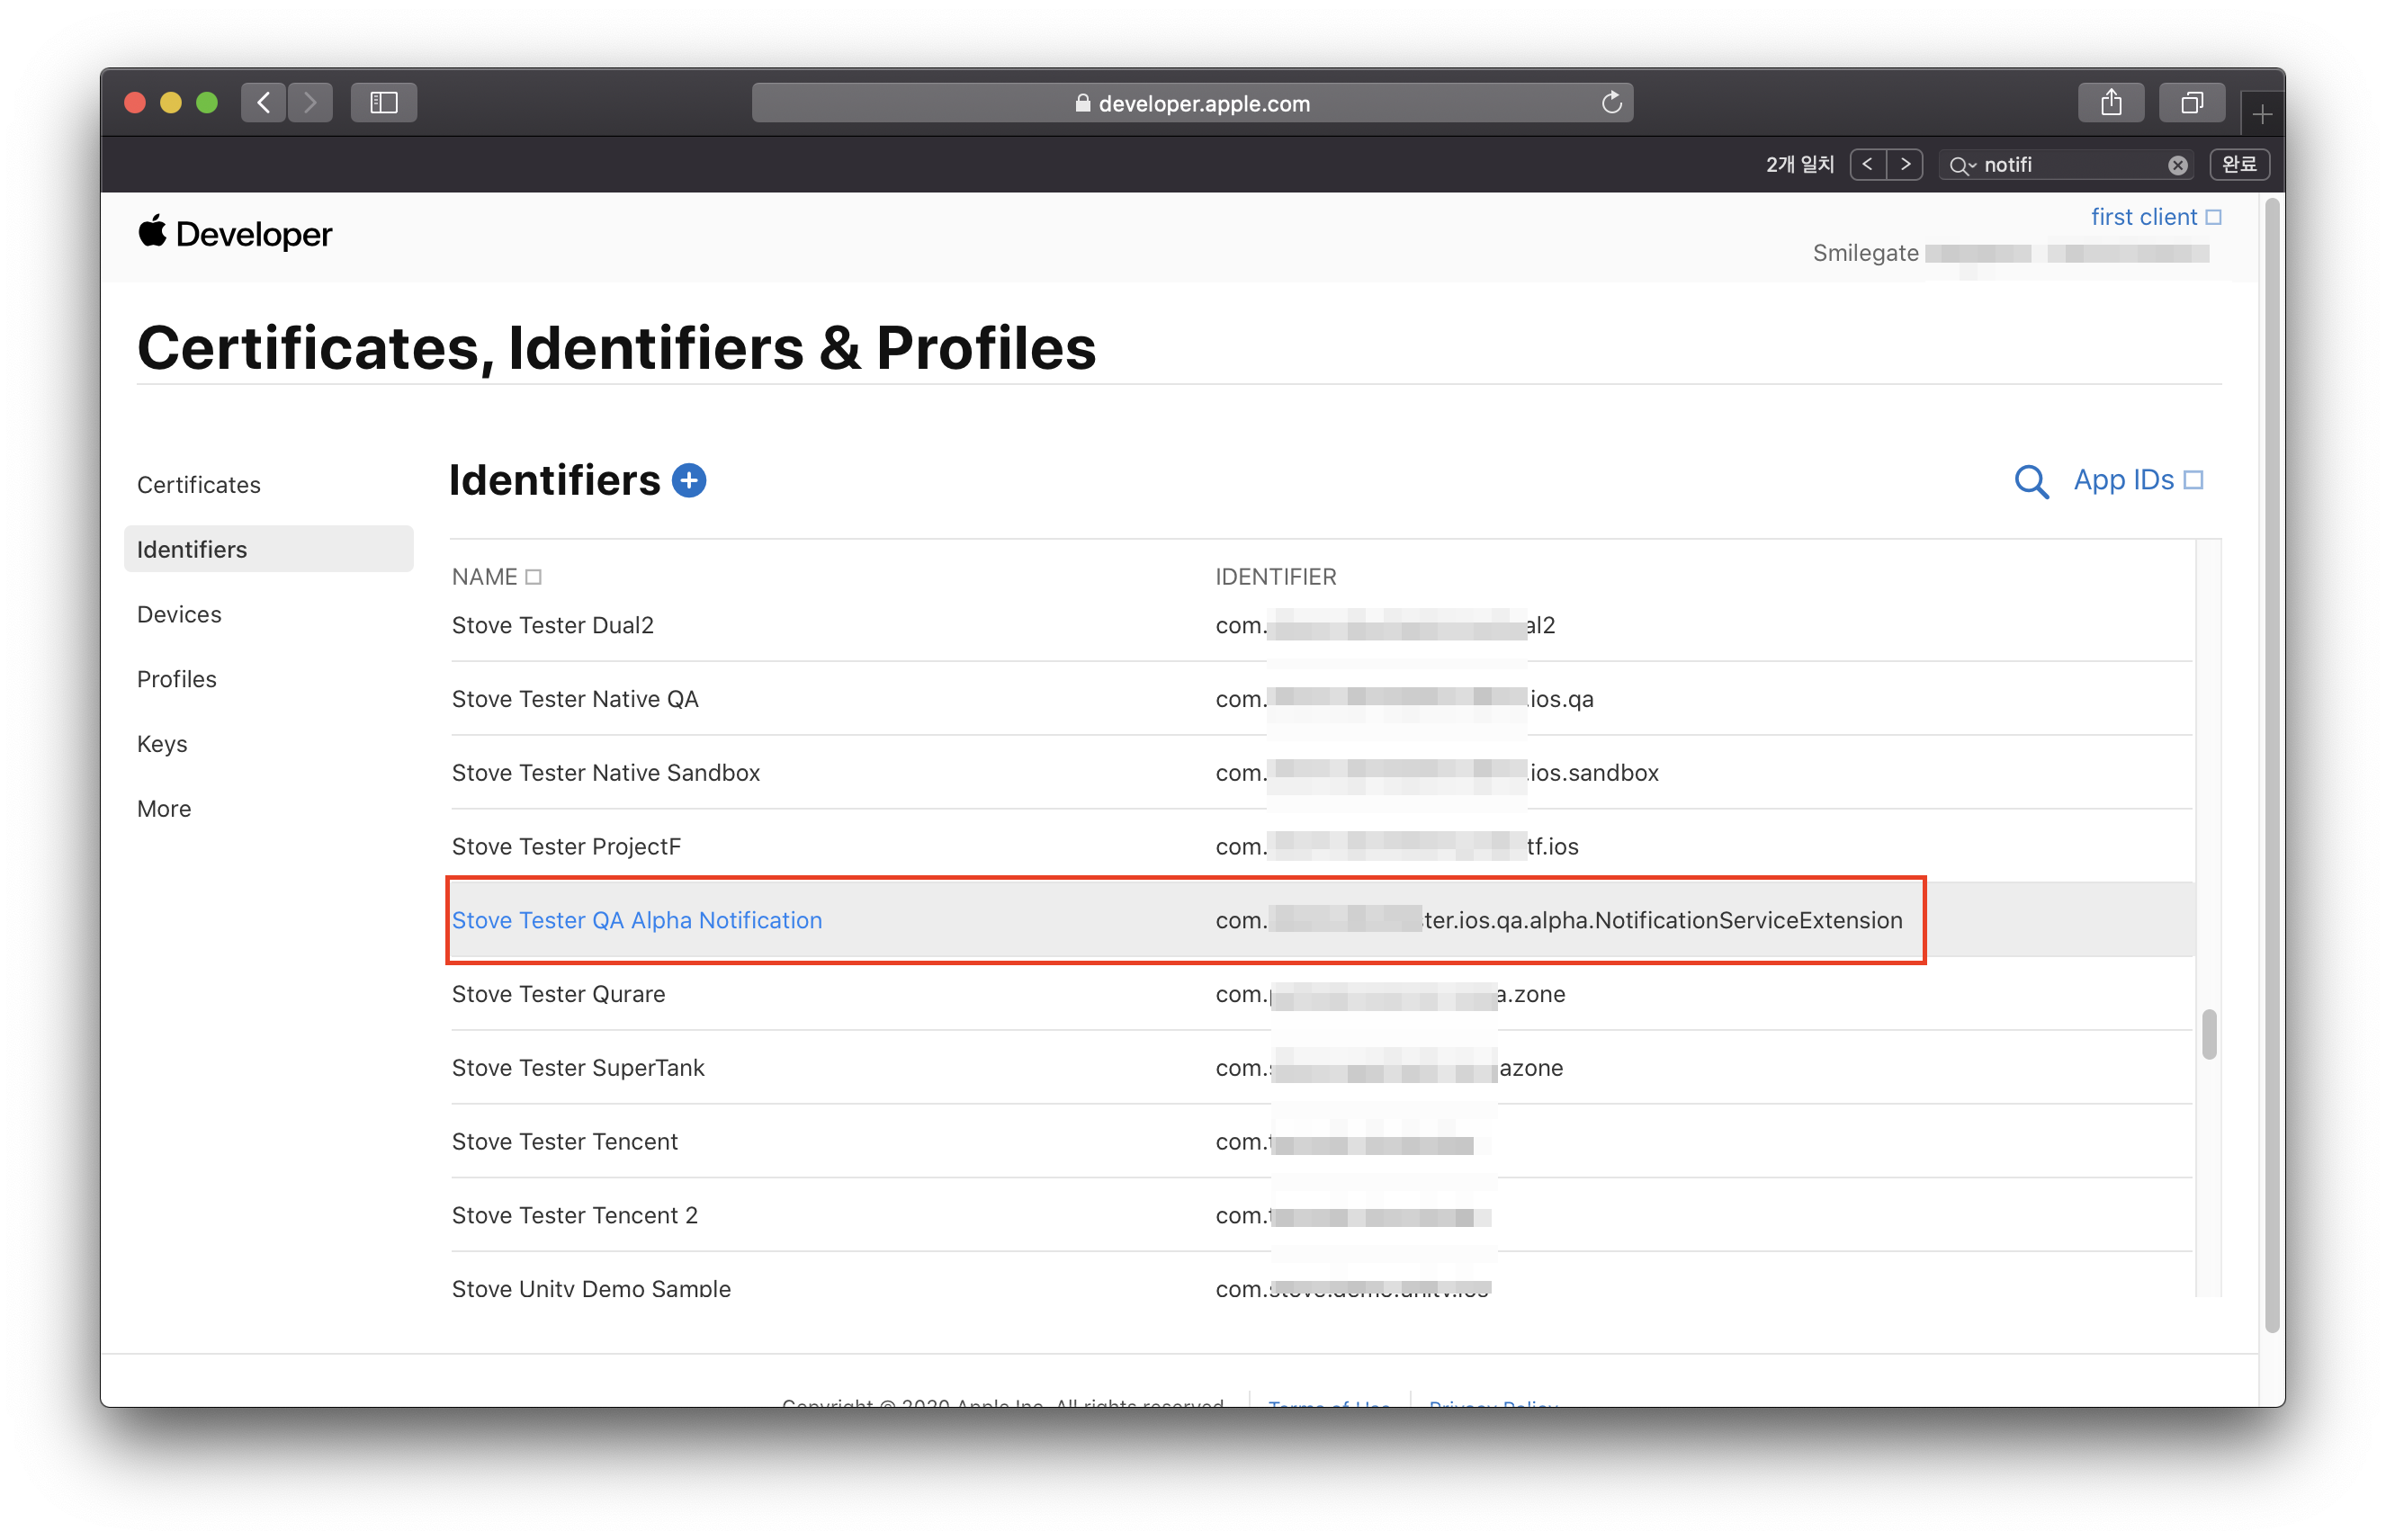
- 7. Start creating a Profile
- Select Profiles in the left menu, then select Profiles +.
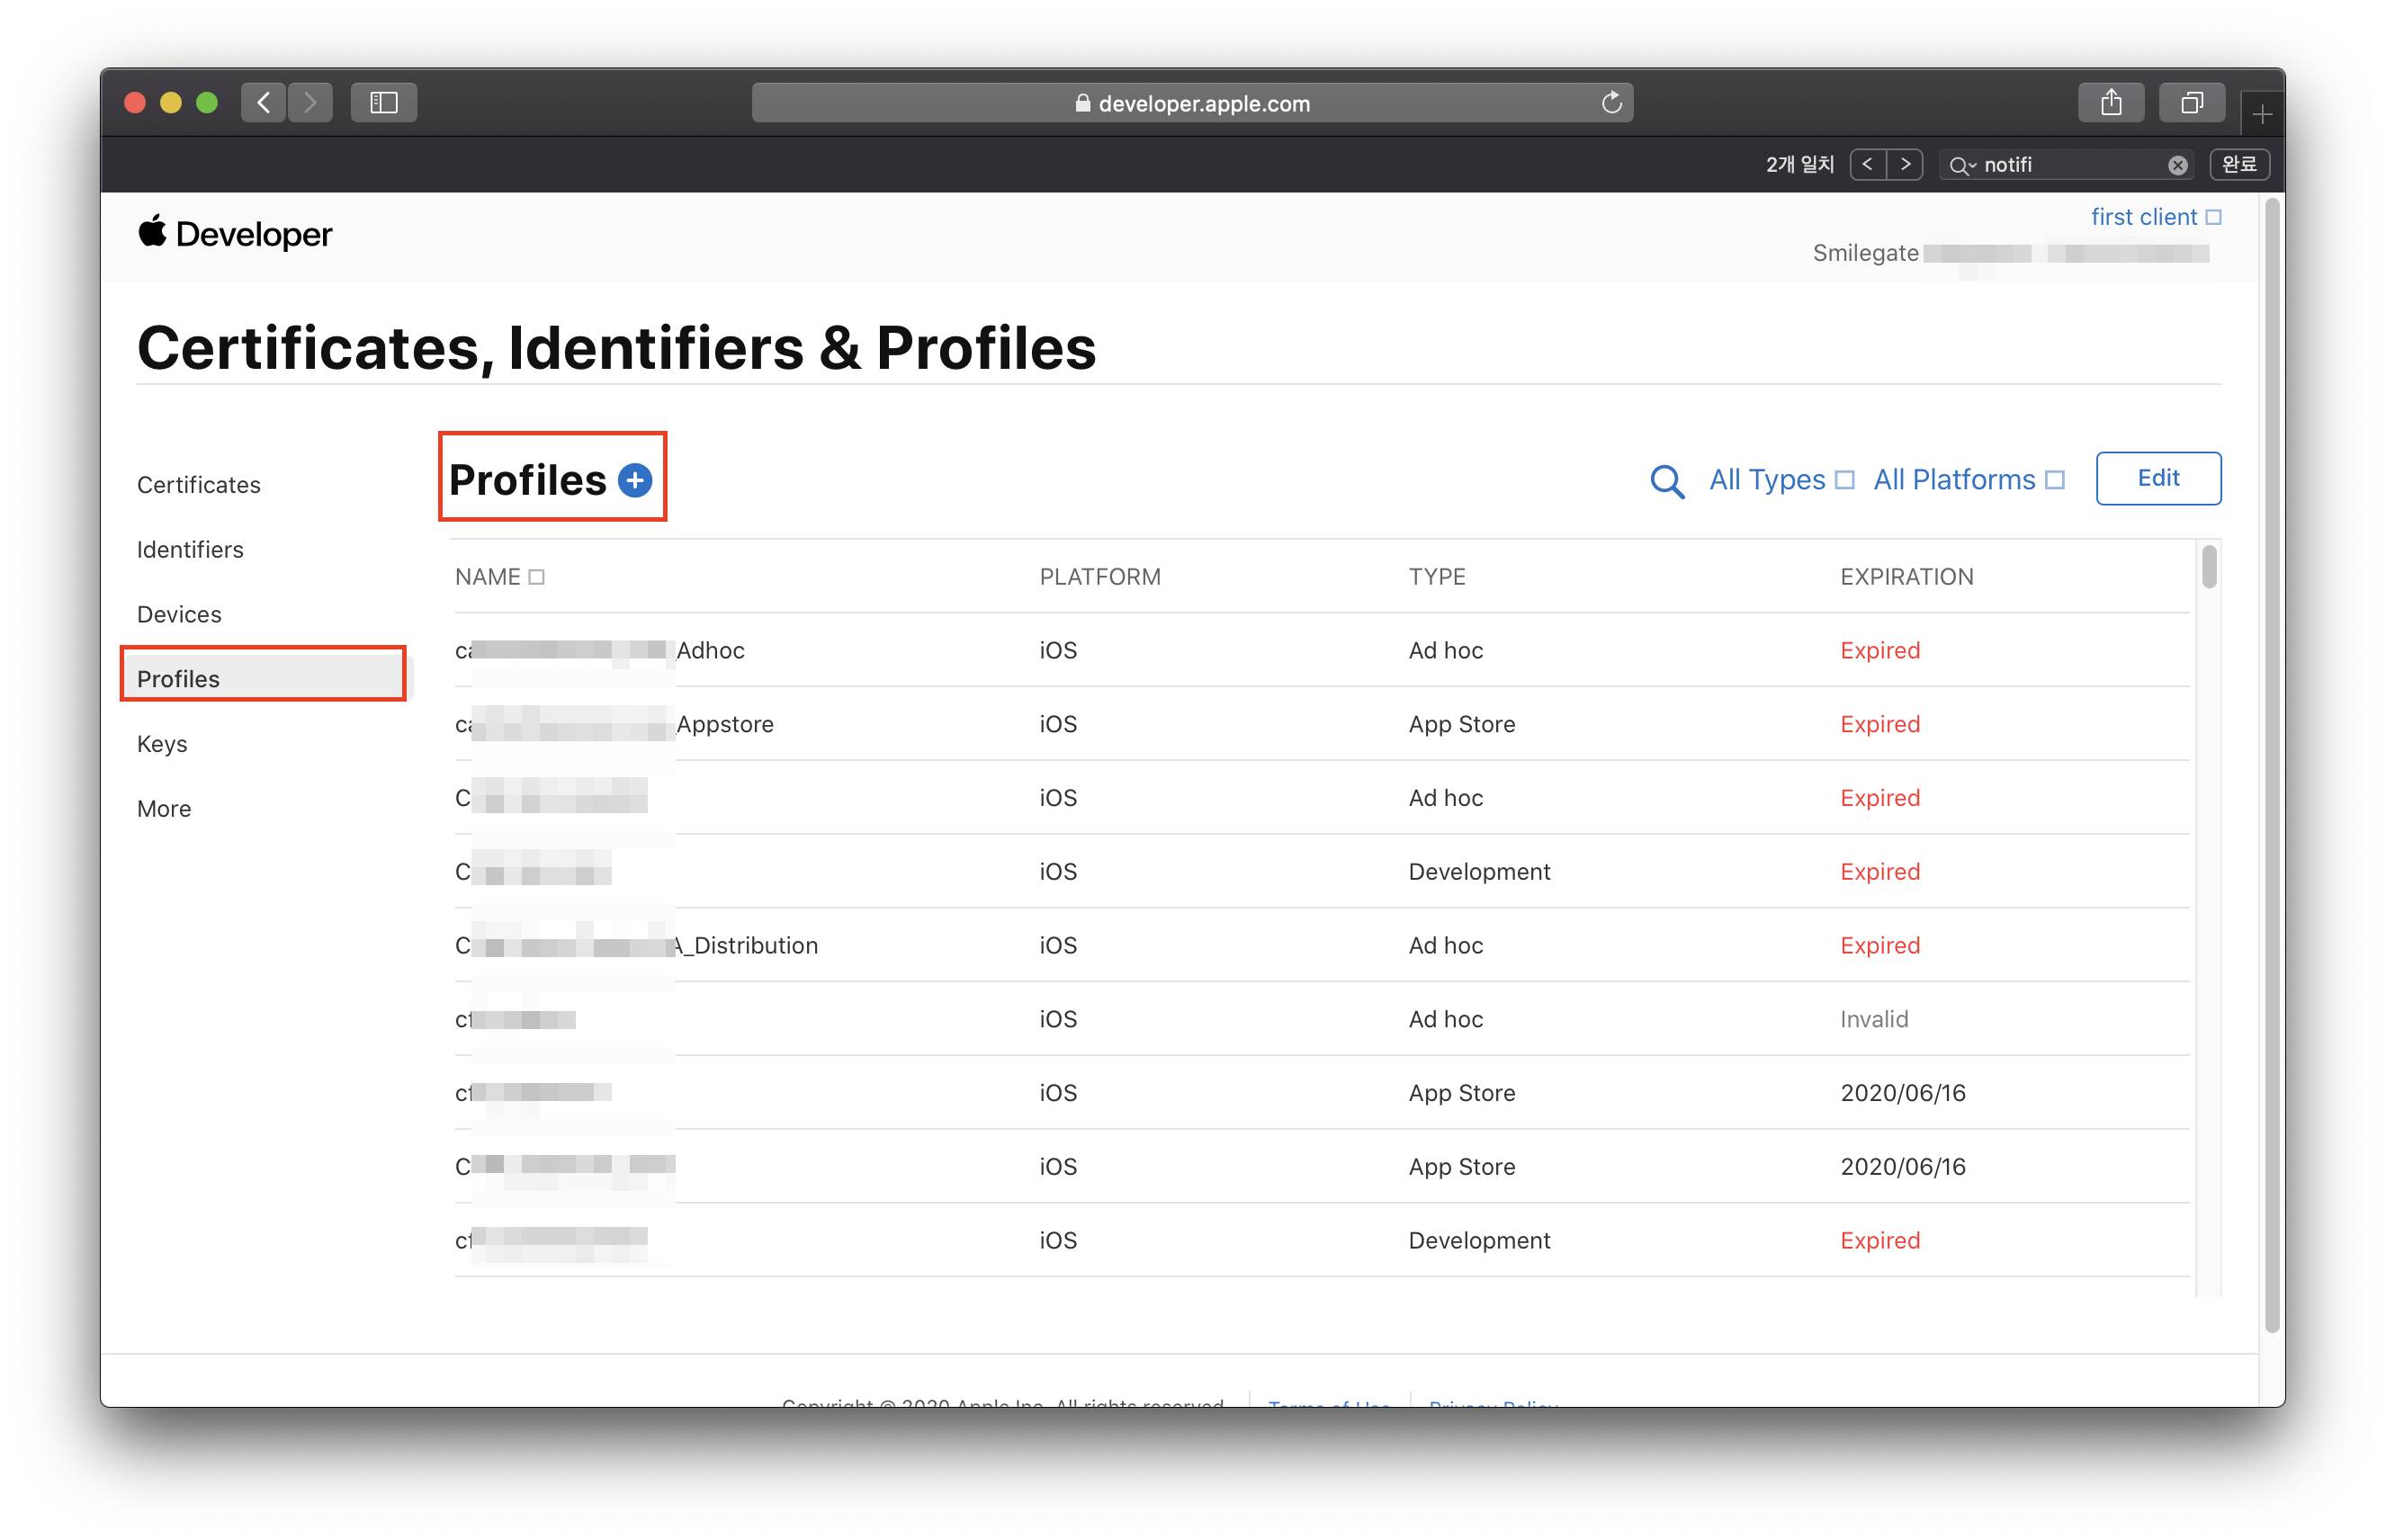
- 8. Select the Distribution type
- Under Distribution, choose the deployment method such as Ad Hoc or App Store, then click Continue. (The guide below is based on Ad Hoc.)
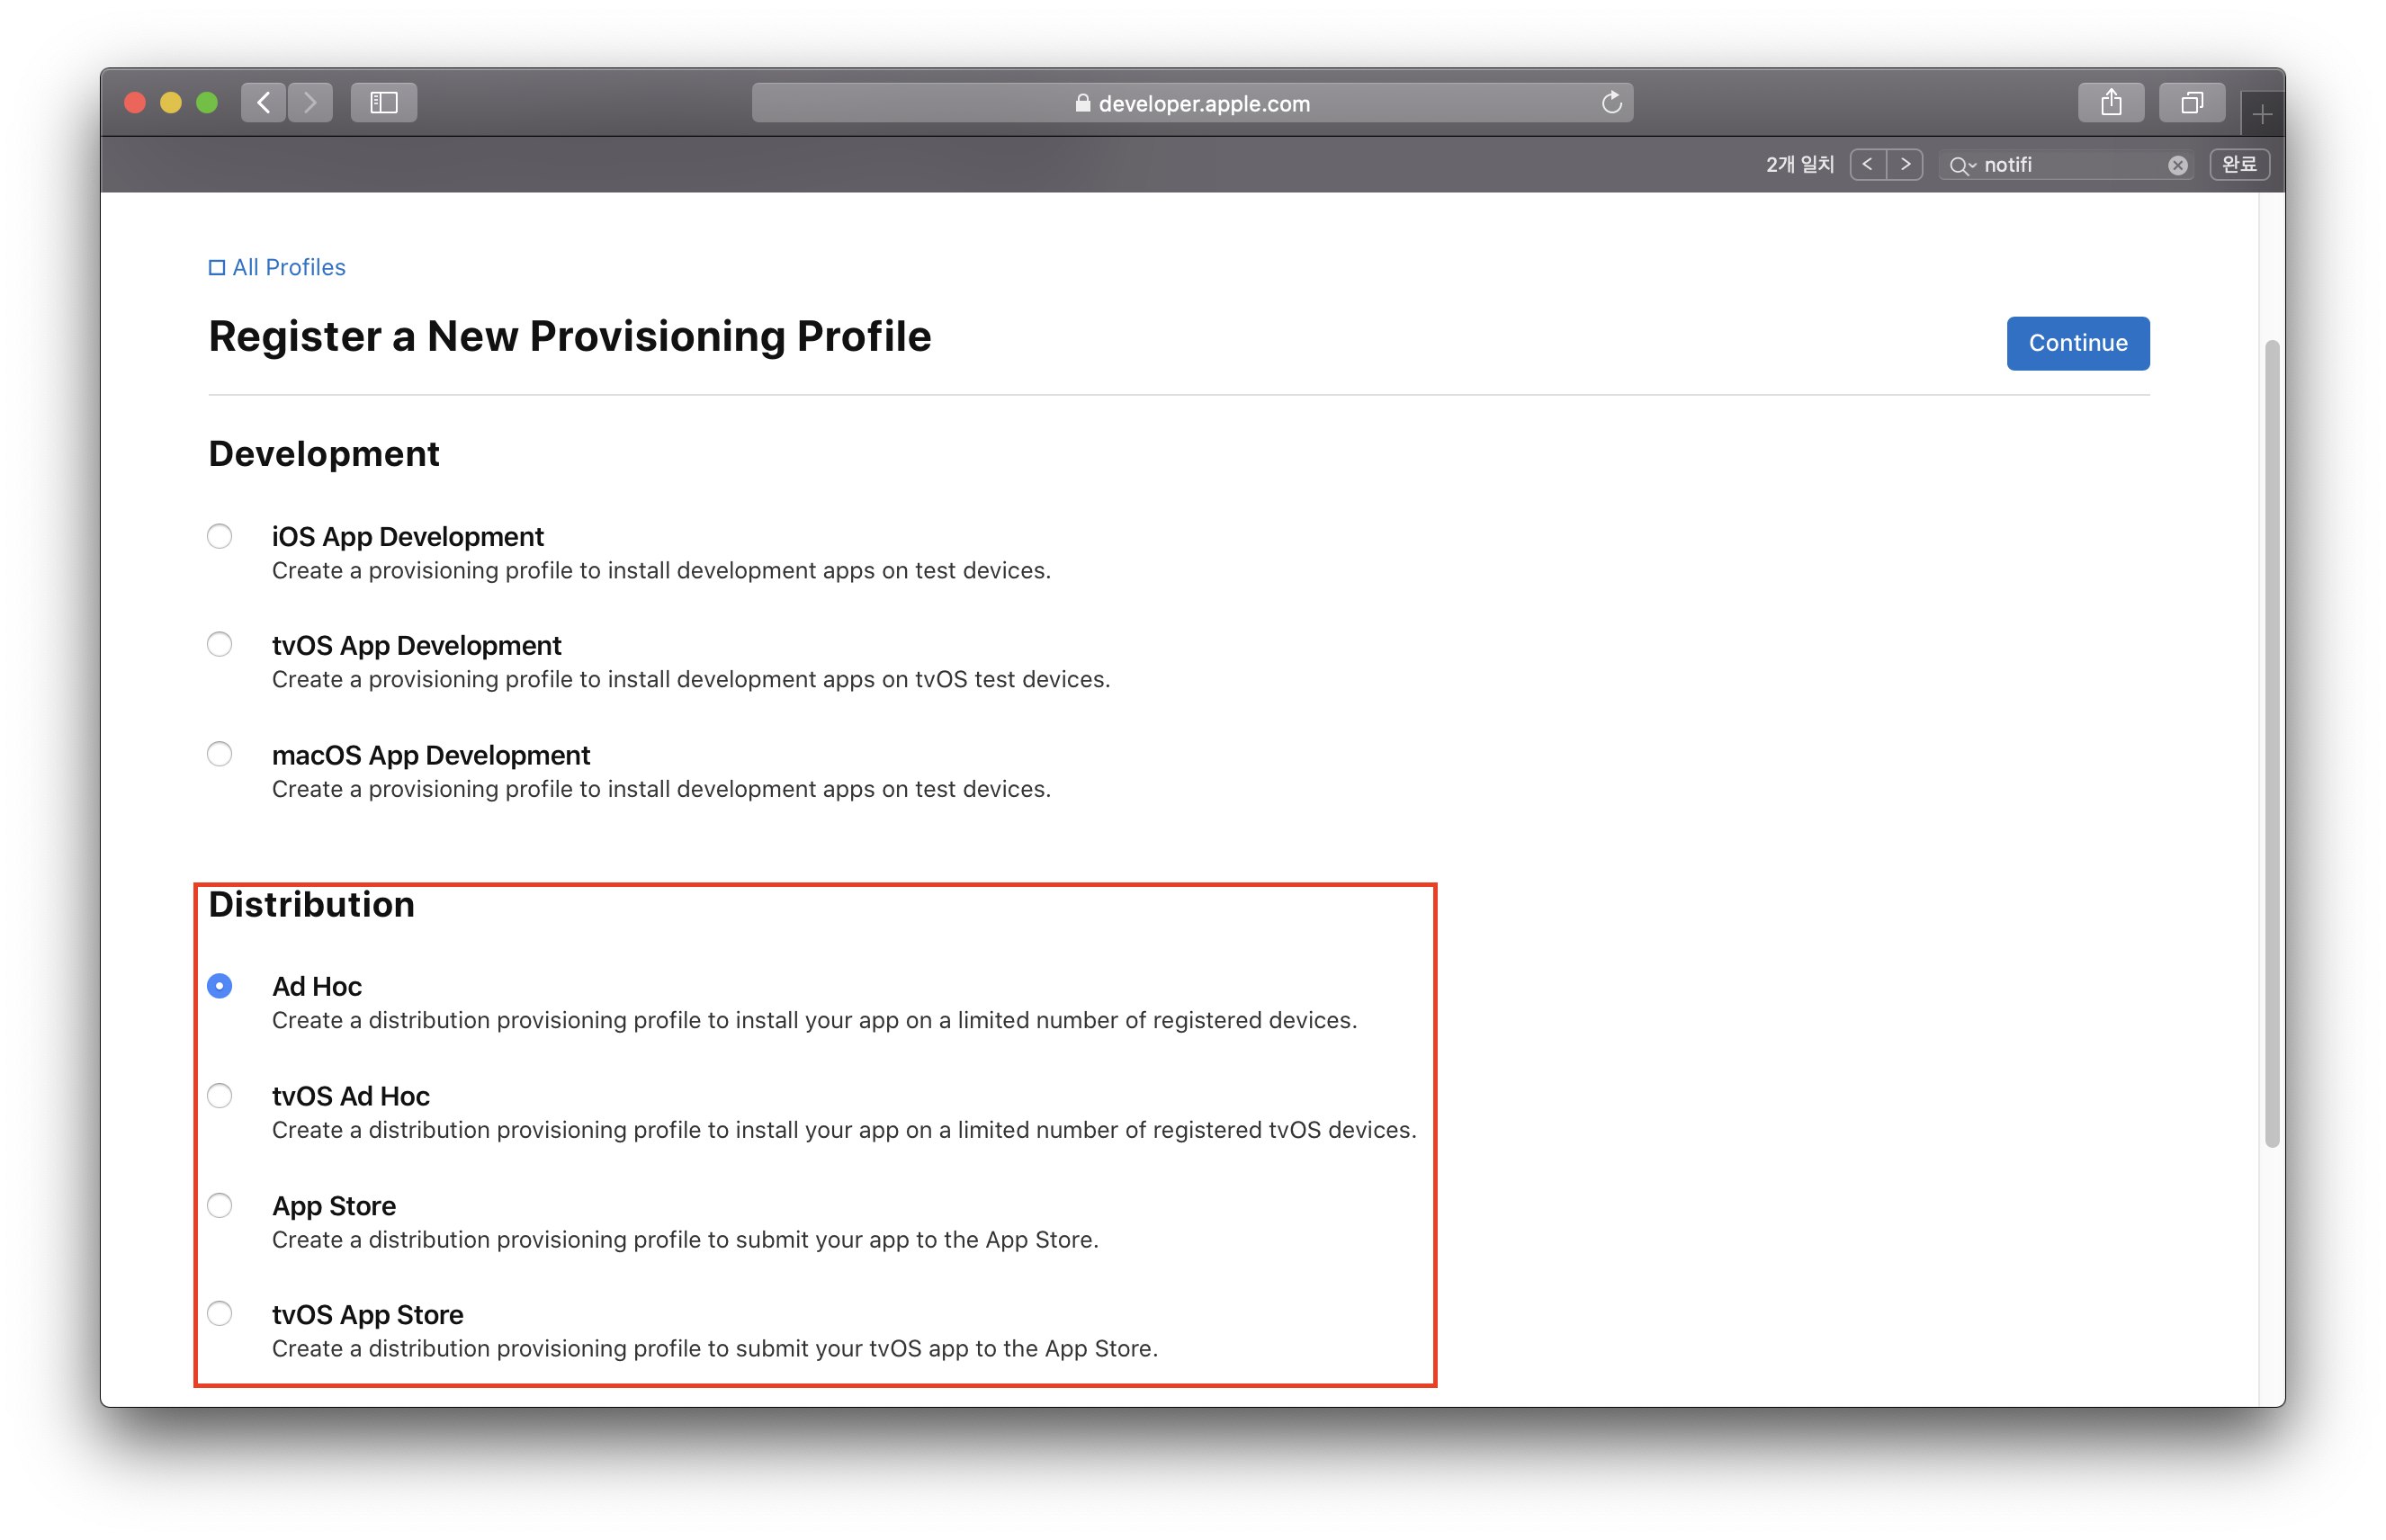
- 9. Select the App ID
- Under App ID, select the ID value you created above, then click Continue.
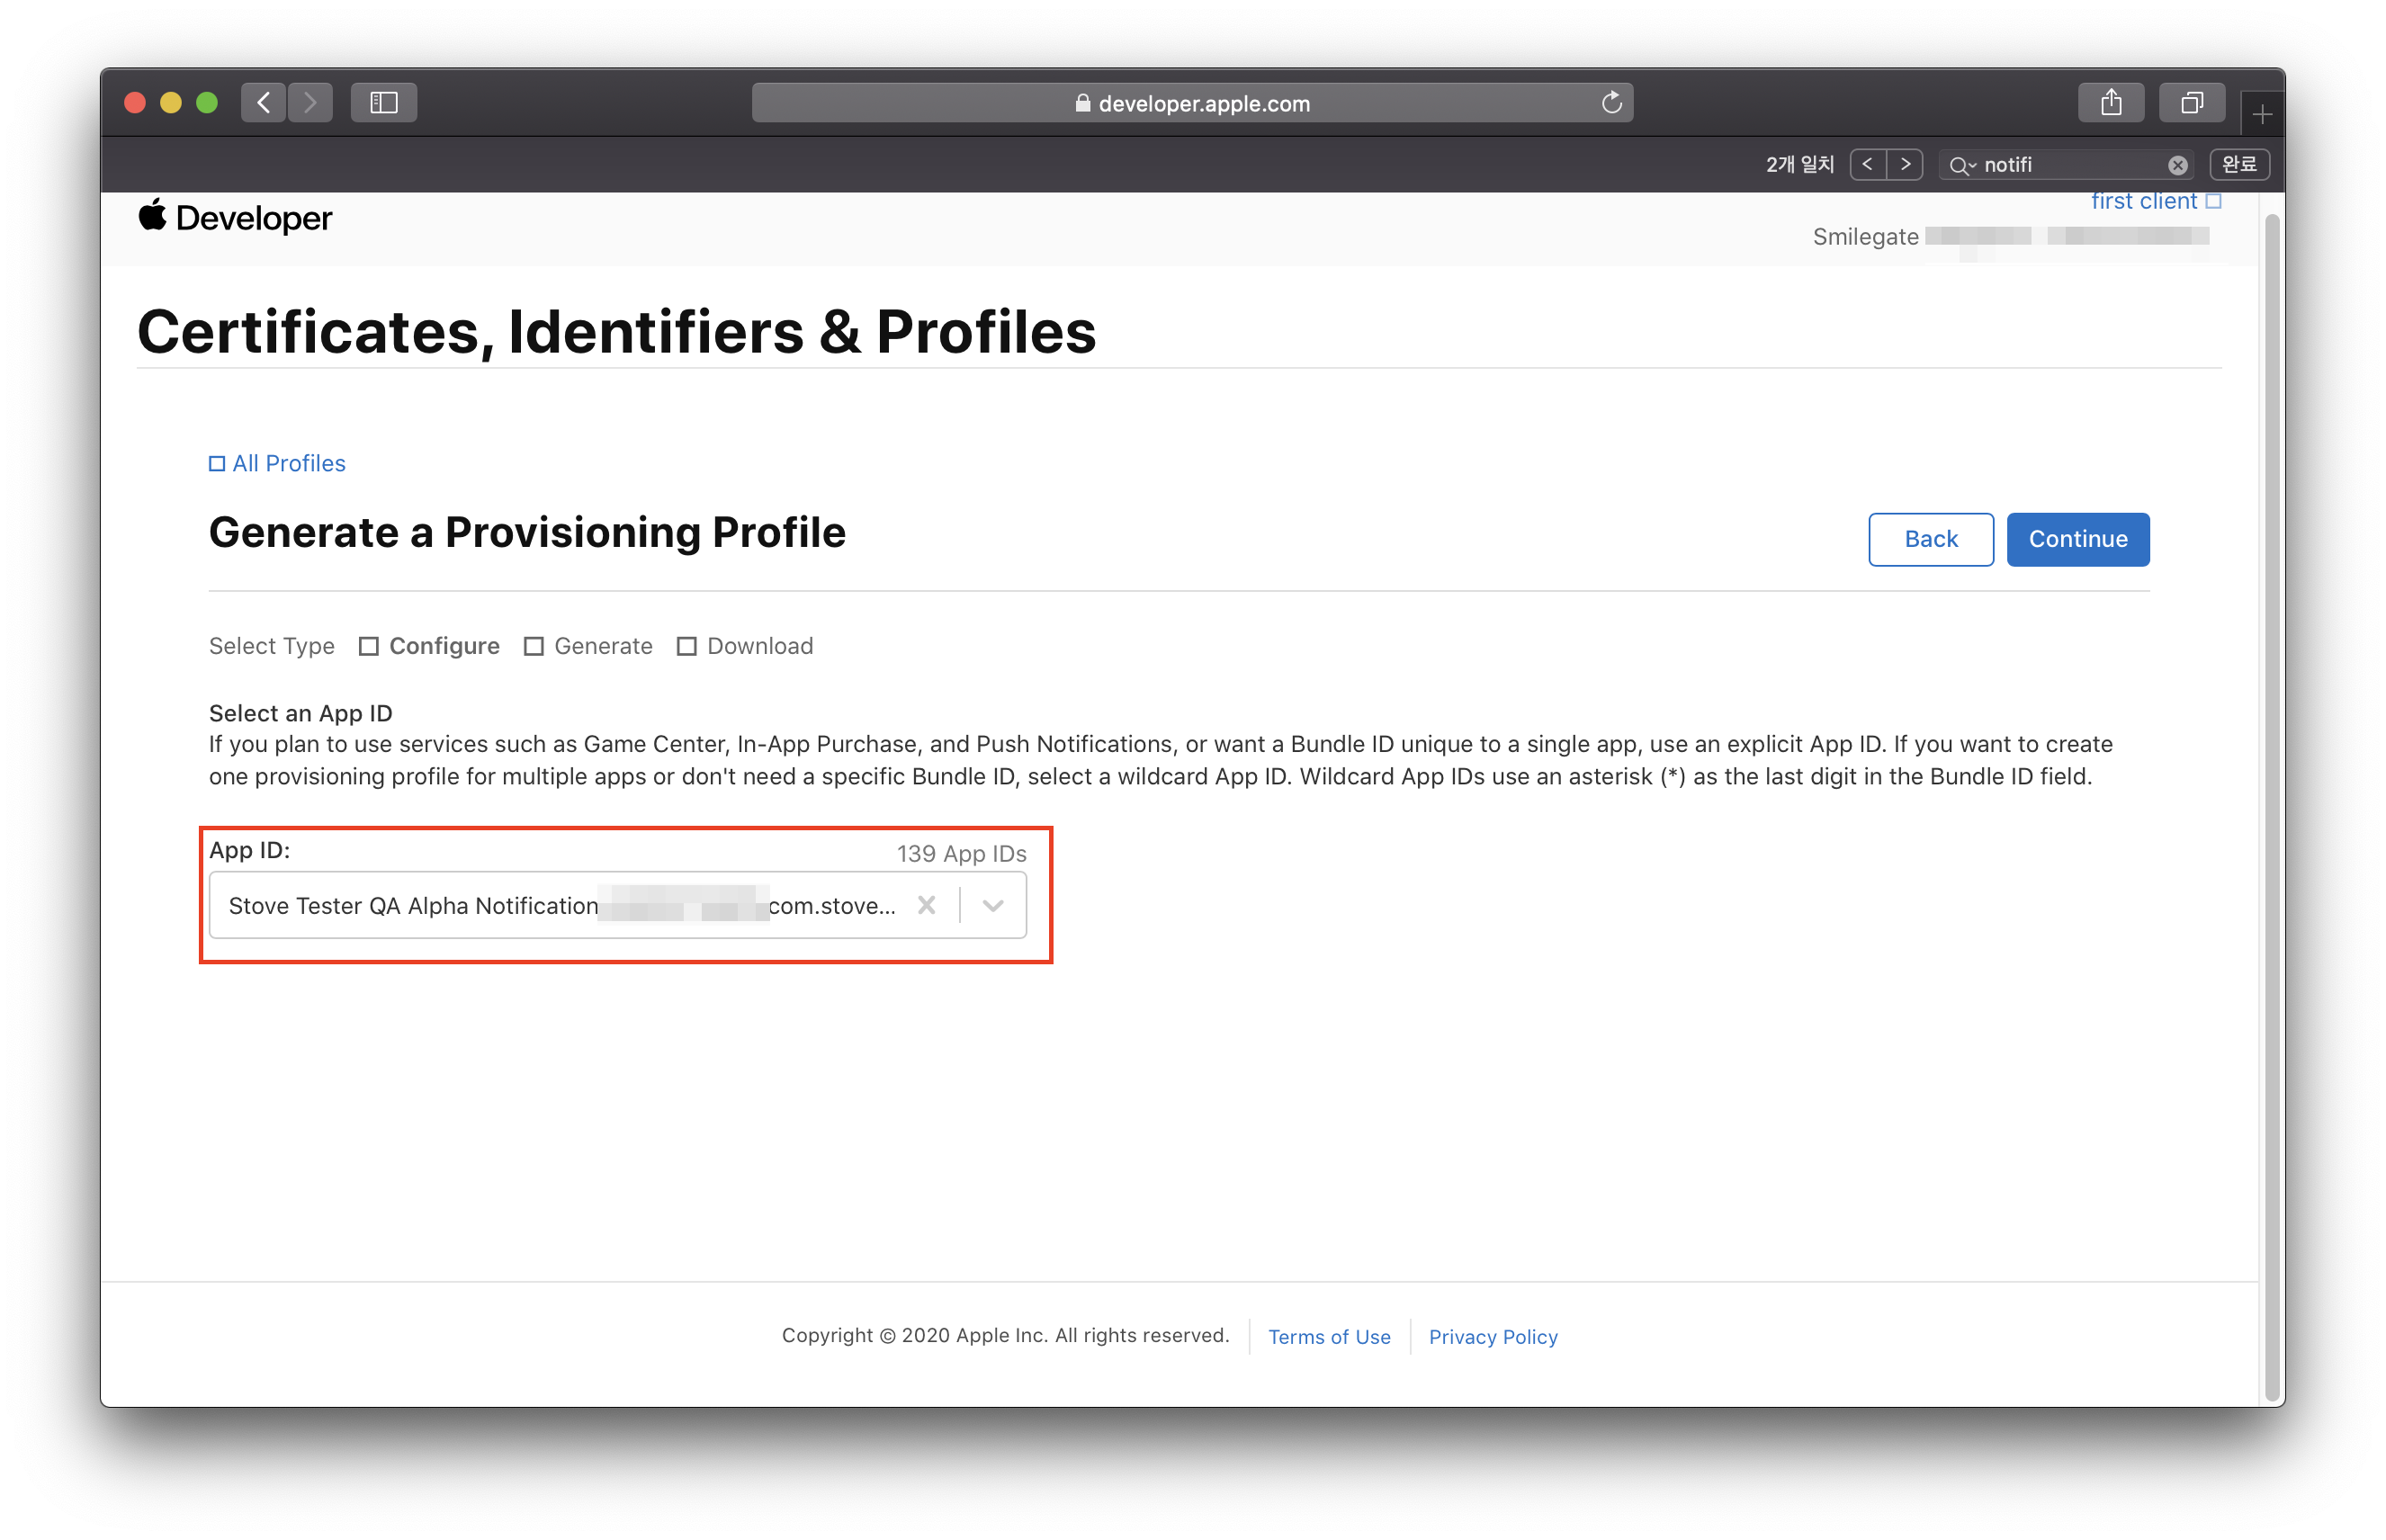
- 10. Select a certificate
- Select the certificate that matches the Provisioning Profile, then click Continue.
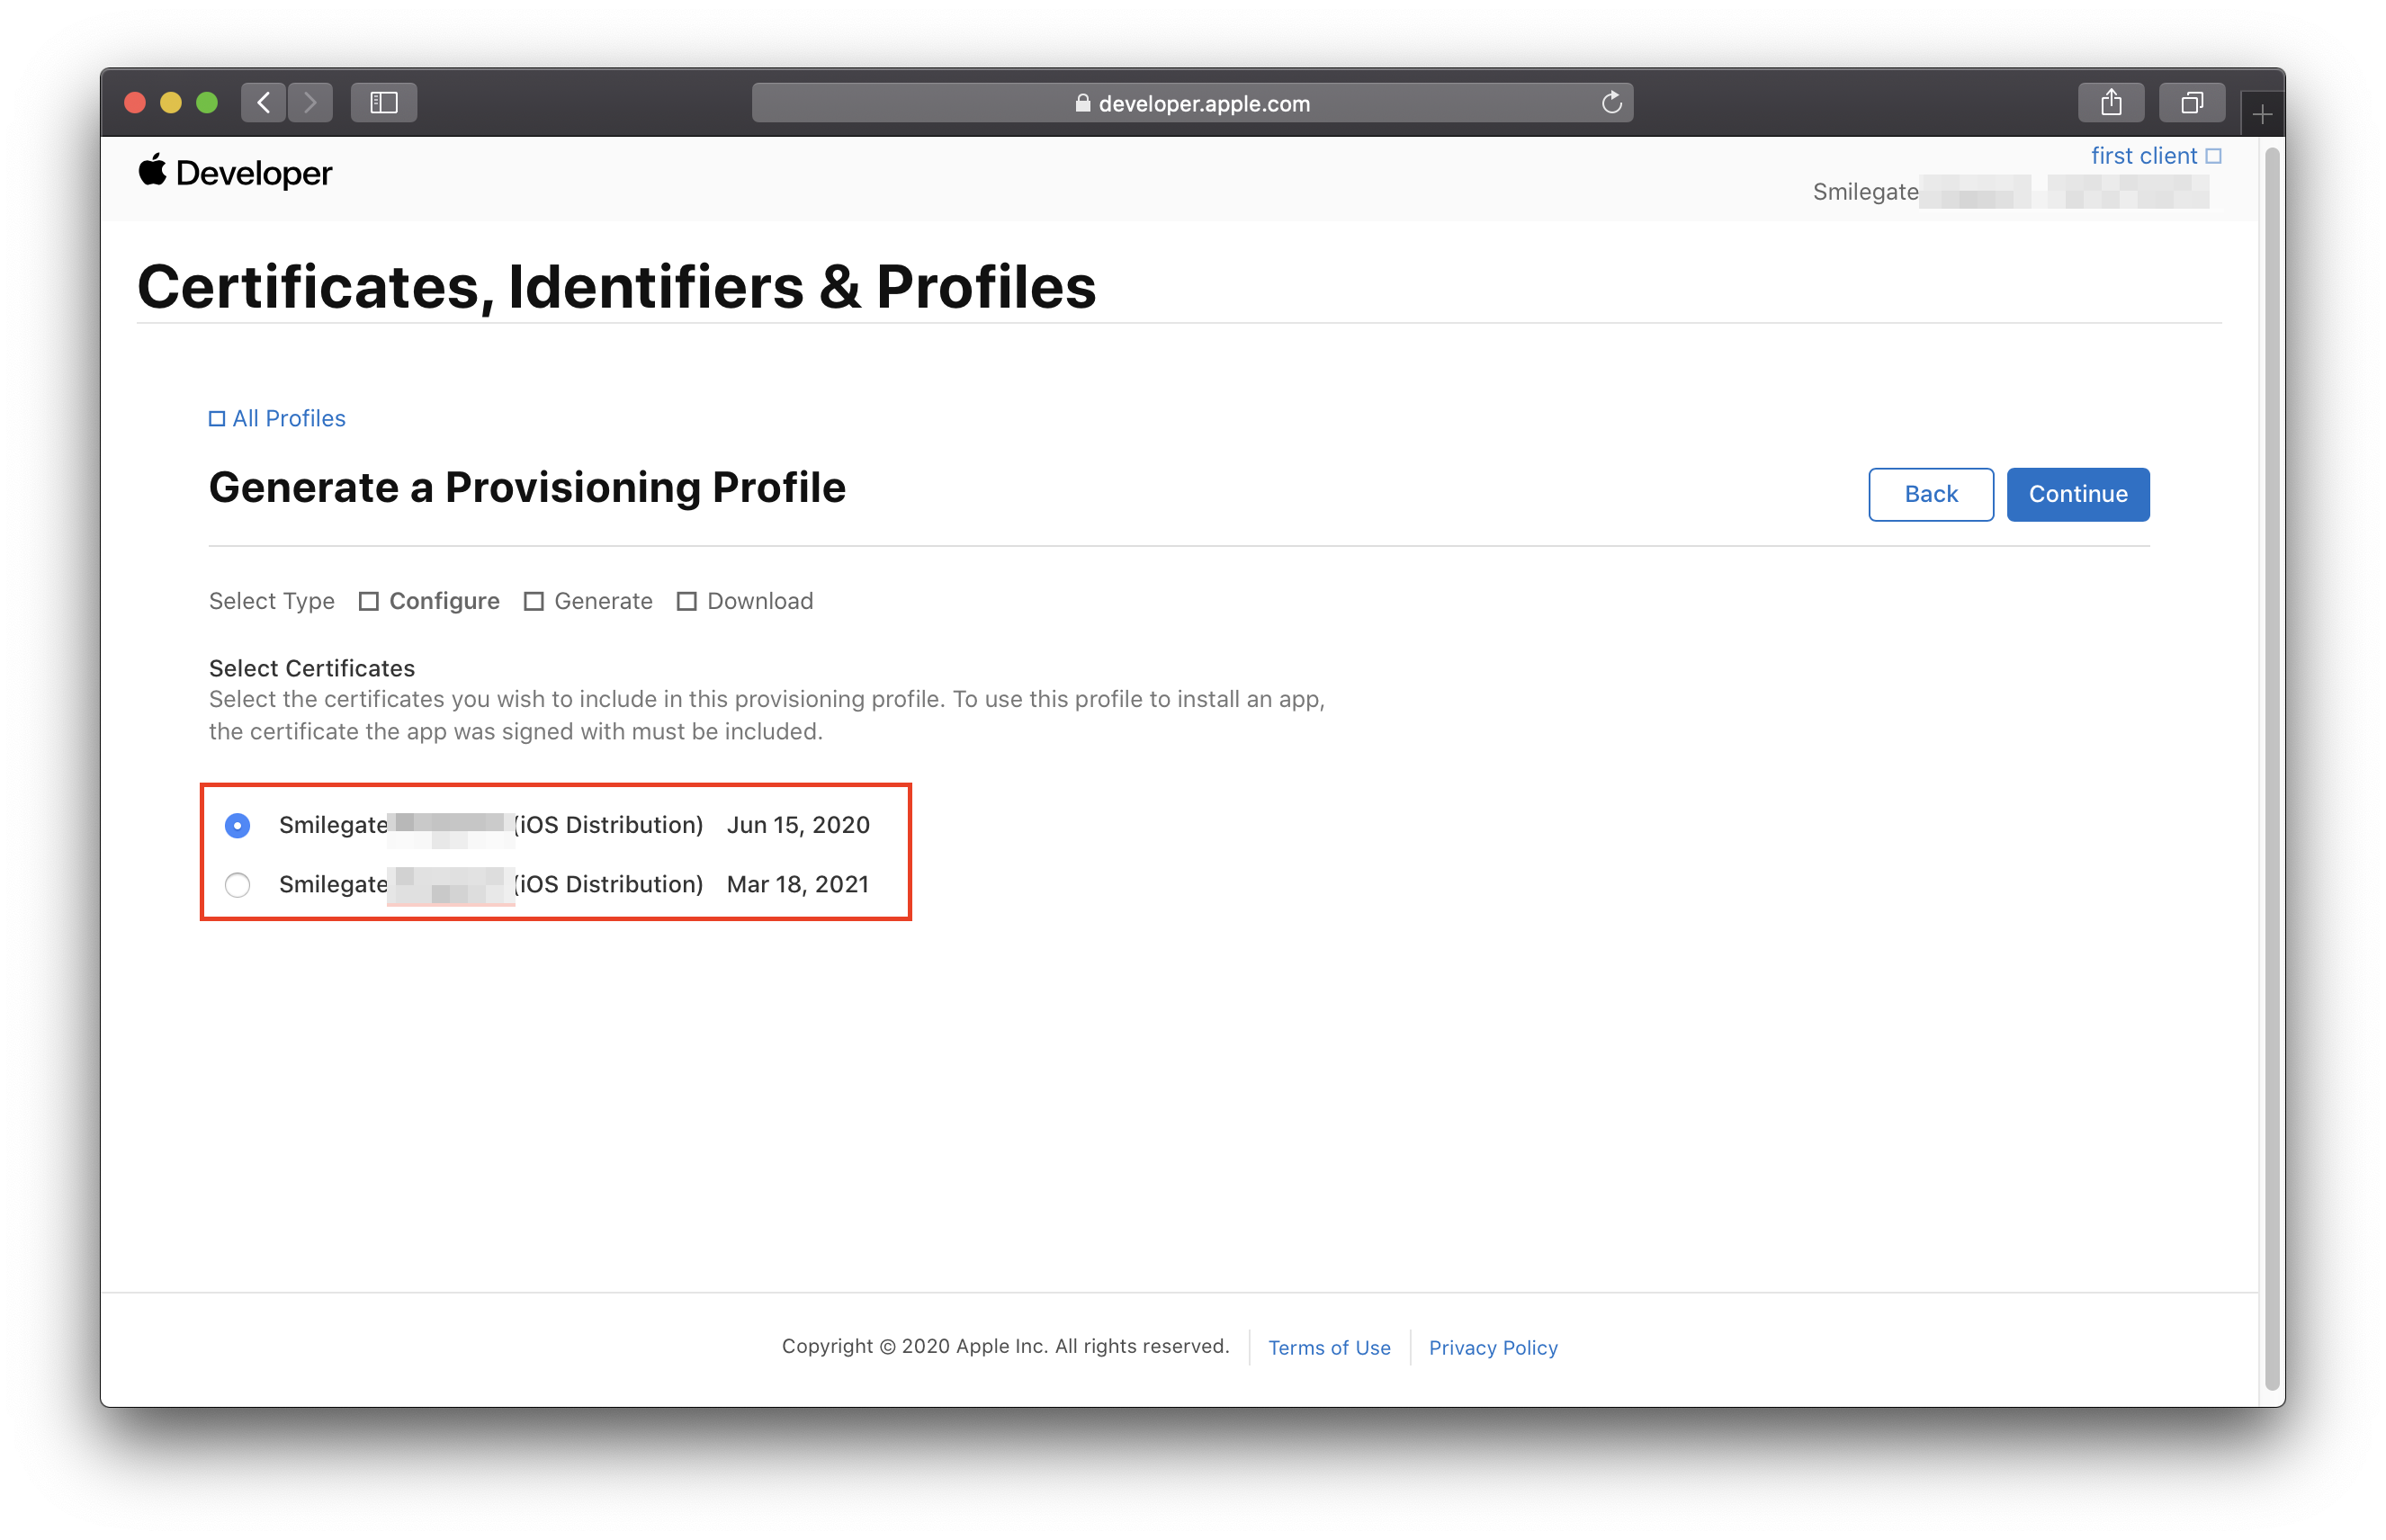
- 11. Enter the Profile name and create it
- Enter the Provisioning Profile Name and click Generate.
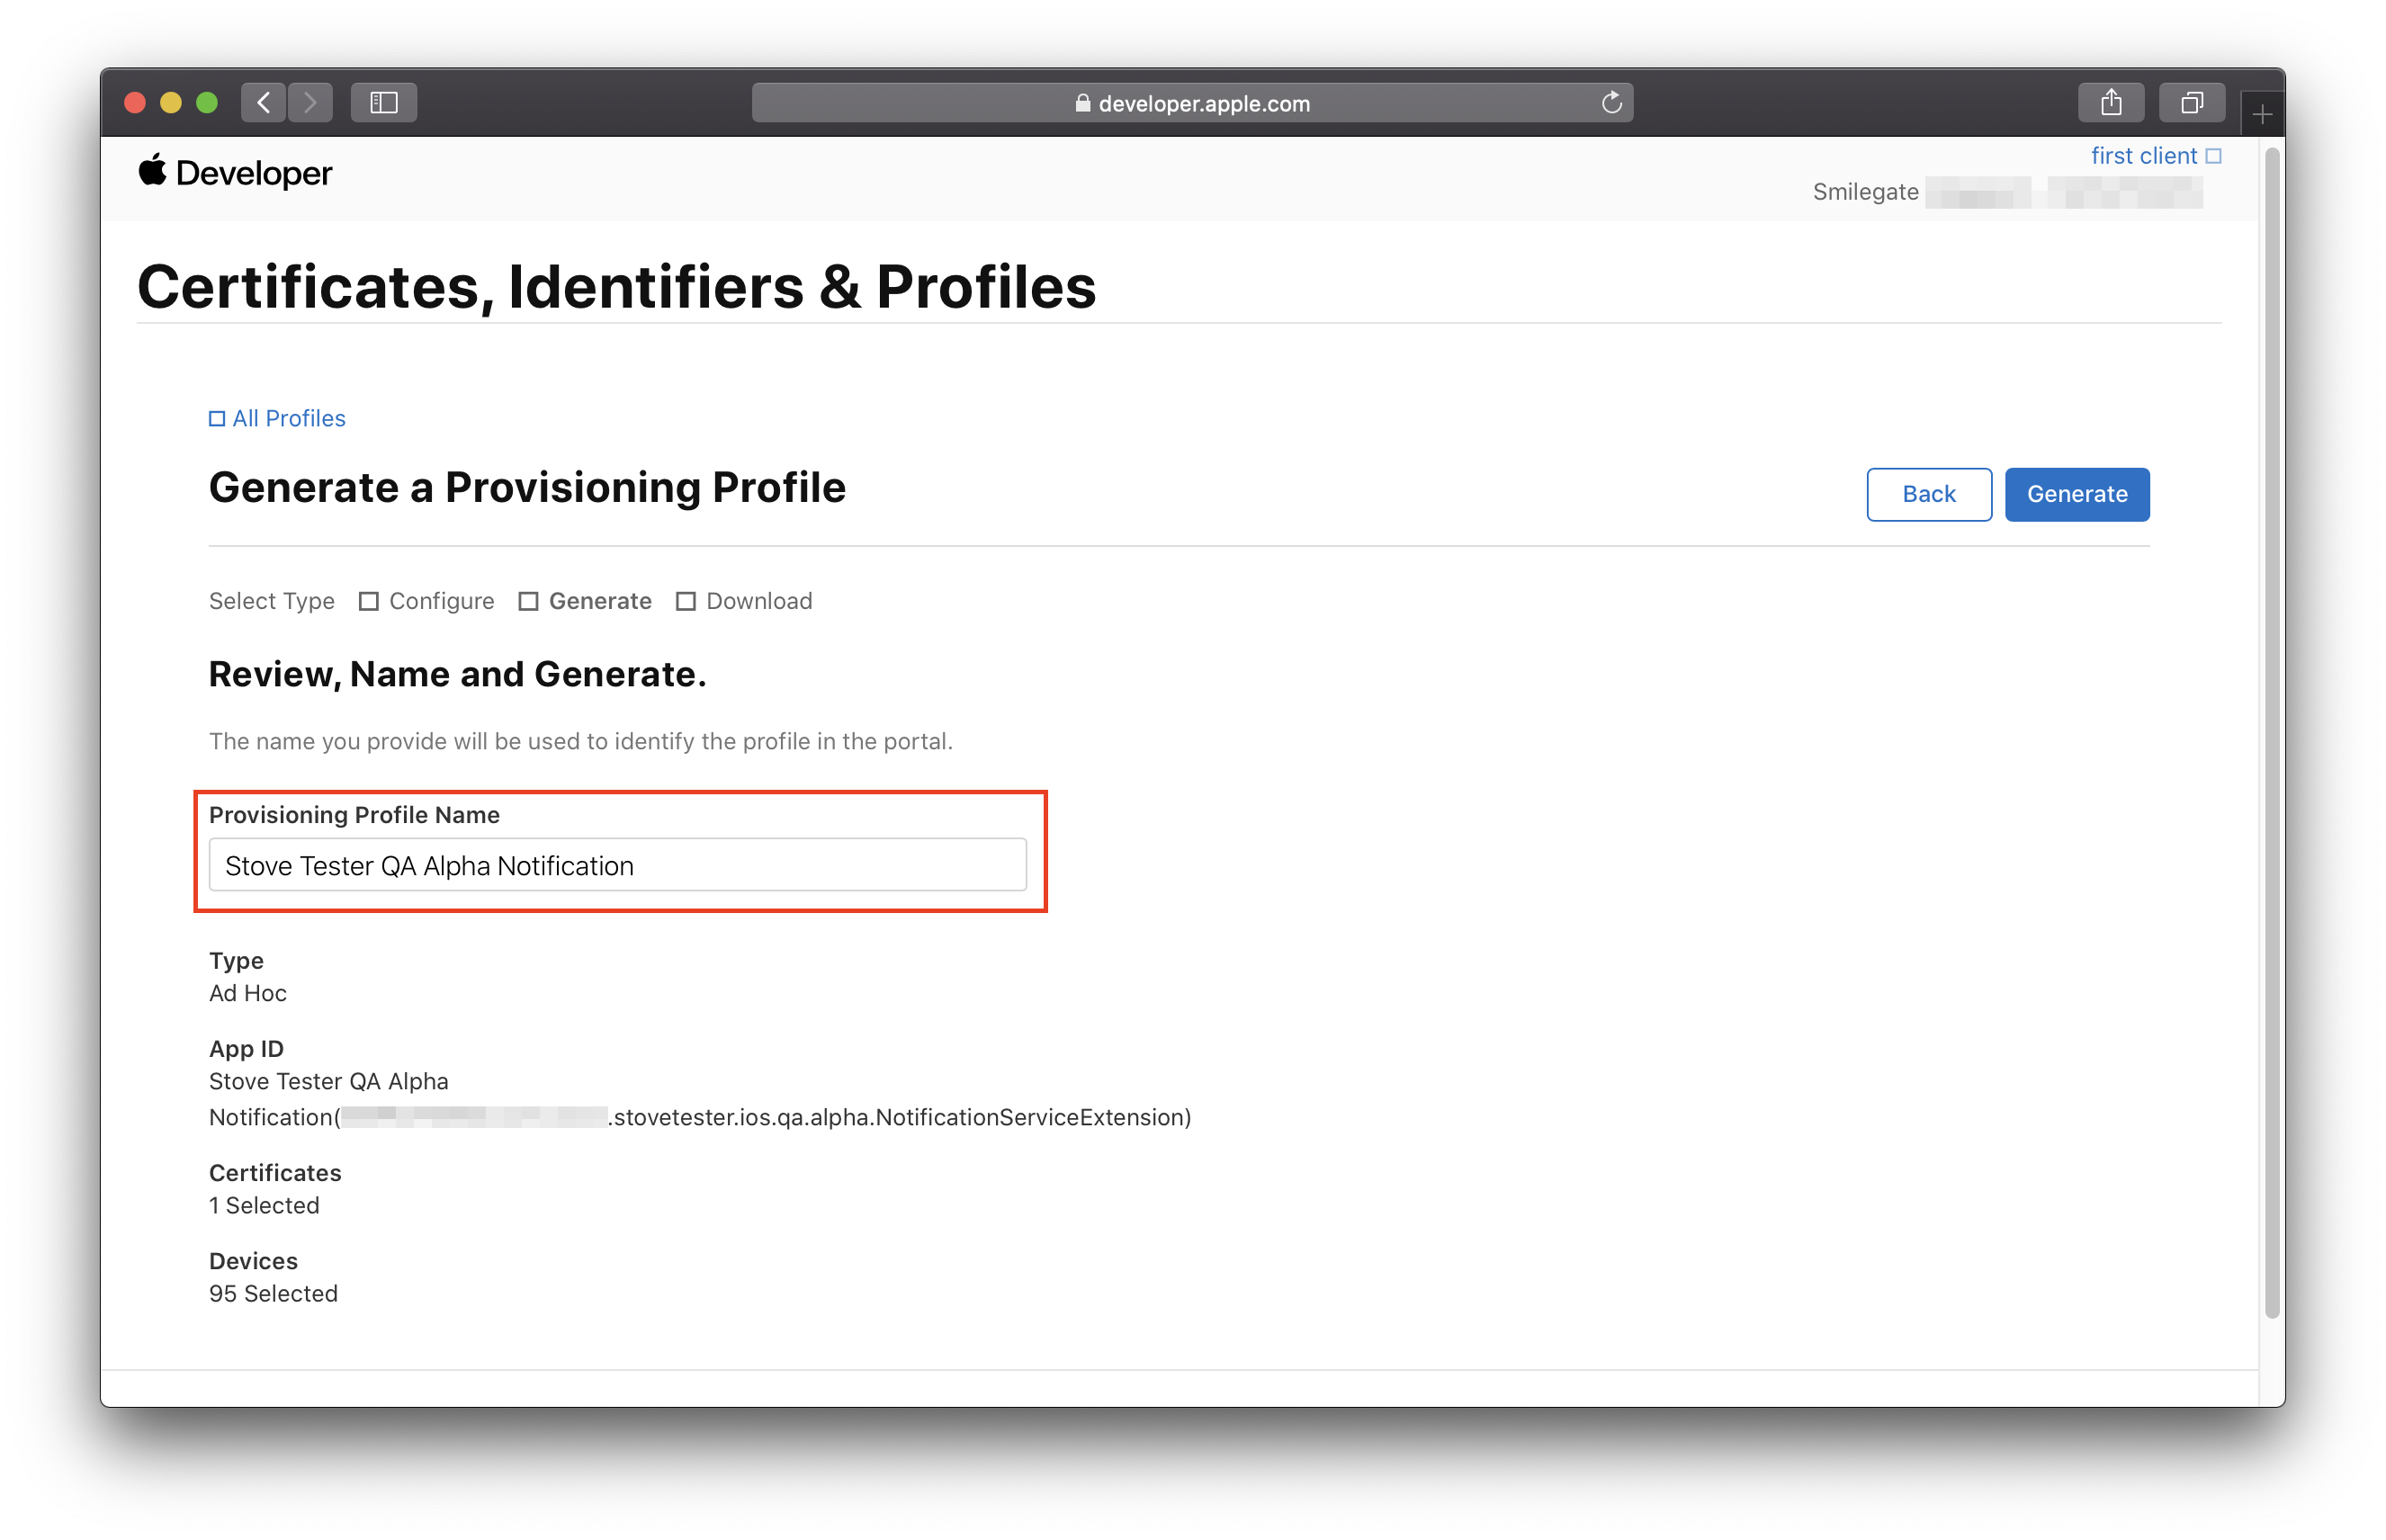
- 12. Download the Profile
- Check the created Provisioning Profile on the Profiles page, then click Download to save it locally.
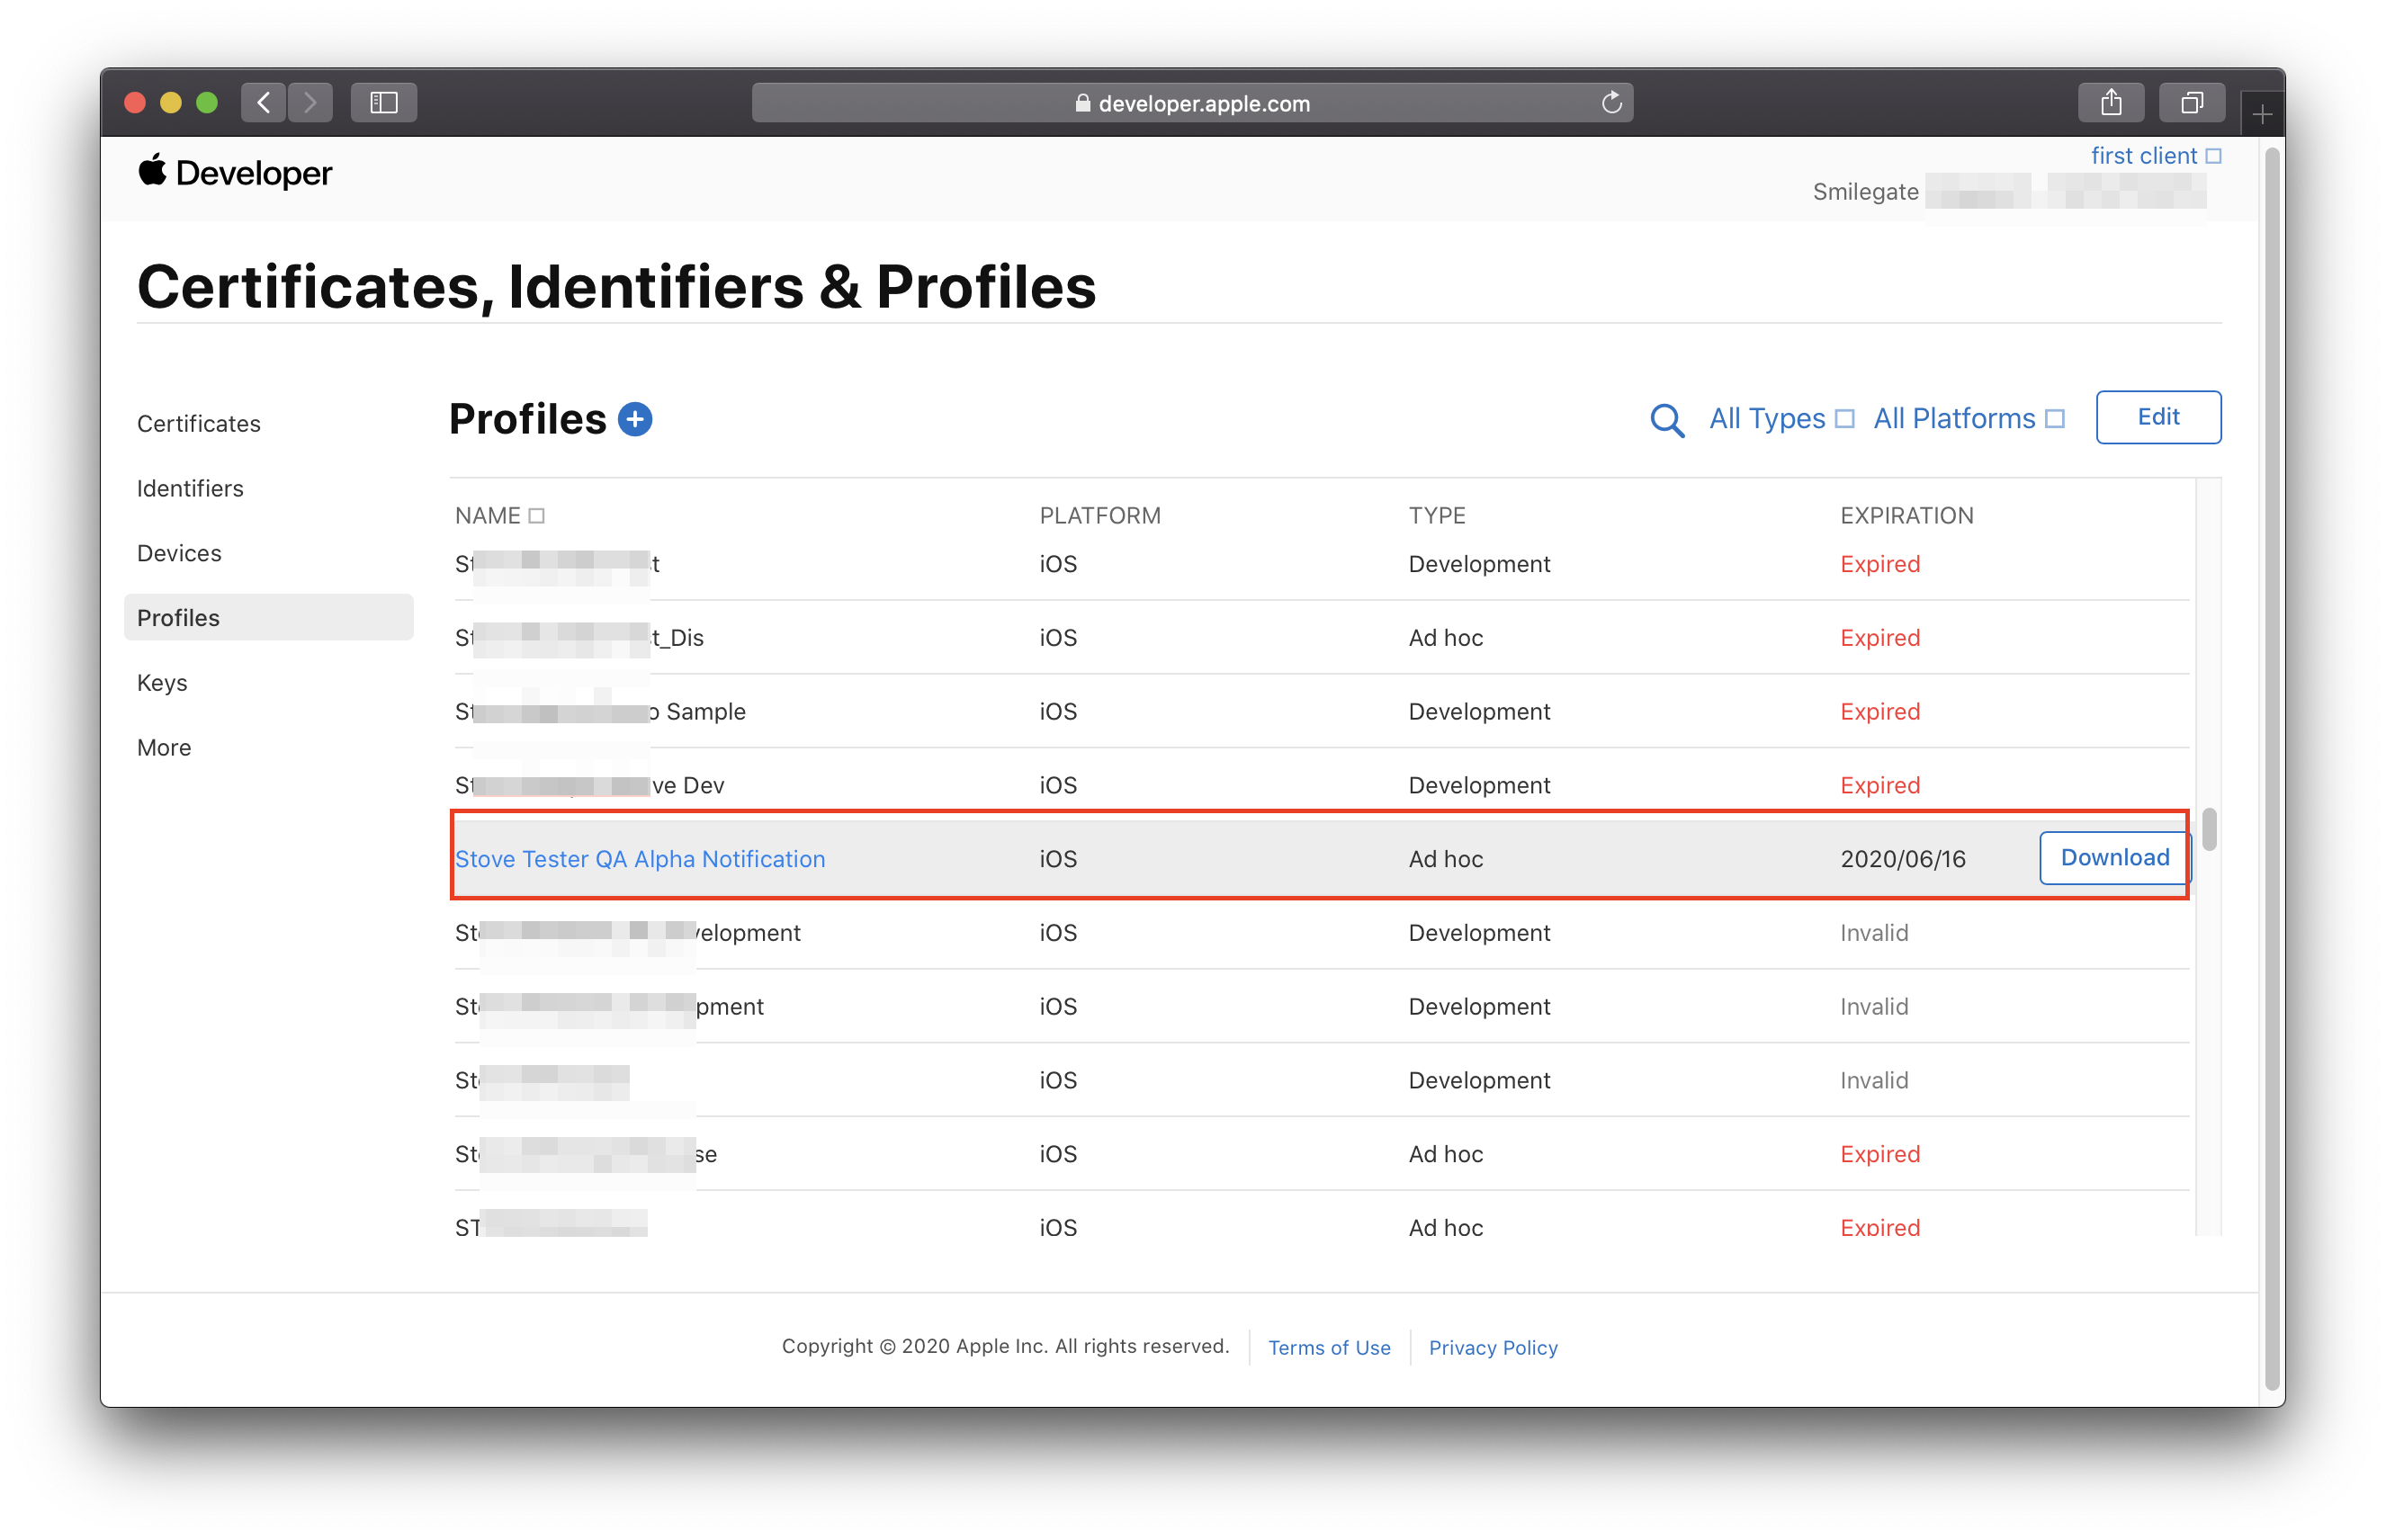
- 13. Add the Profile to Xcode
- Double-click the saved Provisioning Profile to add it to Xcode.
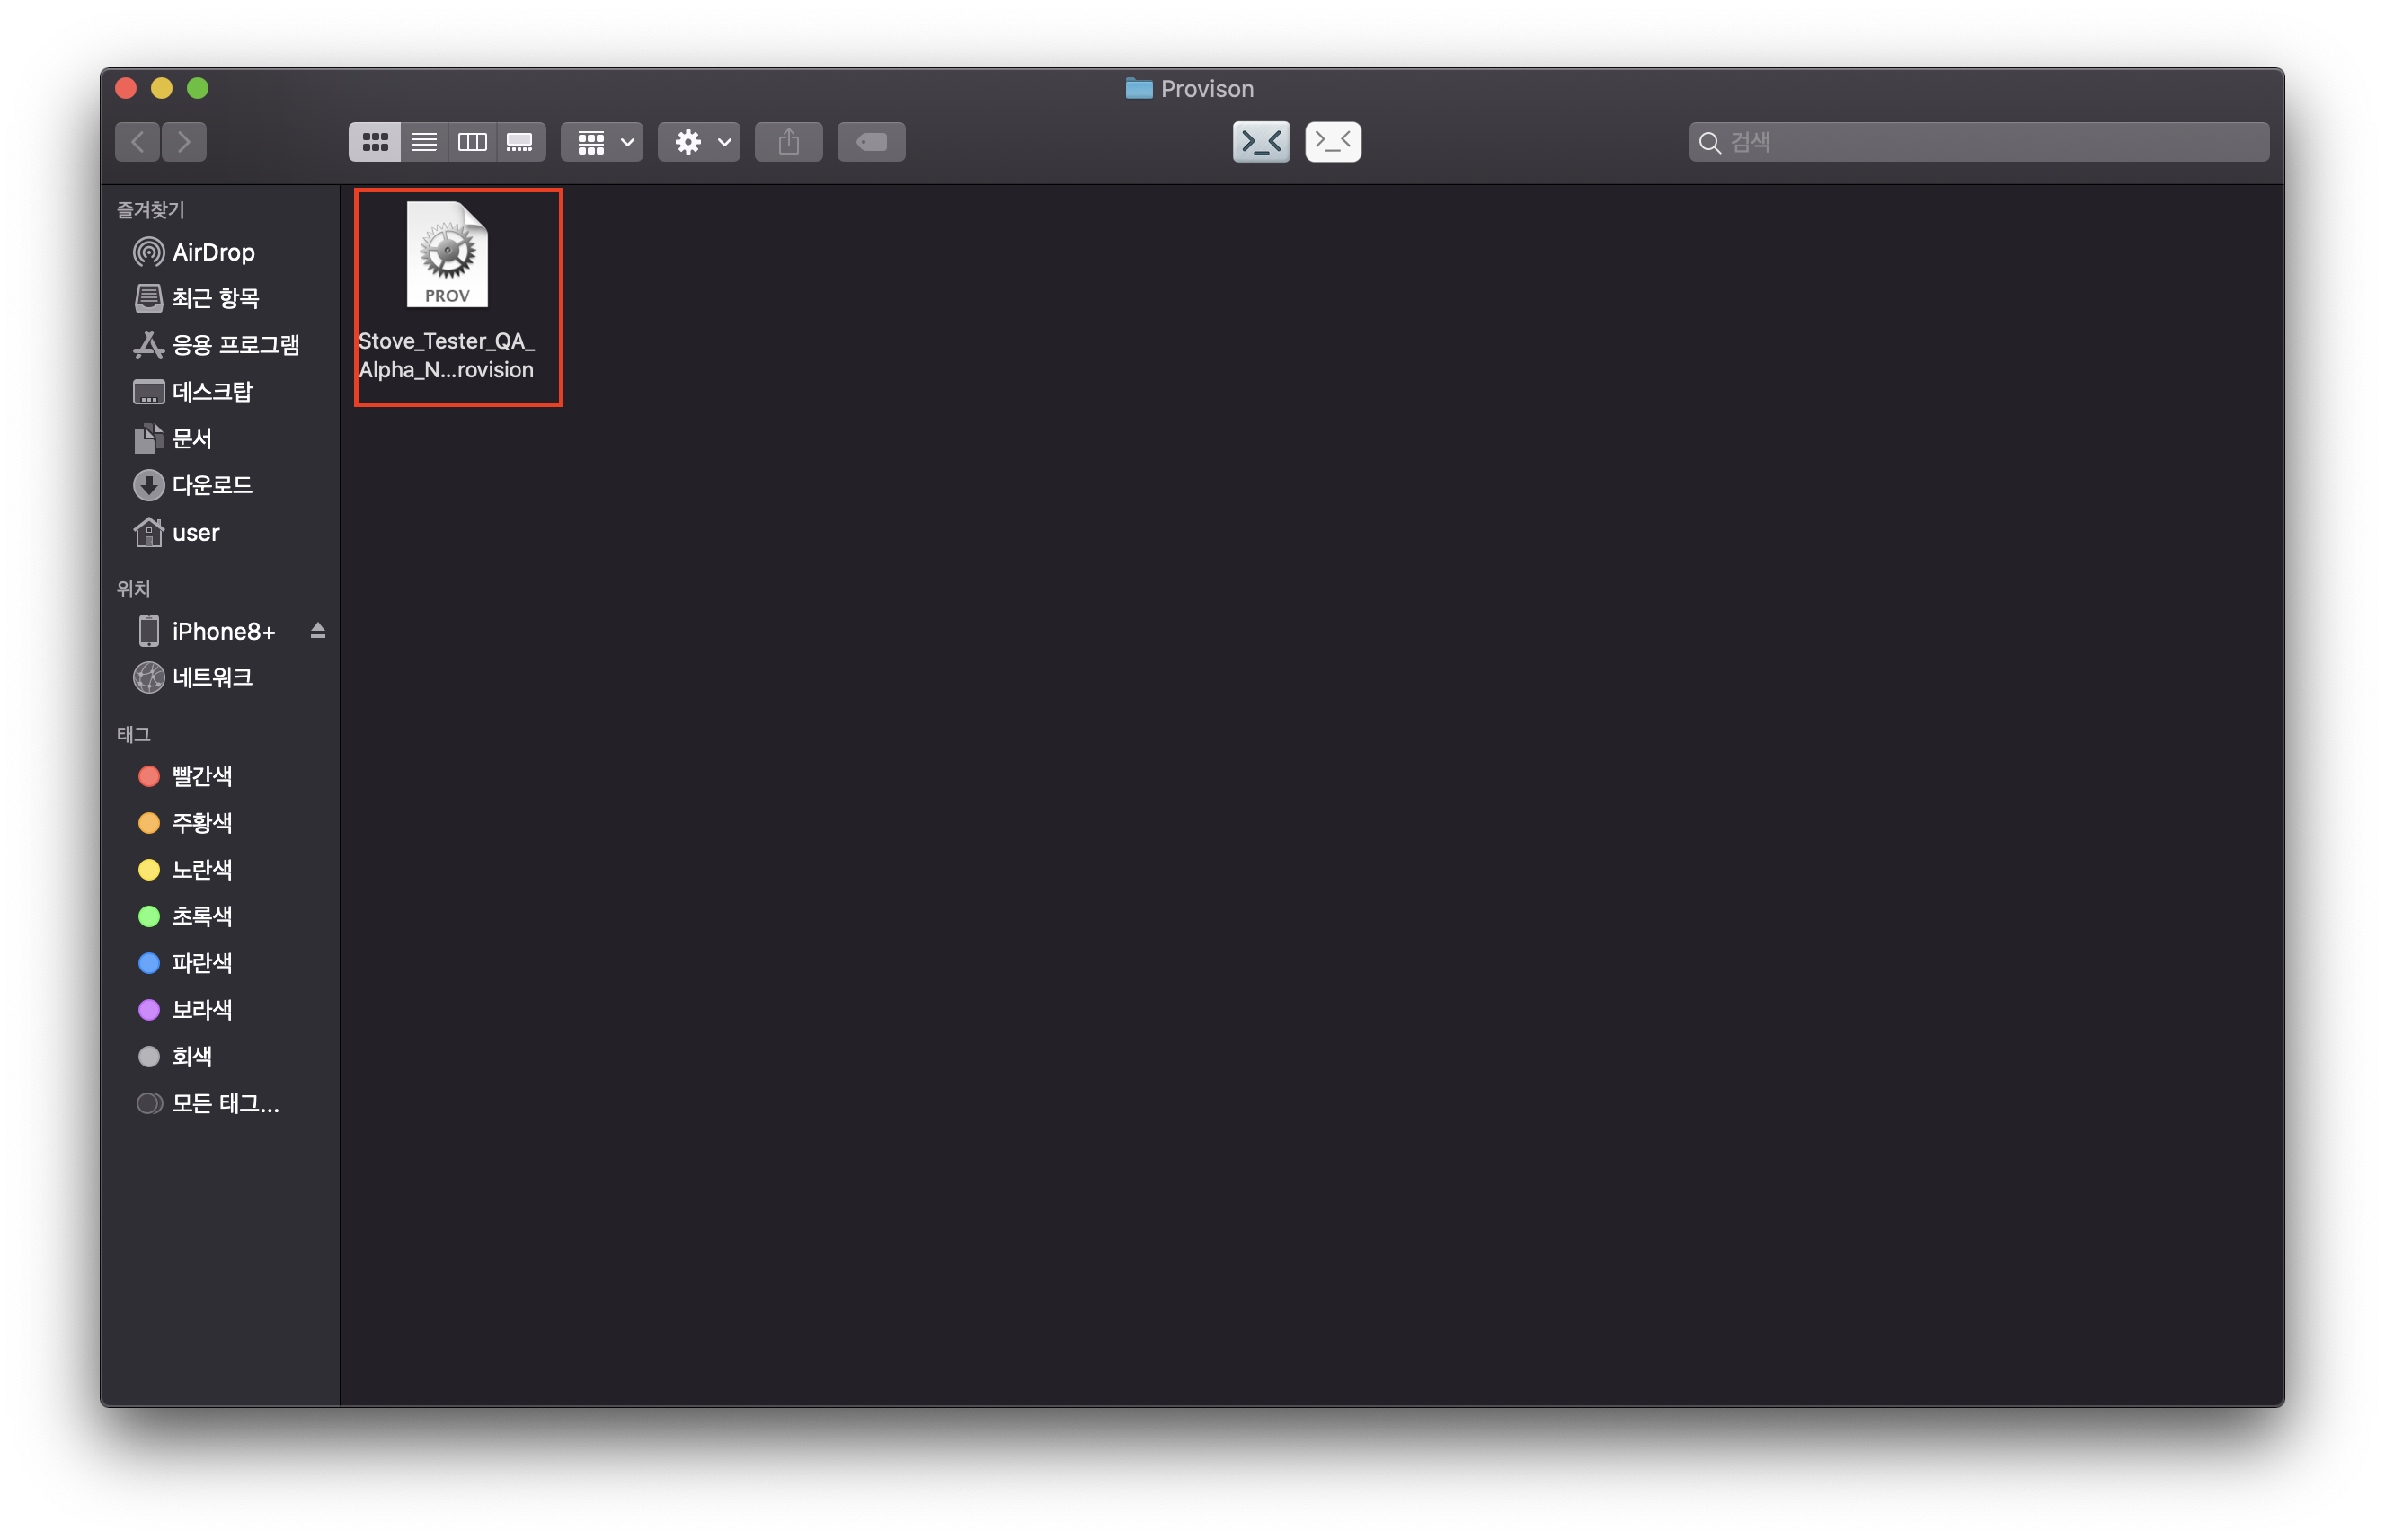
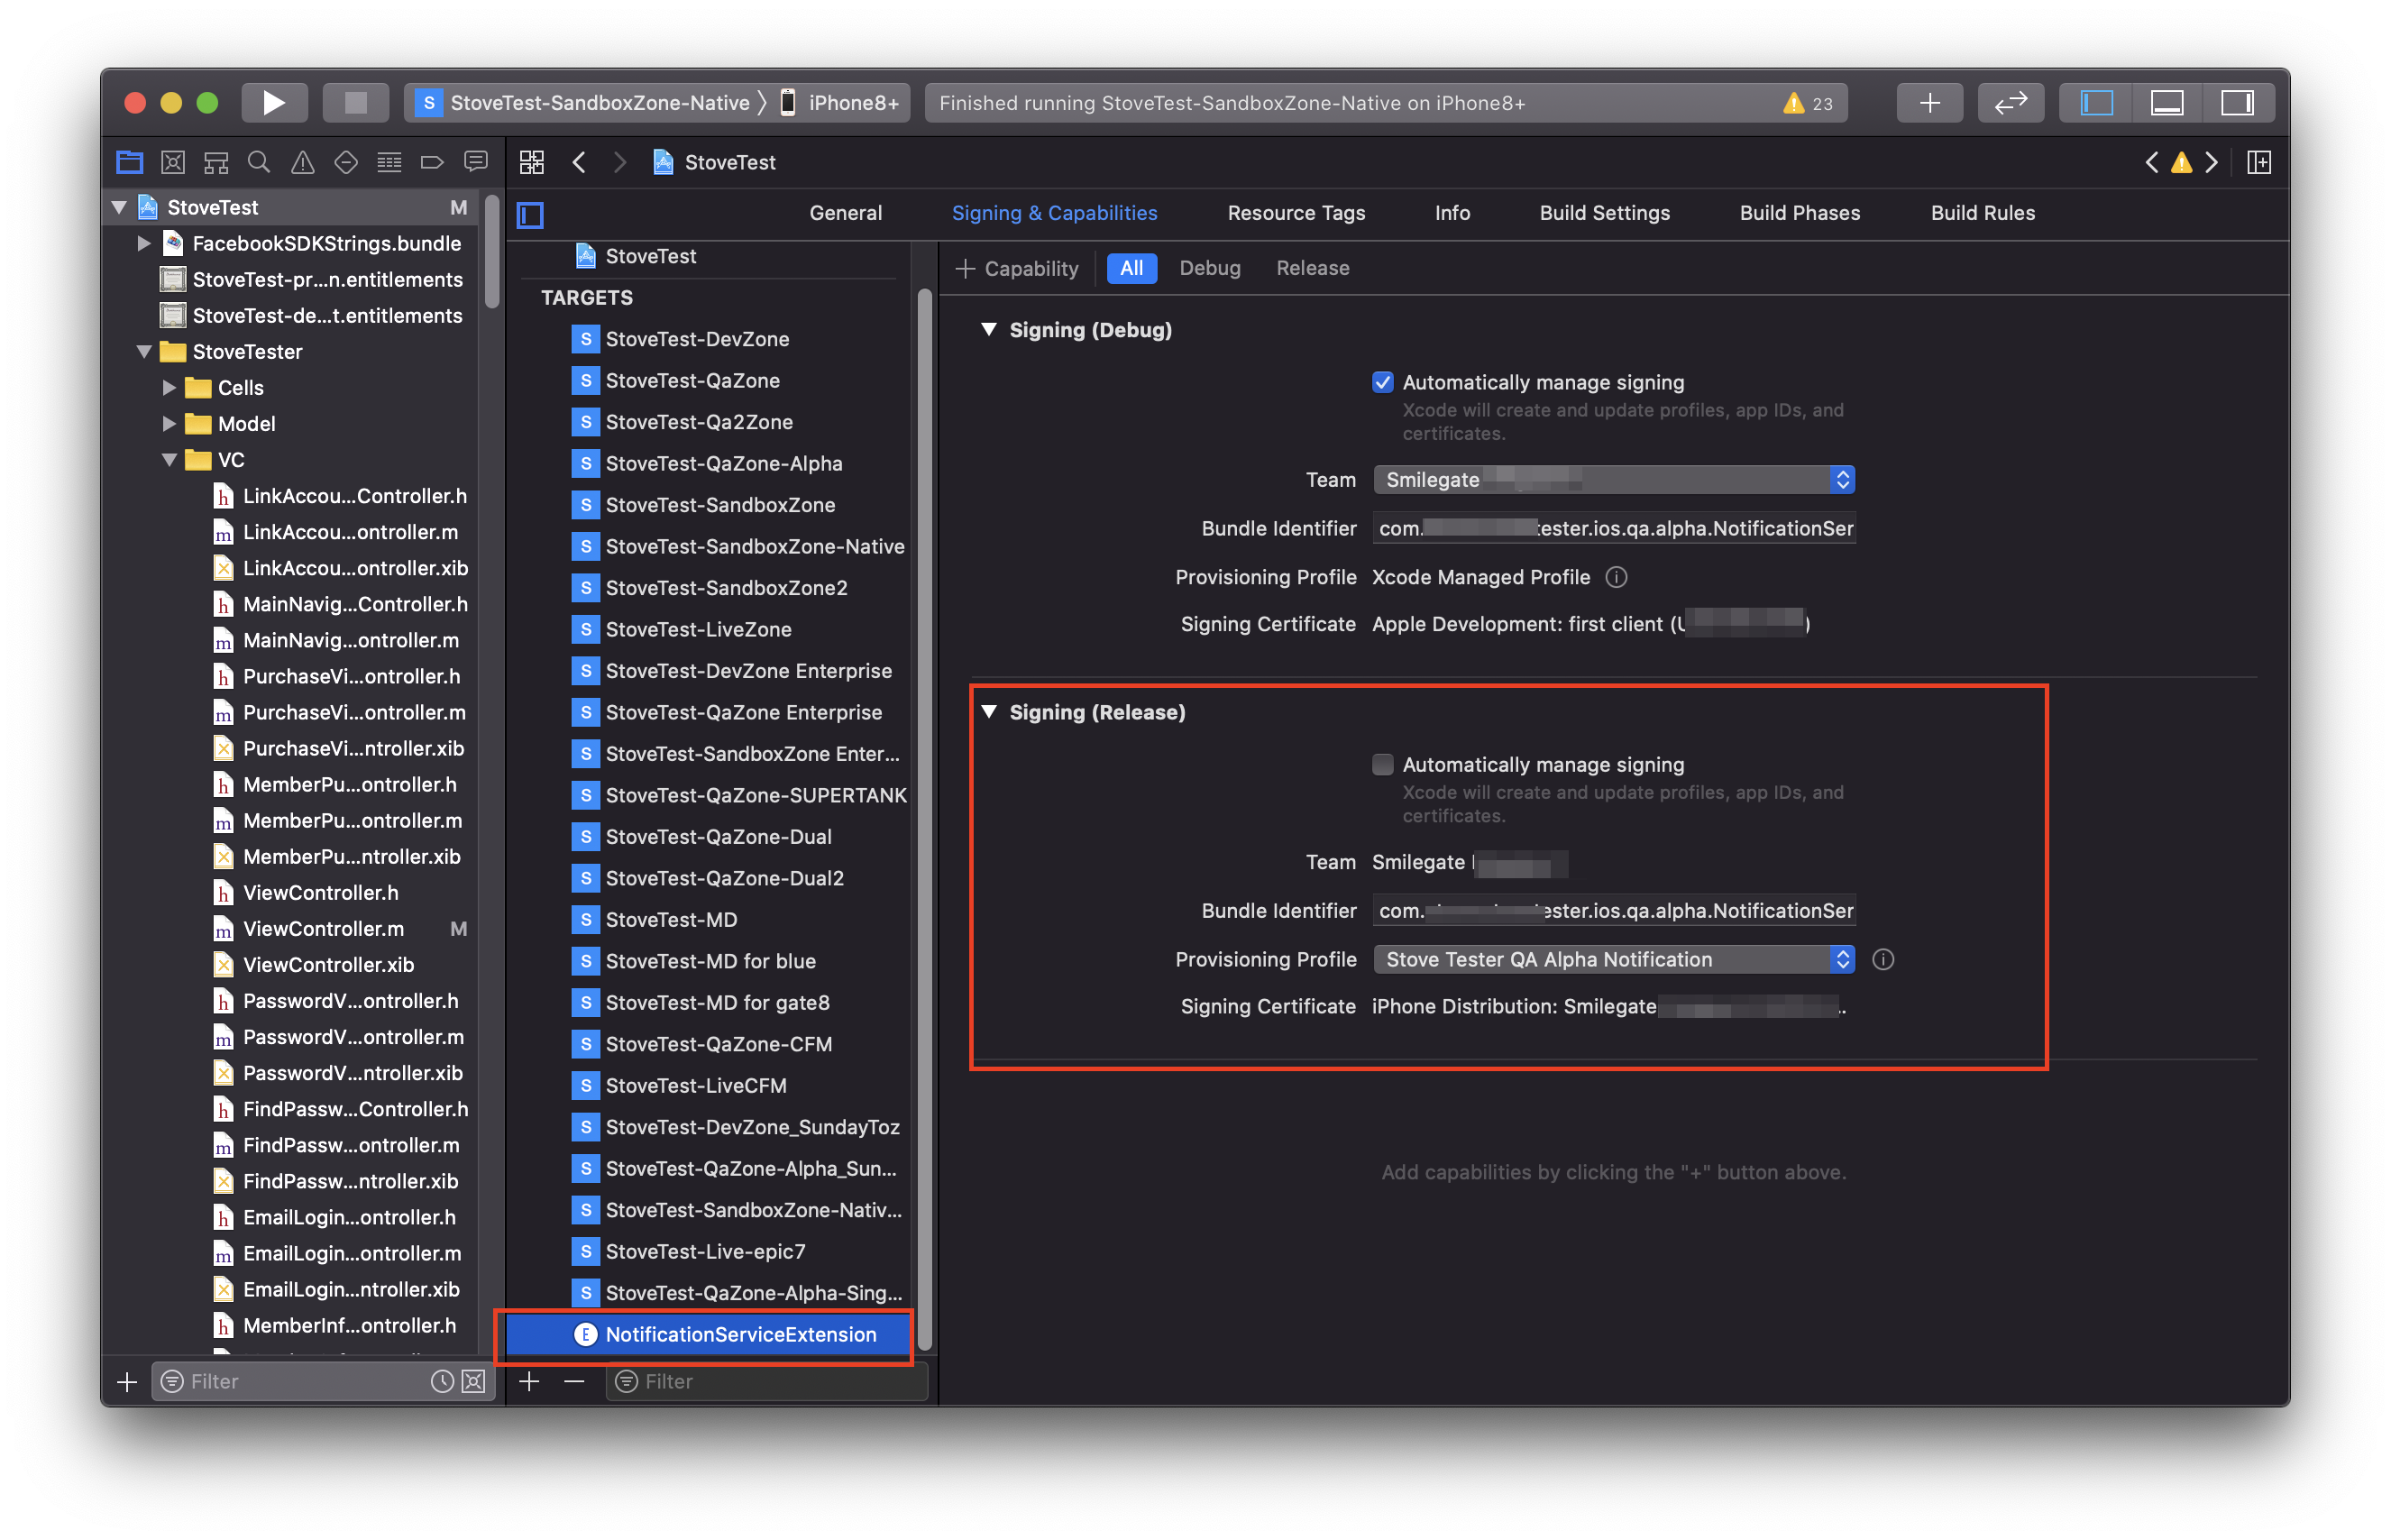
- 14. Verify the Signing settings
- Select the
NotificationServiceExtensionTarget in the Xcode Project, then check that the Provisioning Profile is correctly set in Signing & Capabilities → Signing (Release).
- Select the
Creating App Groups
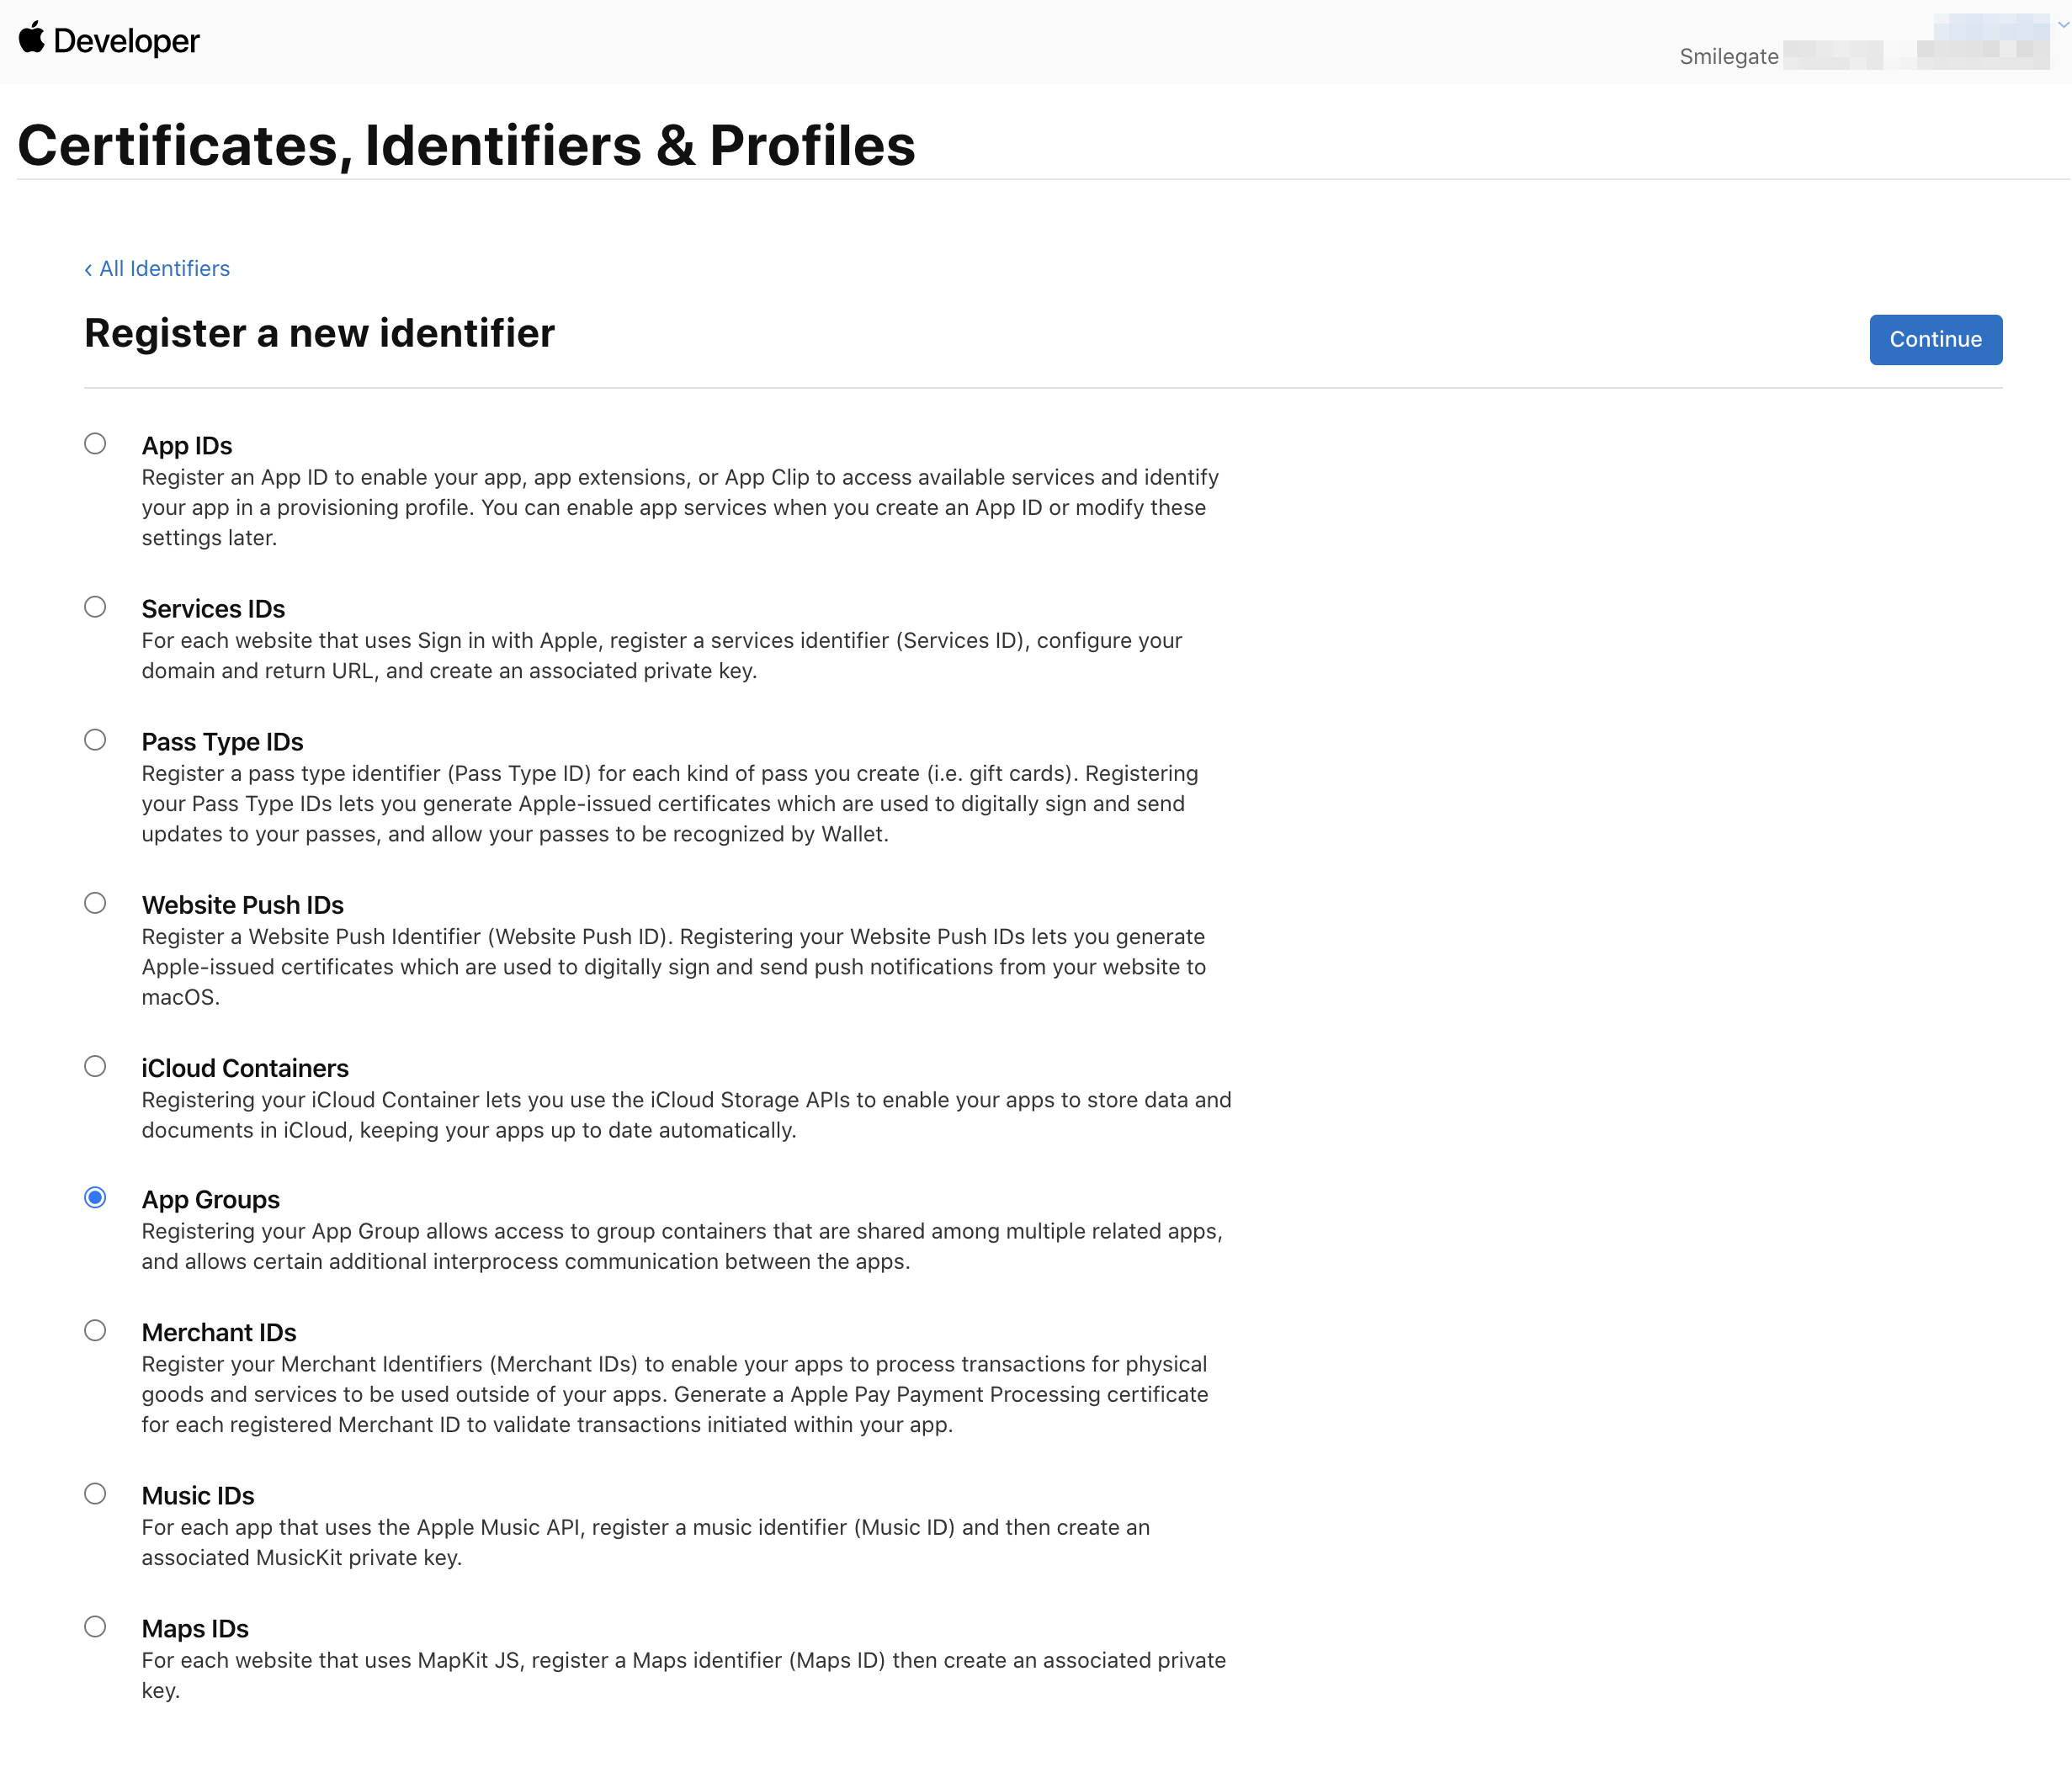
- 1. Register an App Group Identifier
- Go to Apple Developer — App Groups.
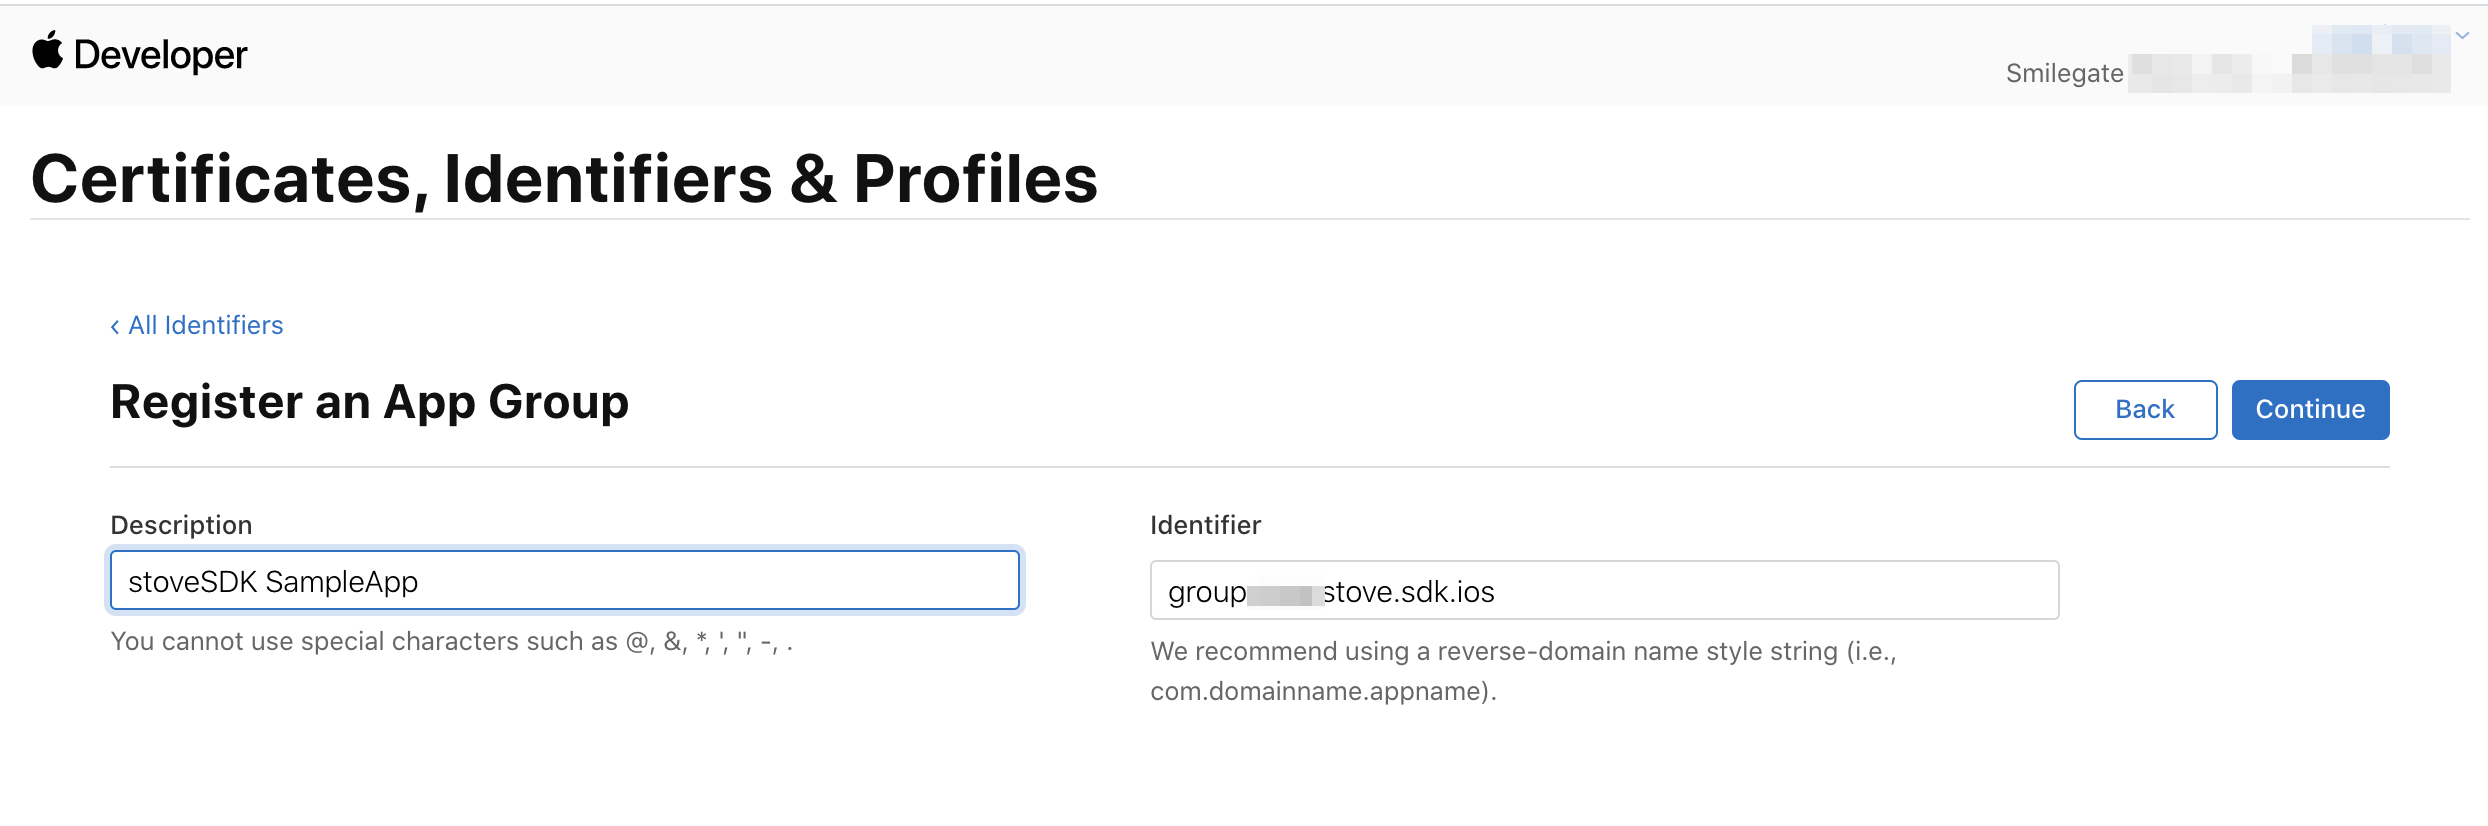
- 2. Create a Group ID
- Create it in the format
group.+ game Bundle Identifier.
- Create it in the format
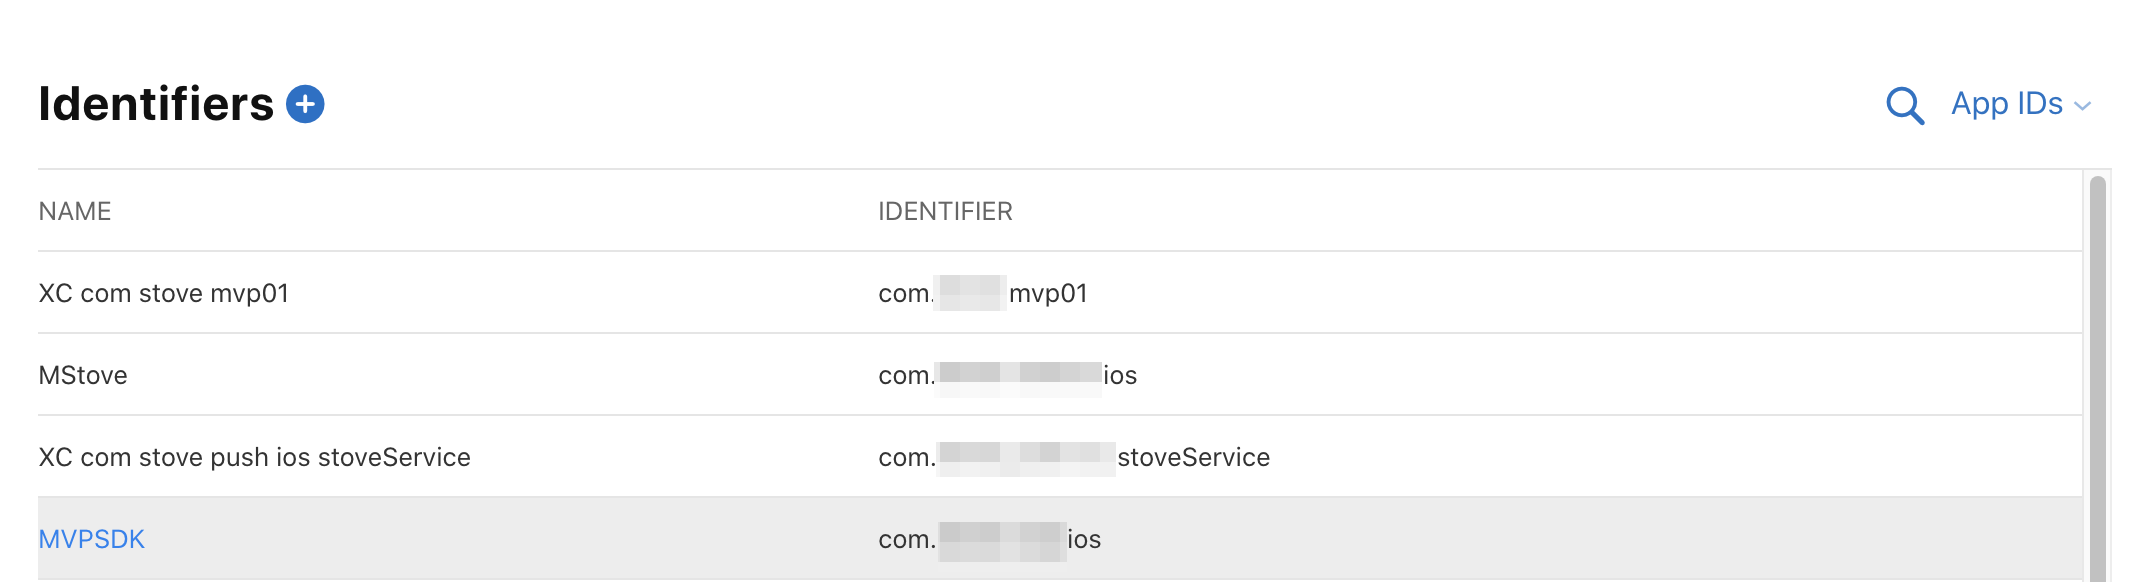
- 3. Select the App ID
- Select the game App ID.
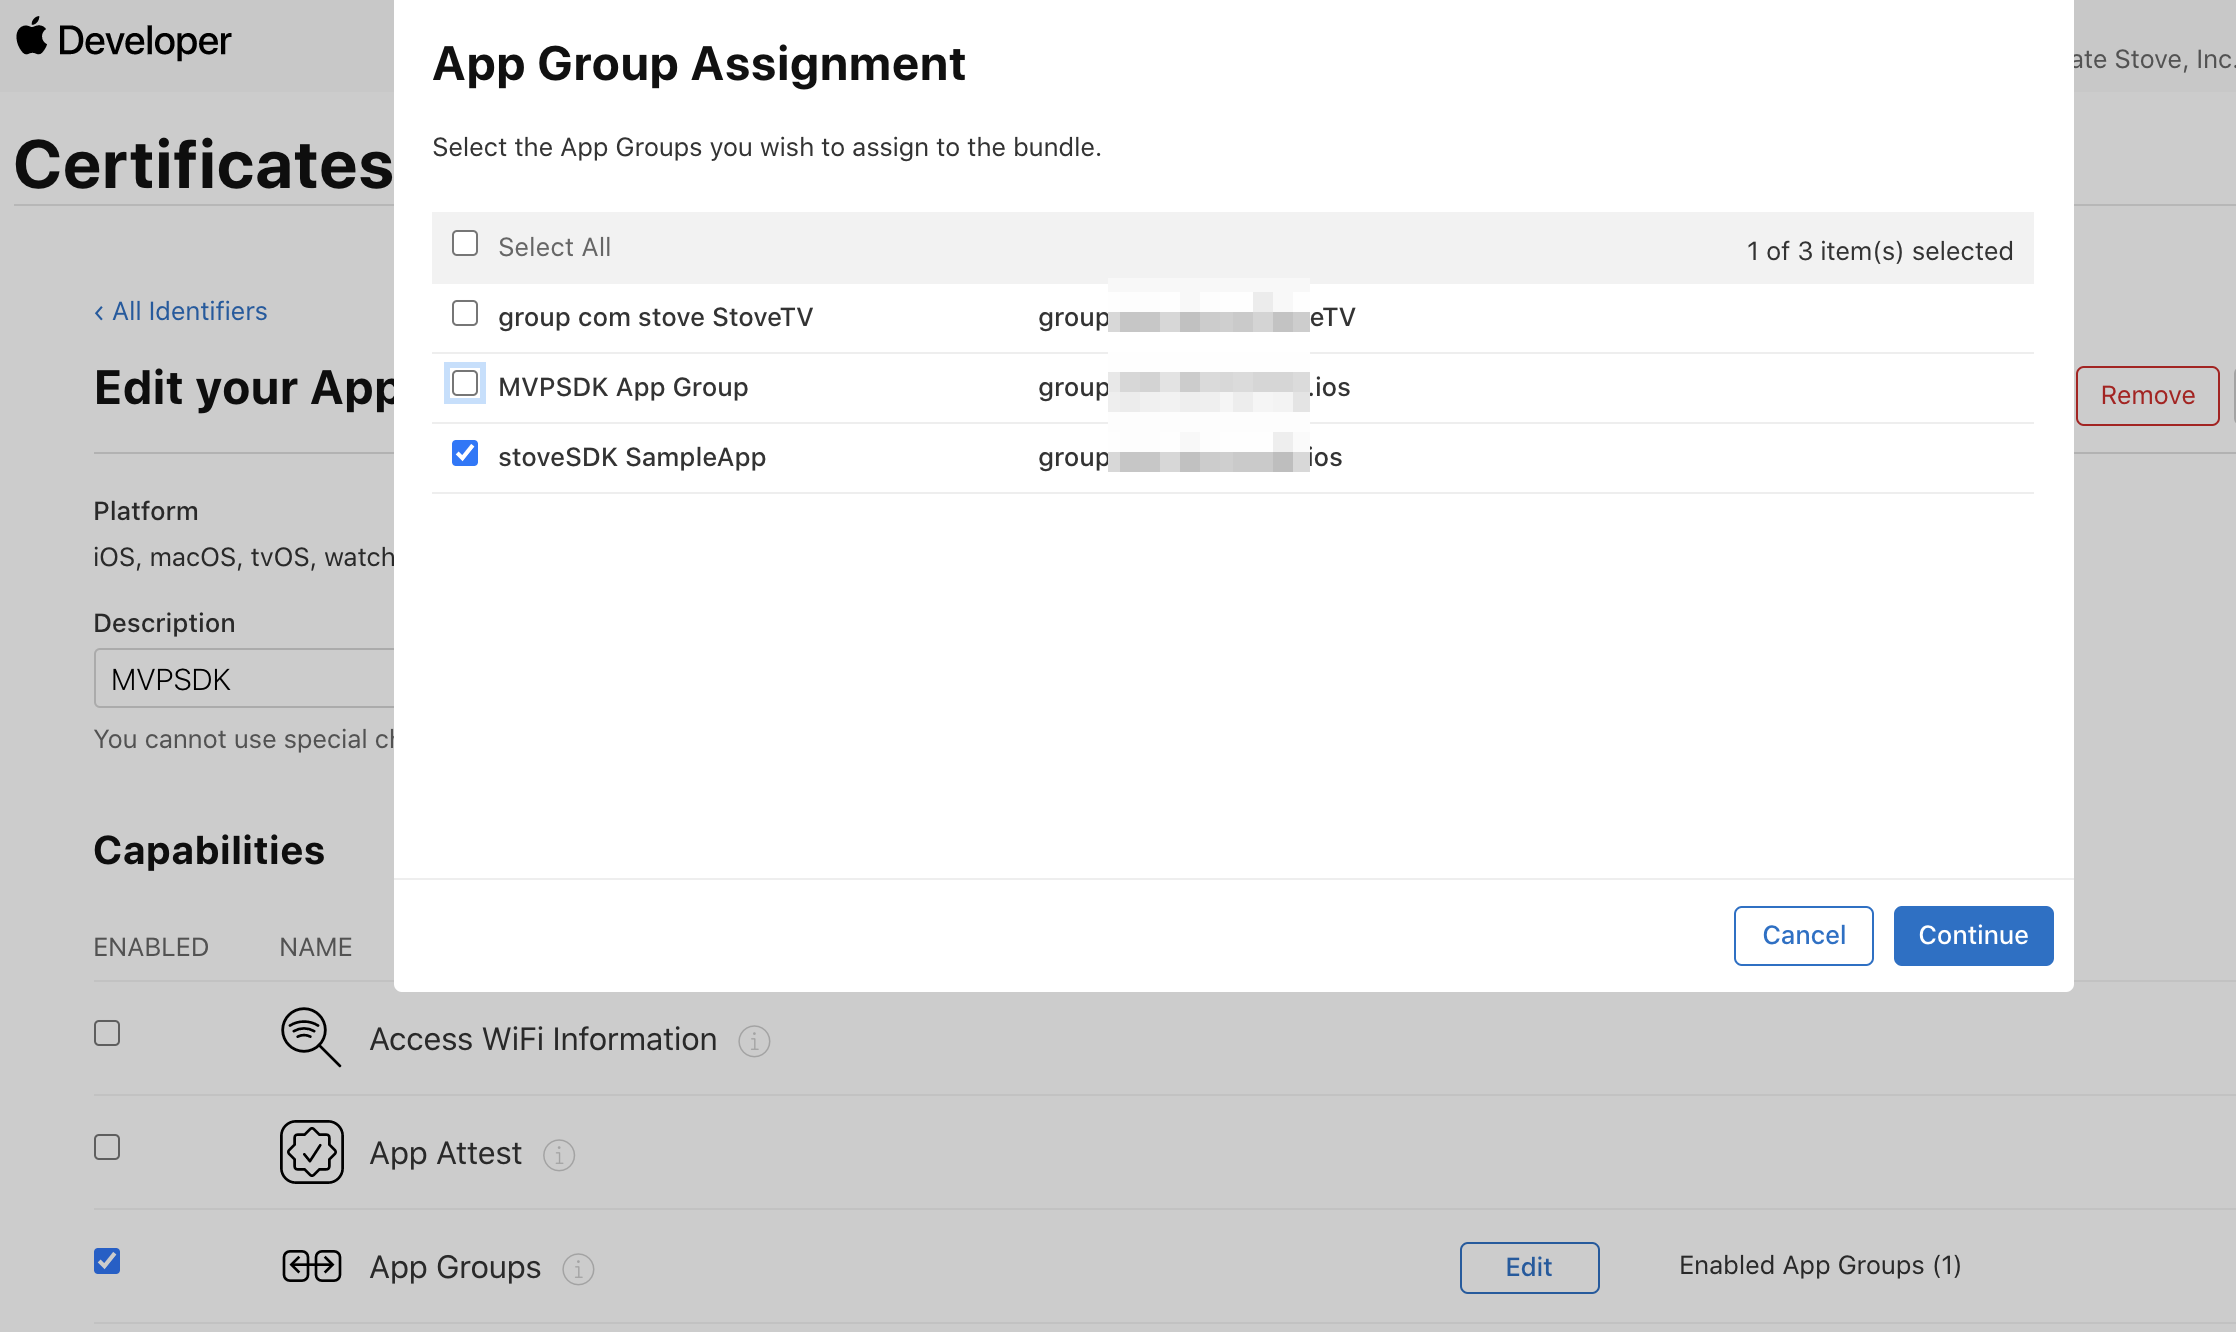
- 4. Link App Groups
- Click the App Groups Edit button to link the created App Groups.
Sending Image Push
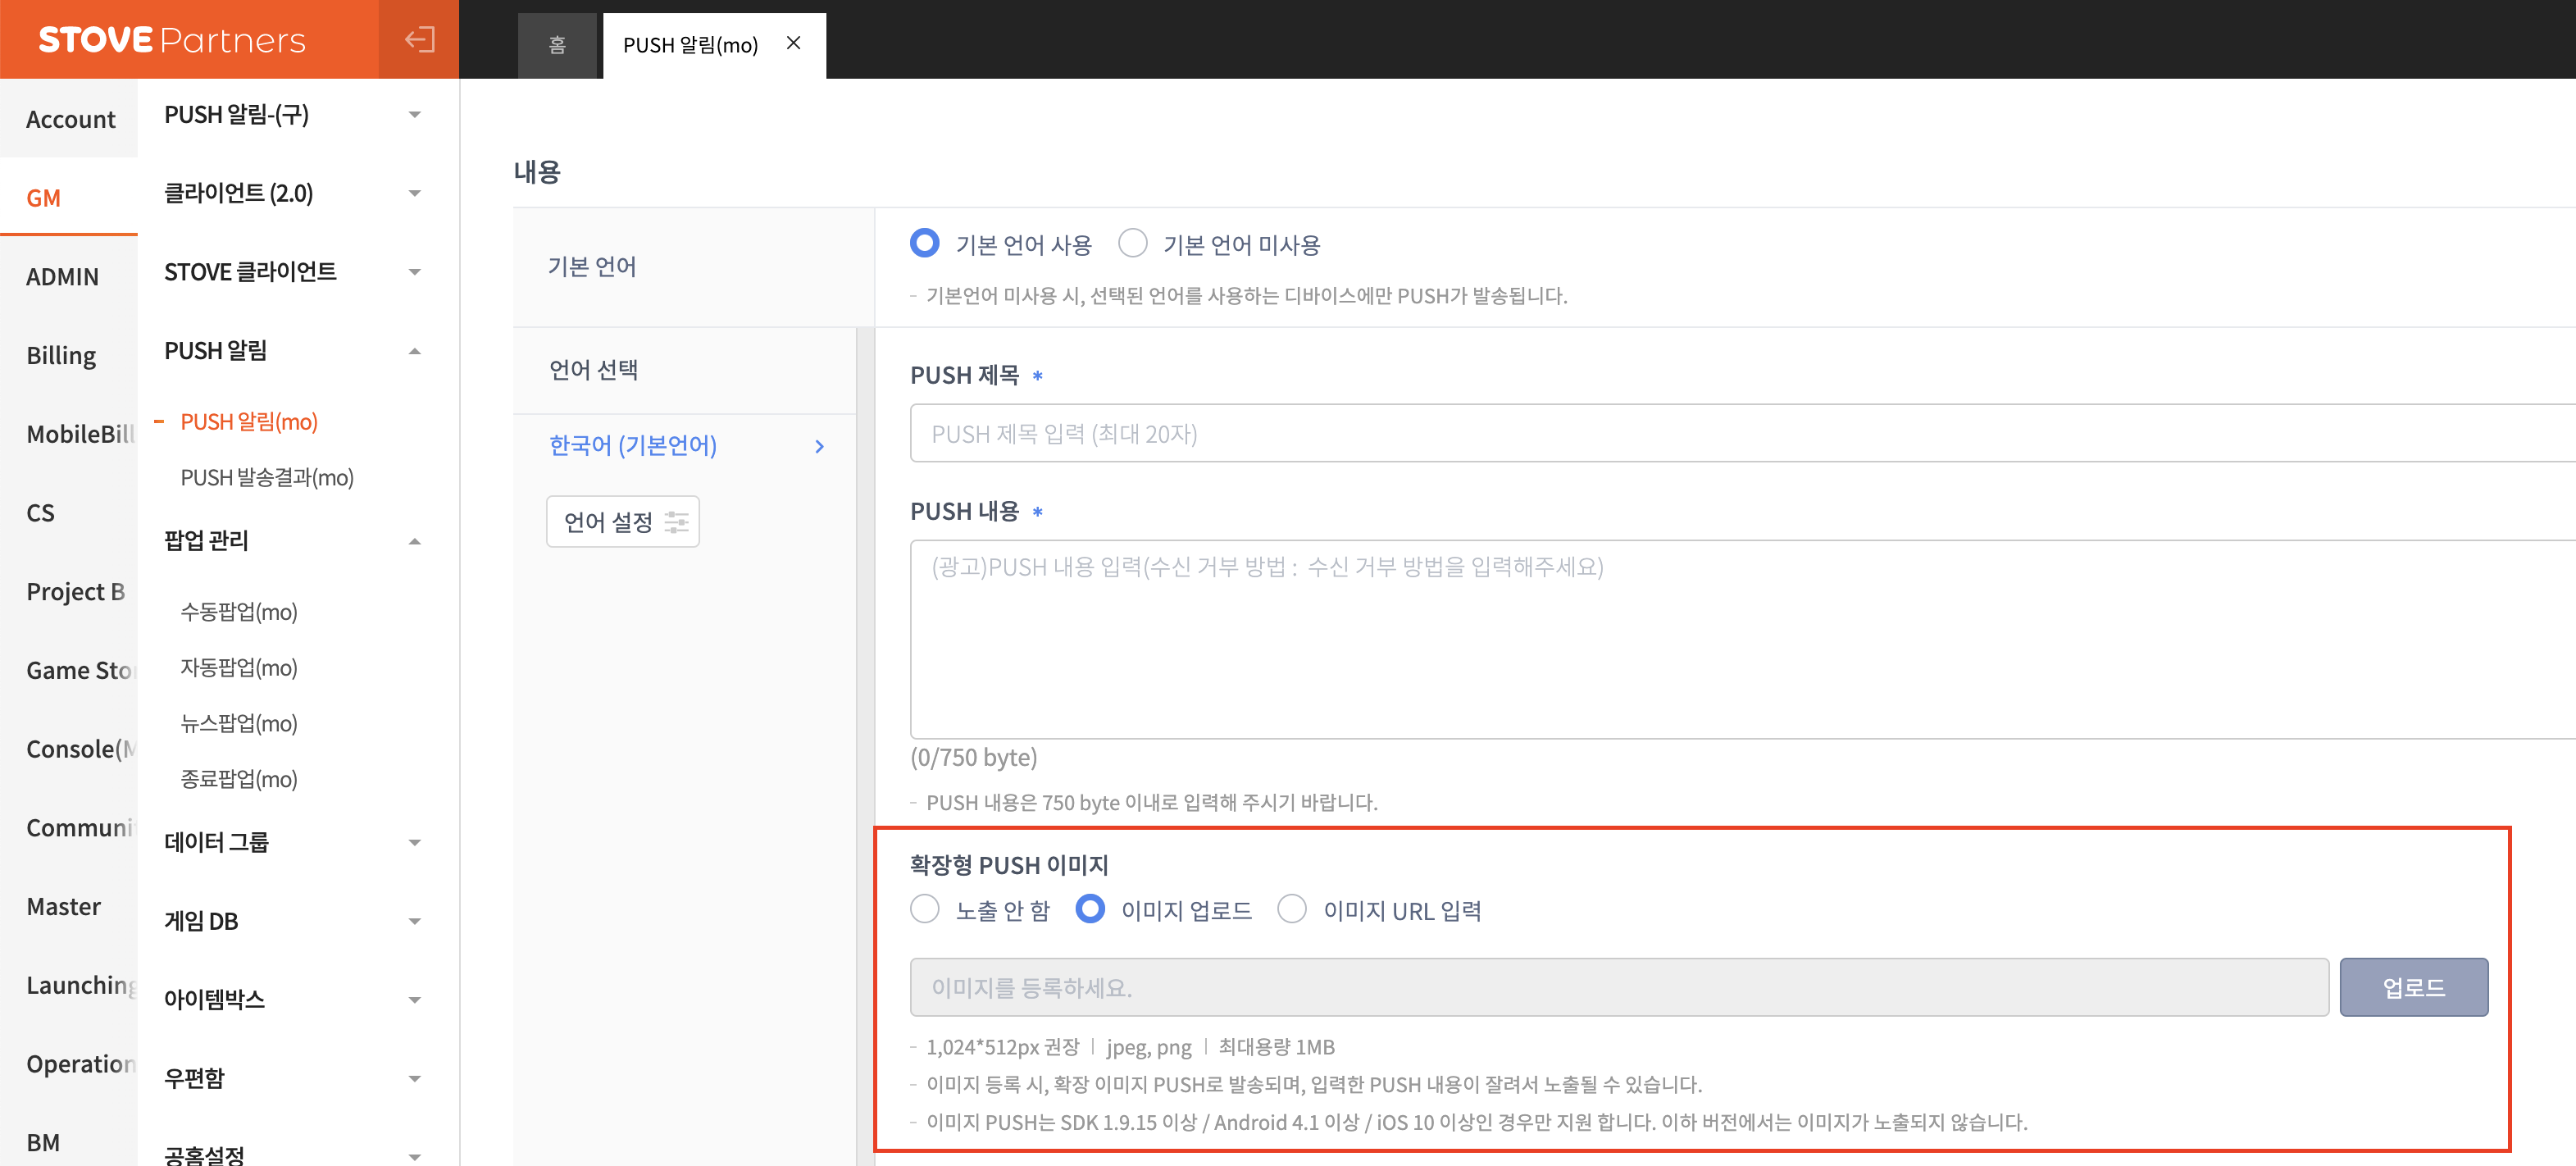
You can send image-included push from the Partners center.
- Path: GM → PUSH Notification → PUSH Notification (mo)
- Partners: partners.gate8.com