
- Last Updated
STOVE Link
Understanding
STOVE Link is a service that plays a game running on a PC remotely by streaming it in real time to a mobile device.
It plays the real-time-rendered game screen and audio, and sends keyboard, mouse, and touch events from mobile to the PC to control the game directly.
With the STOVE Link SDK, you can easily integrate remote-streaming into a game,
and players can continue a smooth game experience on a mobile device while their PC stays on.
Key Features
STOVE Link is not just screen transmission; it also provides two-way communication and security features for gameplay.
| Feature | Description |
|---|---|
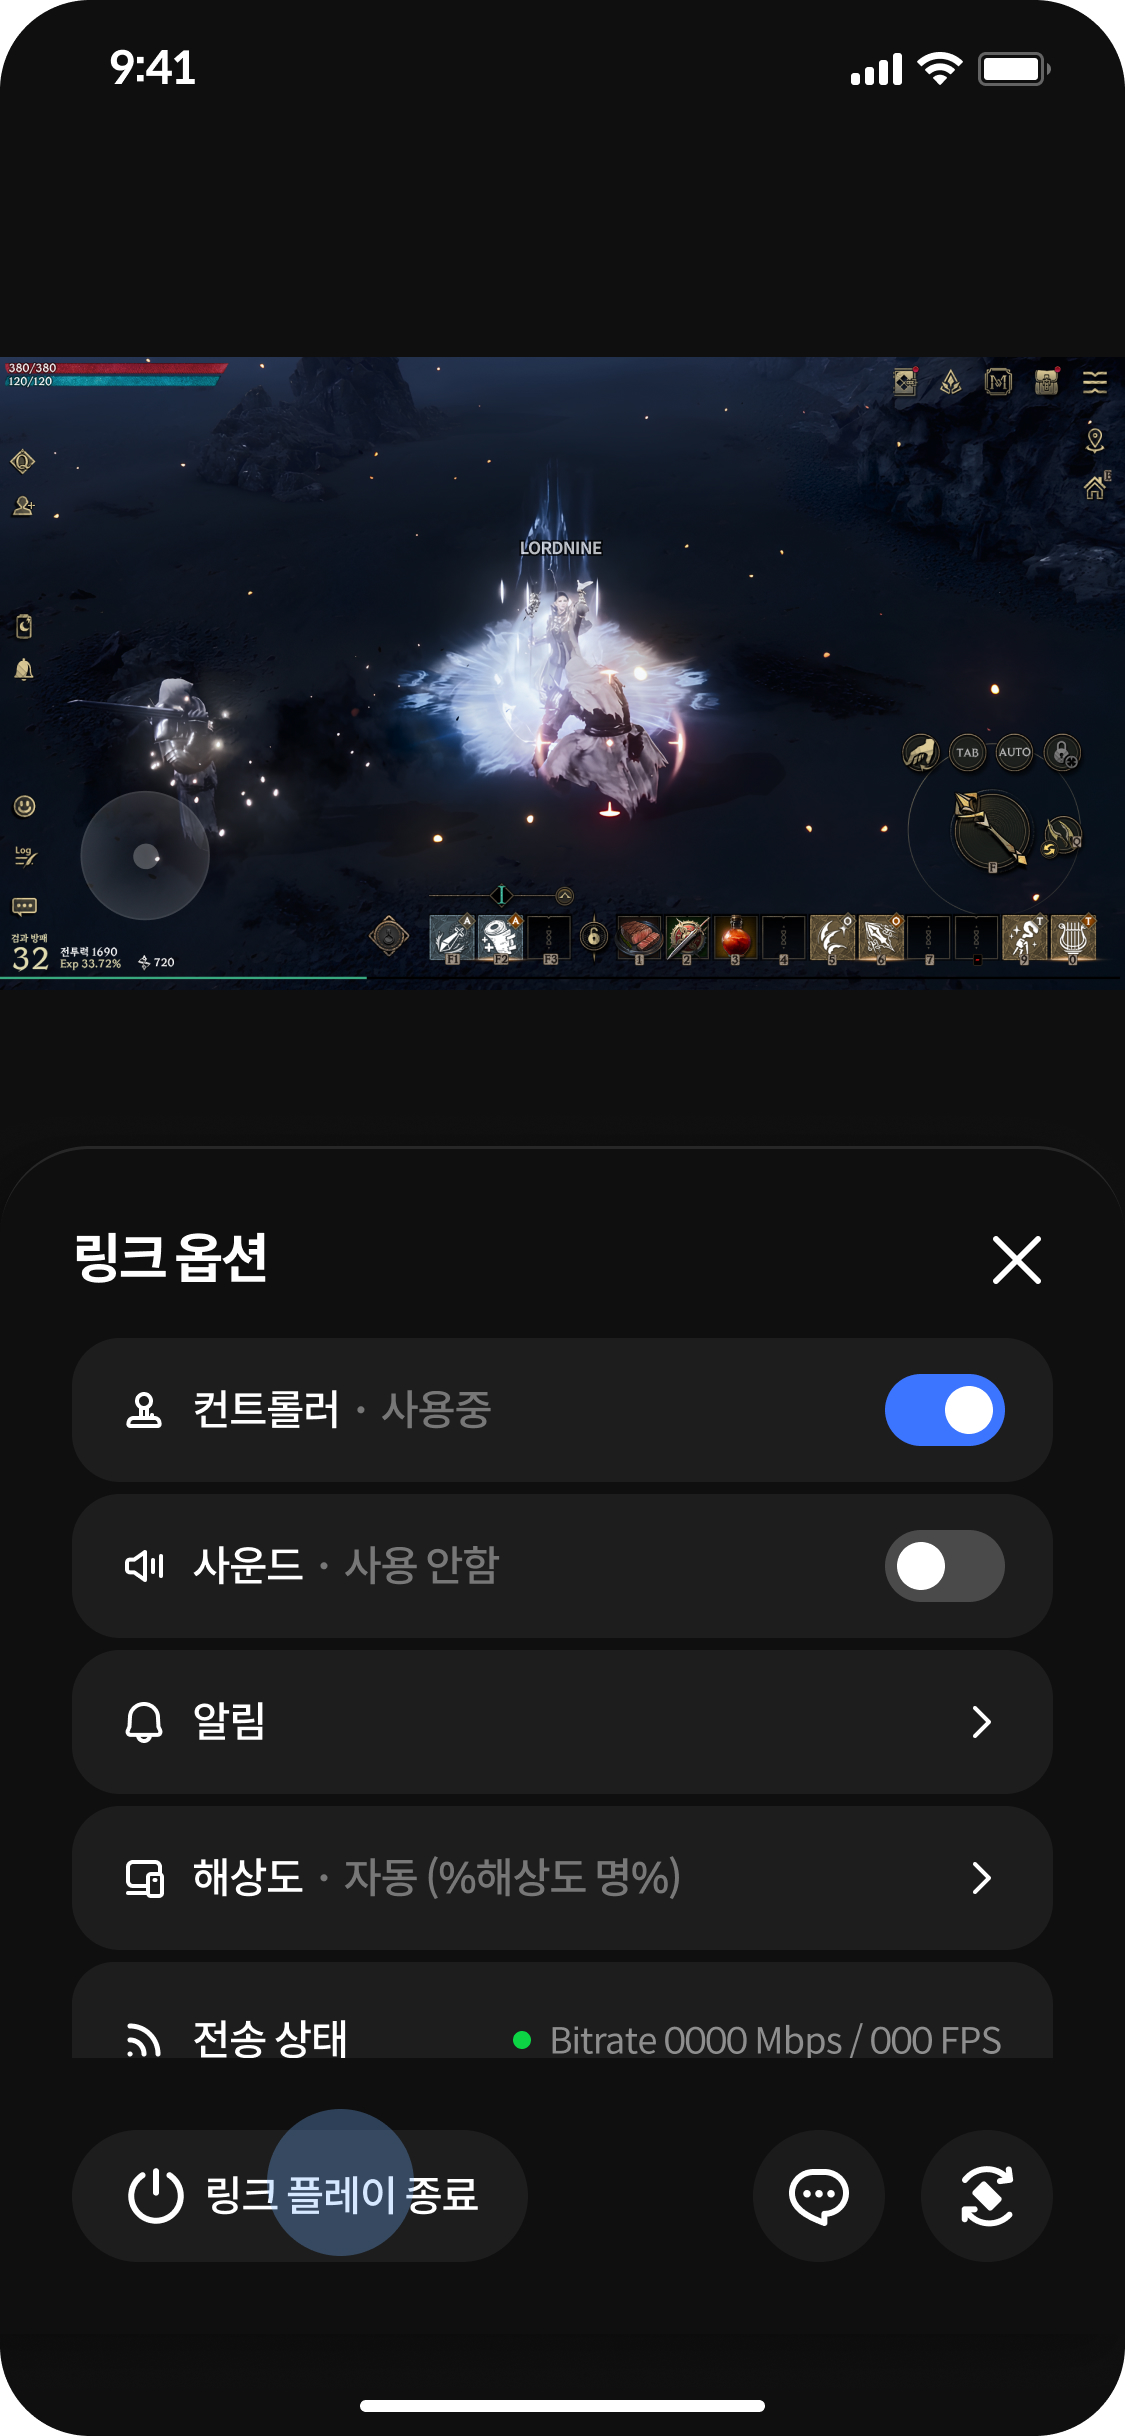
| High-quality remote play | Supports up to 1080p / 60fps resolution and low-latency streaming of 150ms or less end-to-end. |
| Two-way input | Sends touch, virtual-controller, and virtual-keyboard input from mobile to the PC game in real time. |
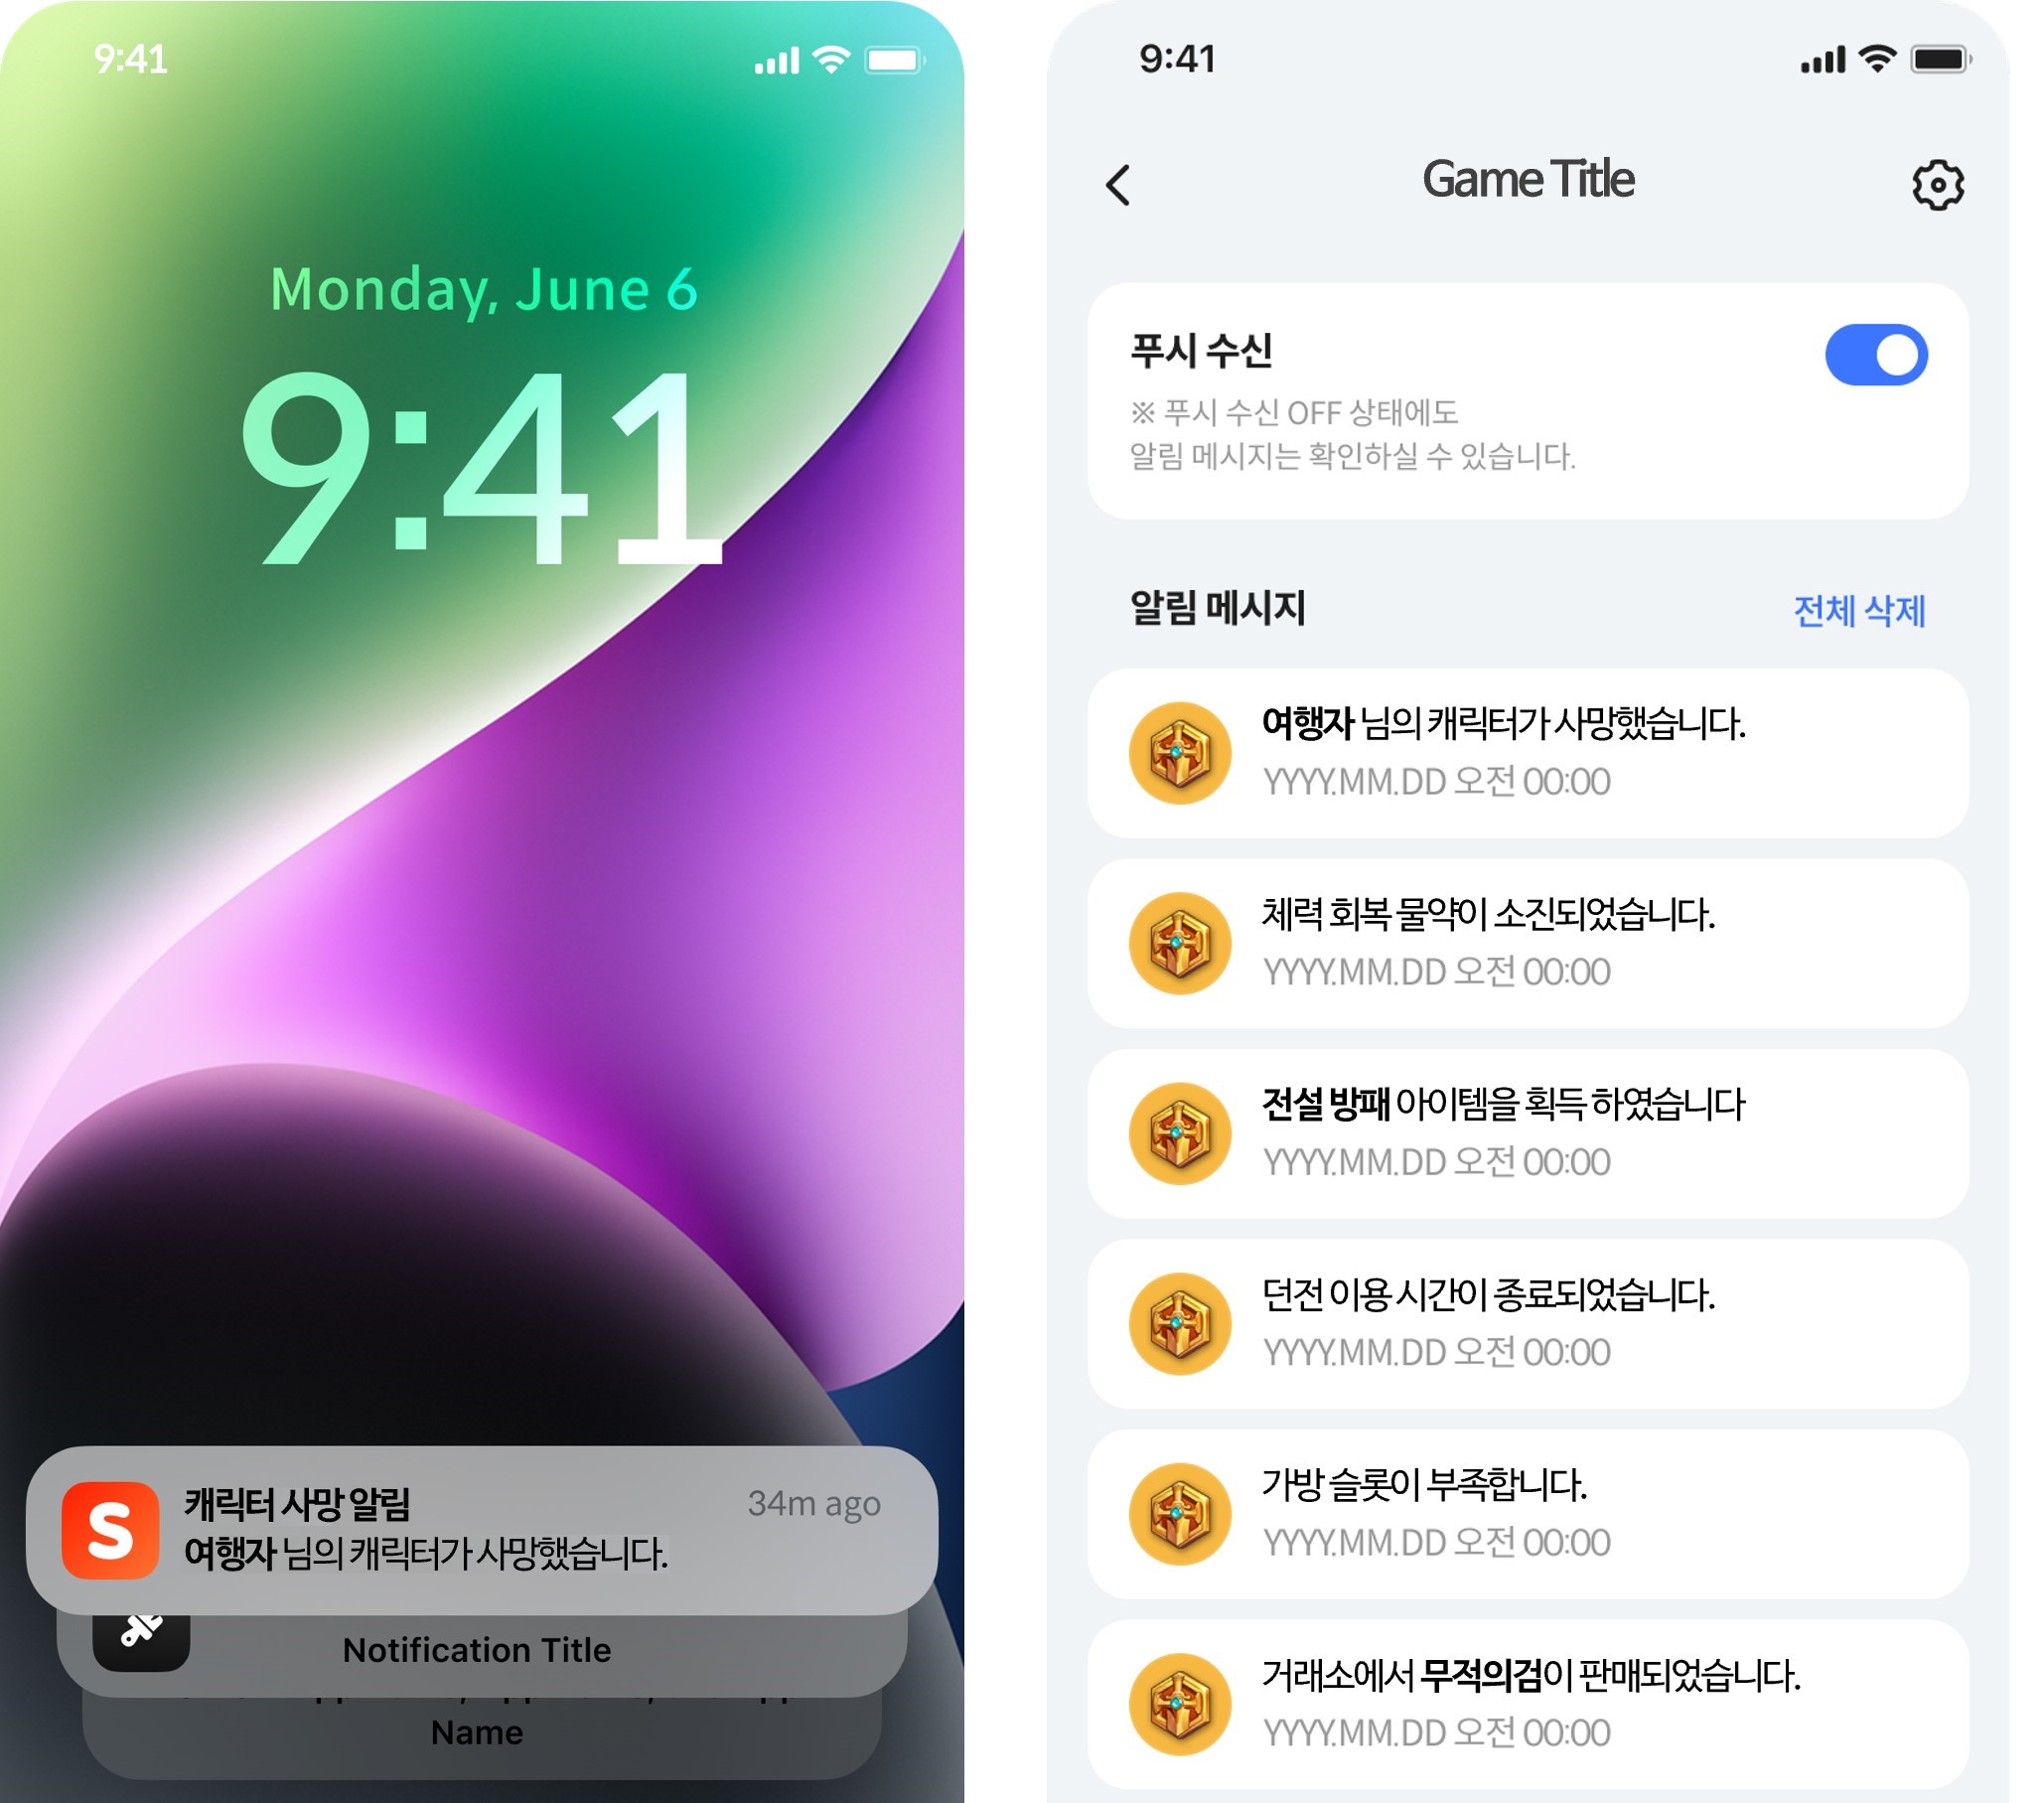
| Game-event notifications | Sends key in-game events (item acquisition, low HP, etc.) as mobile push. |
[Remote play]
[Event notification]
Components
STOVE Link consists of PC, mobile, and the STOVE server infrastructure that relays streaming.
| Component | Role |
|---|---|
| STOVE PC client | The PC-side entry point that runs the game and toggles streaming mode ON/OFF. |
| STOVE app | The mobile-side entry point. Displays the streaming screen and sends user input to the PC. |
| STOVE server infrastructure | Relays the WebRTC connection between PC and mobile via Signaling / Matchmaker / TURN/STUN servers. |
System Components
The system components operating inside the SDK are divided into four.
This structure isn't directly exposed to game code, but it helps in understanding the integration flow.
| Component | Role |
|---|---|
| Streaming SDK plugin | Embedded in the Unreal/Unity engine to encode game frames and receive input events. |
| Signaling Server | Relays the exchange of WebRTC Offer/Answer and ICE Candidates between PC and mobile. |
| Matchmaker Server | Registers streamable PC sessions and matches them with mobile requests. |
| TURN / STUN Server | Relays media traffic so P2P connections are possible even in NAT environments. |
Feature Support by Engine
STOVE Link supports both Unreal Engine and Unity Engine.
The usable LinkSDK version and the games it's applied to differ by engine.
| Category | Unreal | Unity |
|---|---|---|
| LinkSDK version | v2.0.2 | v1.3.6 / v2.0.2 |
| Supported engine version | UE 5.4 ~ 5.6 | Unity 2022.3.10f1 / Unity 6 |
How It Works
When a player starts streaming from mobile, a WebRTC session is established through the STOVE server infrastructure.
The game only handles SDK initialization and callback registration; the SDK handles the actual media transmission and input routing.
| Step | Action | Actor |
|---|---|---|
| 1. Session request | Select the game on mobile, then send a streaming request. | Player → STOVE App → STOVE Server |
| 2. Matching | Look up available PC streamers, then reply to mobile. | STOVE Server (Matchmaker) |
| 3. SDK initialization | Initialize the PCSDK and StreamingSDK, and start the game process. | STOVE App → BaseSDK → Game |
| 4. WebRTC negotiation | Exchange Offer/Answer, exchange ICE Candidates, and issue TURN credentials. | STOVE App ↔ StreamingSDK ↔ Game |
| 5. Streaming | Encode game frames, send them over the WebRTC media channel, and display them on the mobile screen. | Game → StreamingSDK → STOVE App → Player |
Streaming doesn't include external areas
Areas the game invokes via an external browser or WebView (the billing payment window, external links, in-game WebViews, etc.) are excluded from streaming.
They display and work normally on PC but can't be seen on the mobile streaming screen, so you must handle it to show a separate notice message in-game.
Recommended Specs and Supported Environments
STOVE Link works correctly only when the environment conditions on both PC and mobile are met.
| Category | Requirement |
|---|---|
| PC operating system | Windows 10 or Windows 11 (64-bit) |
| PC GPU | An NVENC-capable NVIDIA GPU is recommended (AMD/Intel may not be smooth). |
| Mobile OS | Android 10+ / iOS 15+ |
| Streaming quality | Up to 1080p / 60fps, end-to-end latency of 150ms or less. |
| Network | Wi-Fi or 5G/LTE. Data usage incurs carrier charges. |
Limitations
These are limitations to review in advance before applying STOVE Link.
Most require separate handling in-game, so it's good to reflect them from the planning stage.
| Limitation | Details |
|---|---|
| External web pages unsupported | External browsers (Chrome, Edge, etc.) and in-game WebViews aren't streamed. In-game notice handling is required. |
| Concurrent-streaming limit | Runnable only per account (not per character). One account and one game can run on only one mobile device. |
| Game-window minimization (Unreal) | The Unreal engine stops rendering in a minimized window, so streaming isn't possible. |
| PC environment changes | Streaming can slow down or stop in sleep mode, screen lock, or hibernation. |
| Network dependence | Real-time data transmission is required, so insufficient network speed causes video stutter or breakup. |
Integration Guide
Integration Preparation
STOVE Link runs on the STOVE Base SDK.
Before integration, STOVE PC SDK 3.4 or higher must be integrated into the game, and you initialize the STOVELINK SDK after the Base SDK initializes correctly.
STOVE Link integration requires per-environment authentication info.
We recommend switching to Live after thoroughly verifying in Sandbox.
| Item | Description |
|---|---|
| Environment | Two environments provided: Sandbox (SB) / Live. |
| AppKey | A public key for game identification. Issued differently per environment. |
| AppSecret | A secret key for game authentication. Must not be exposed externally. |
| GameId | The unique game ID registered in Partners. |
Issuance info can be checked in [the Partners portal], and separate issuance requests are made through the publishing technical contact.
To use STOVE Link, you must register per-game streaming info and notification settings in Partners in advance.
For registration requests, contact the publishing technical contact.
| Item | Registration details |
|---|---|
| Apply to use STOVE Link | Apply to use STOVE Link in the Partners portal. Register basic info such as Live ON/OFF, game ID, and build version. |
| Streaming feature settings | Set whether OTP, controller, chat, and notifications are used, and the supported resolutions (1080p / 720p / 480p / 360p). |
| Register the notification key (when using the notification feature) | Register the notification message, notification icon, and per-language messages. |
- Partners settings (request from the publishing technical contact)
- Streaming feature settings
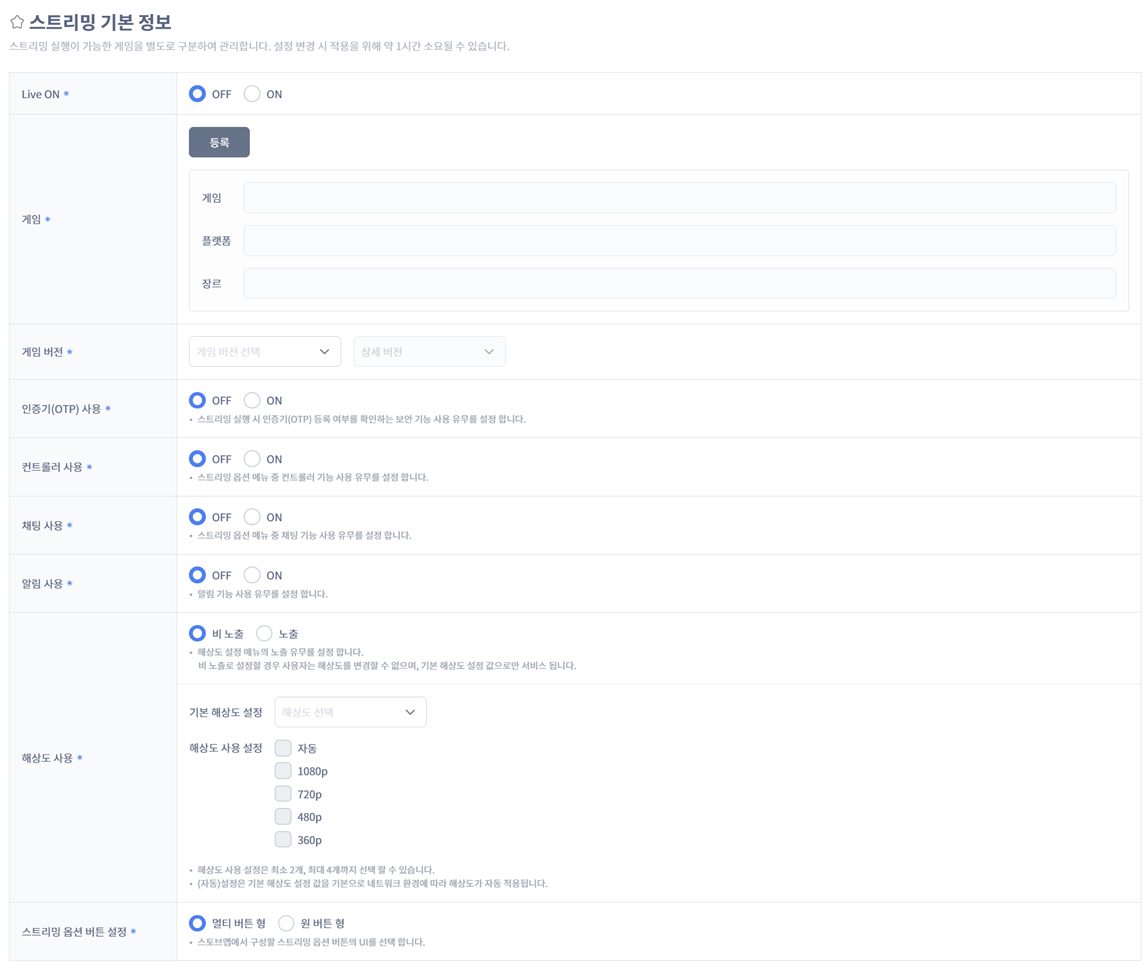
- Streaming feature settings
- Notification-key registration
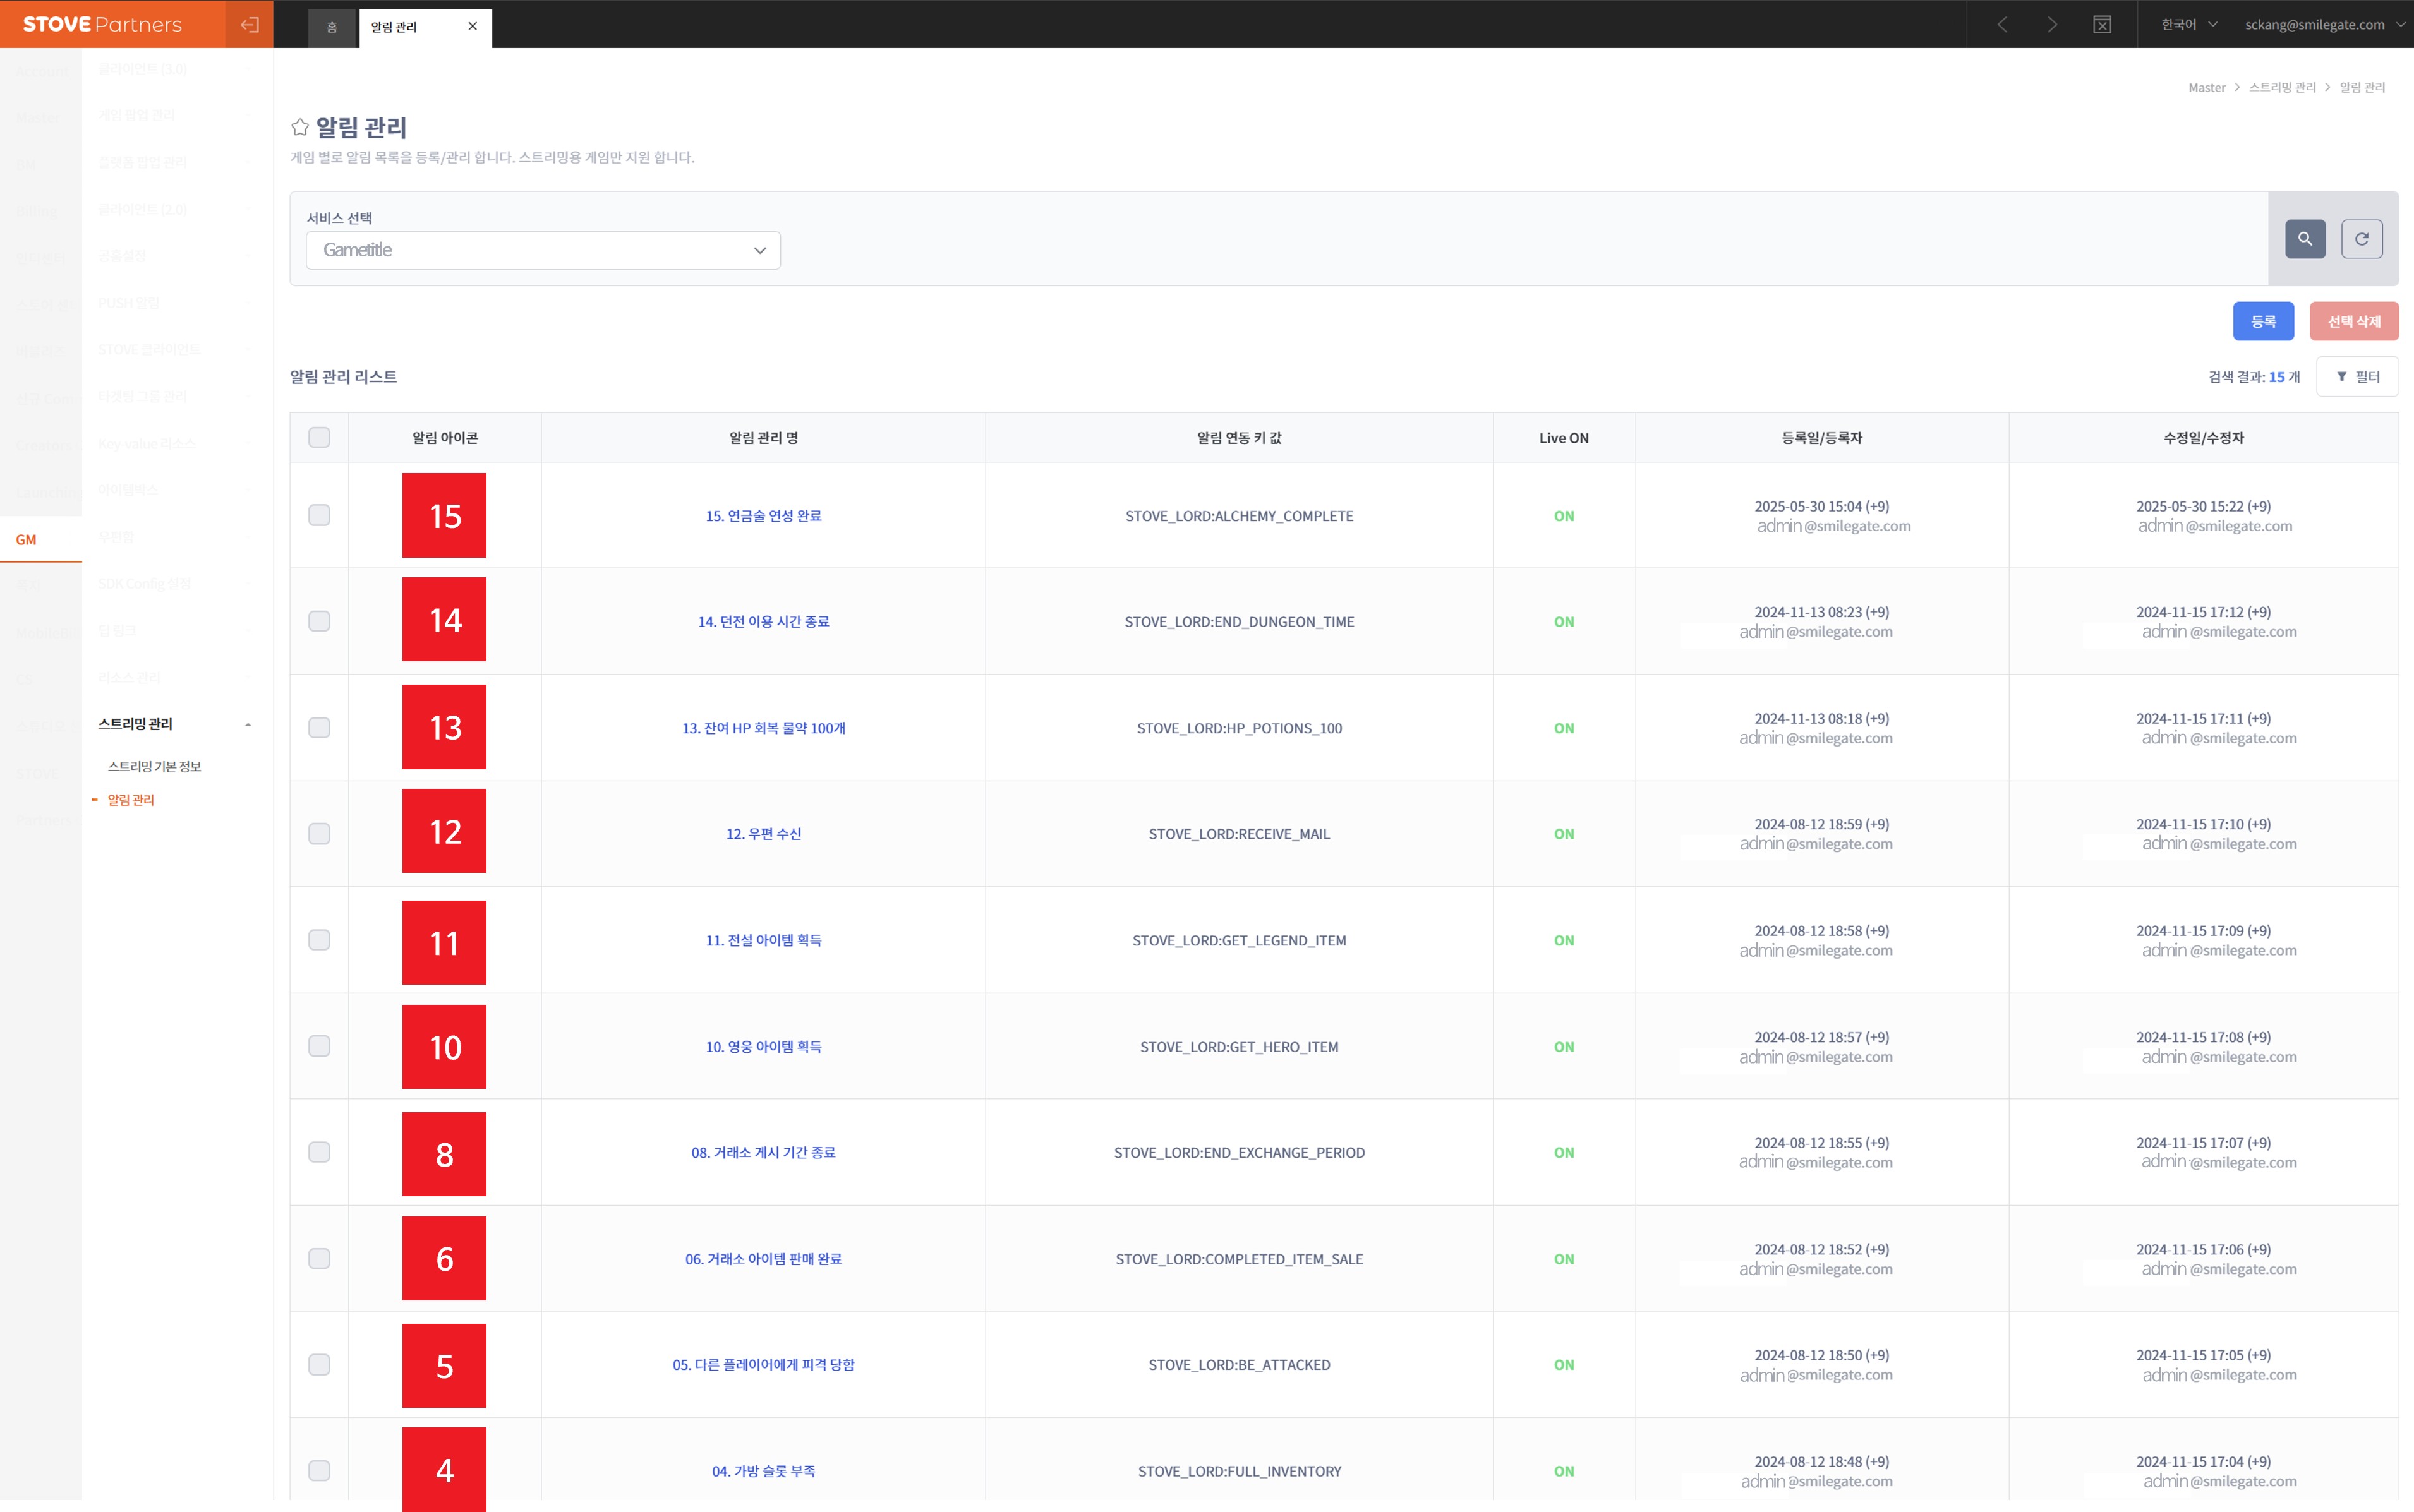
Basic Integration Flow
It shows a simplified view of the whole flow, from a player selecting a game on PC to streaming to mobile.
You can quickly grasp what mobile, PC, and the server each do at which step.
See the development guide for the detailed flow
The sequence above is the big picture of the whole flow.
Engine-specific concrete steps such as SDK initialization and callback registration can be checked for Unreal and Unity respectively in Development > Development Flow.
External-Link Exception Handling
Areas invoked via an external browser or WebView in-game aren't shown on the streaming screen, so
while streaming, you need to show a notice message and block the feature.
| Exception-handling target | Handling method |
|---|---|
| Billing payment window | On clicking payment Confirm, show a "not available during STOVE Link play" notice pop-up. |
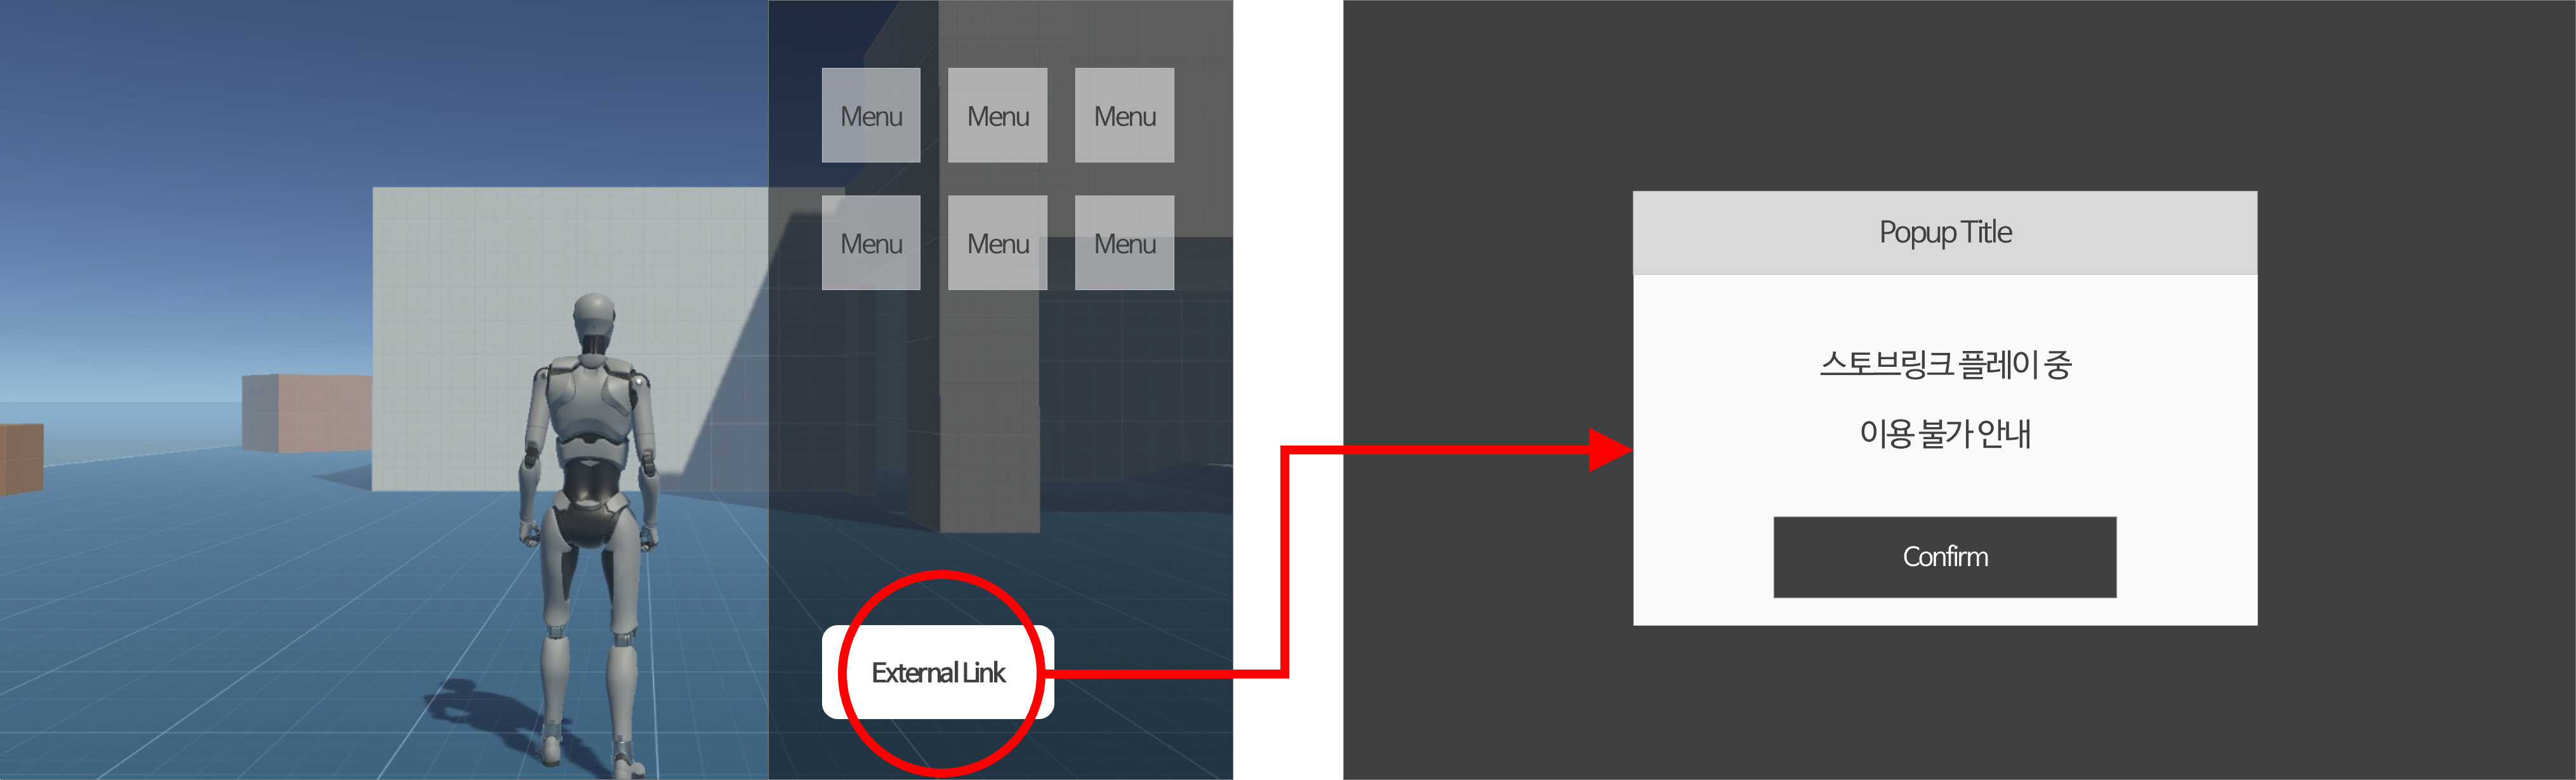
| External link | On clicking an External Link such as community, FAQ, or privacy policy, show the same notice pop-up. |
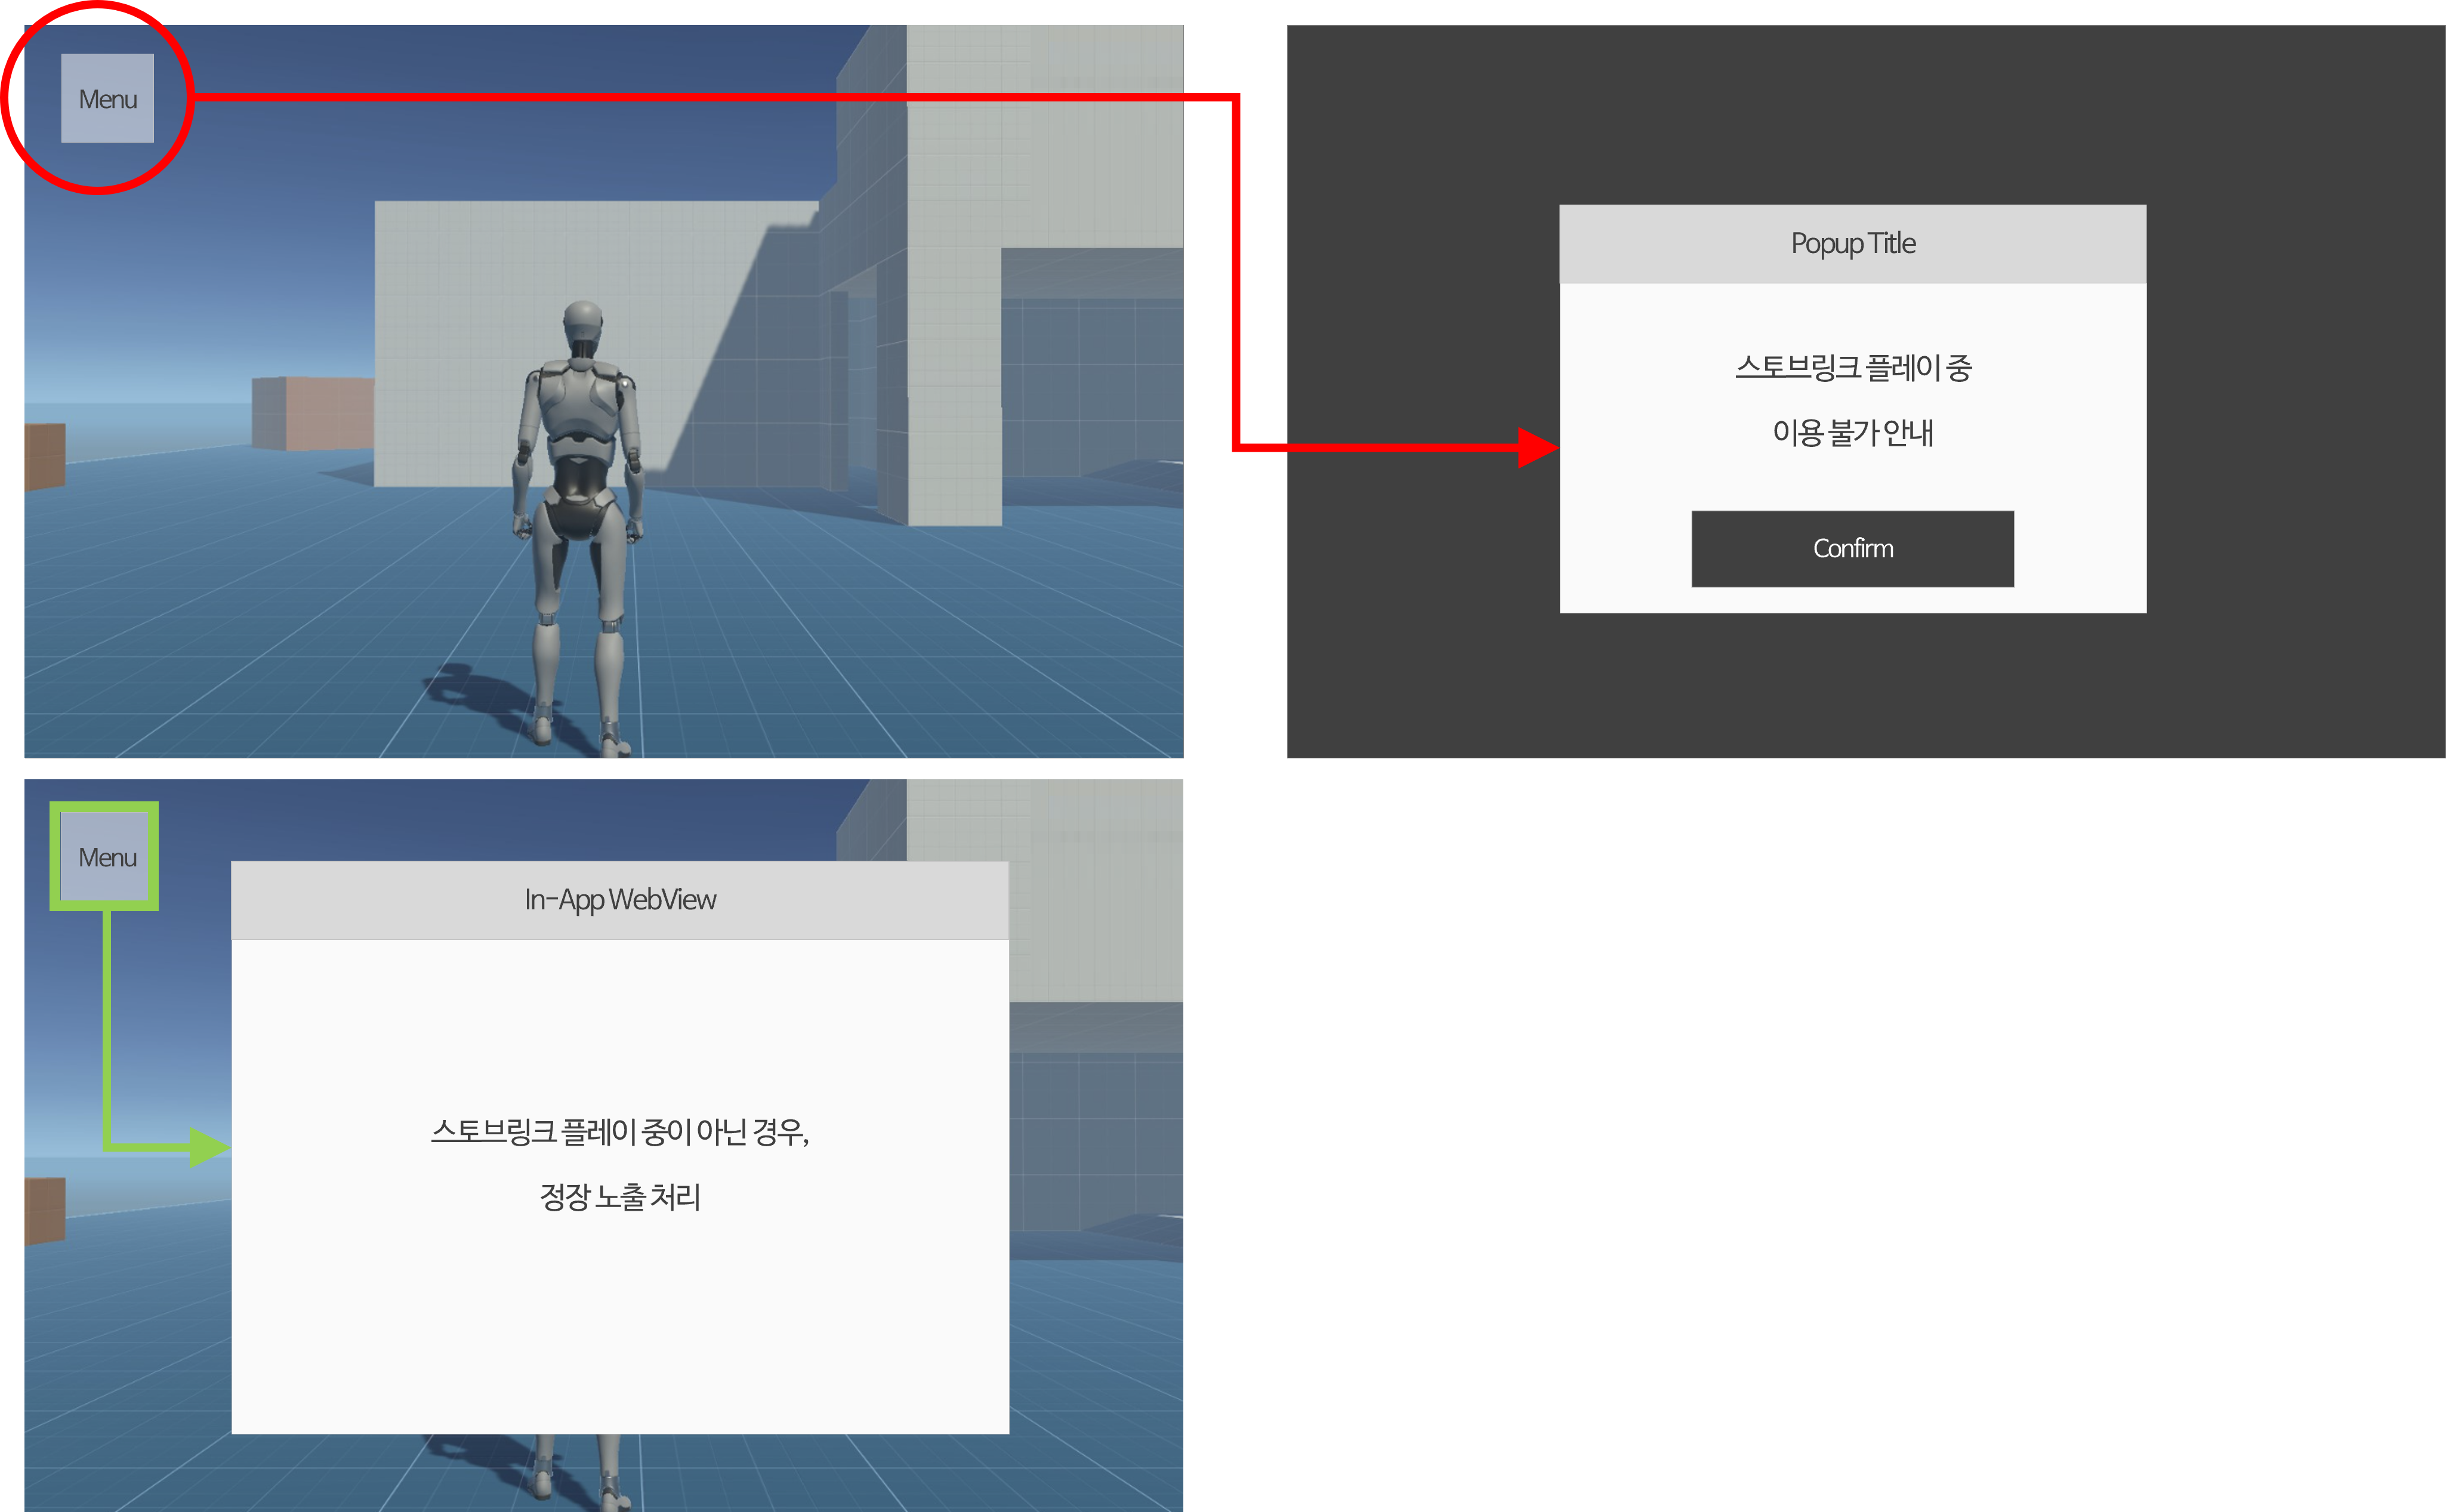
| In-game WebView | On invoking an In-App WebView such as probability info, game notices, or coupon entry, show the same notice pop-up. When not in STOVE Link play, it's shown normally. |
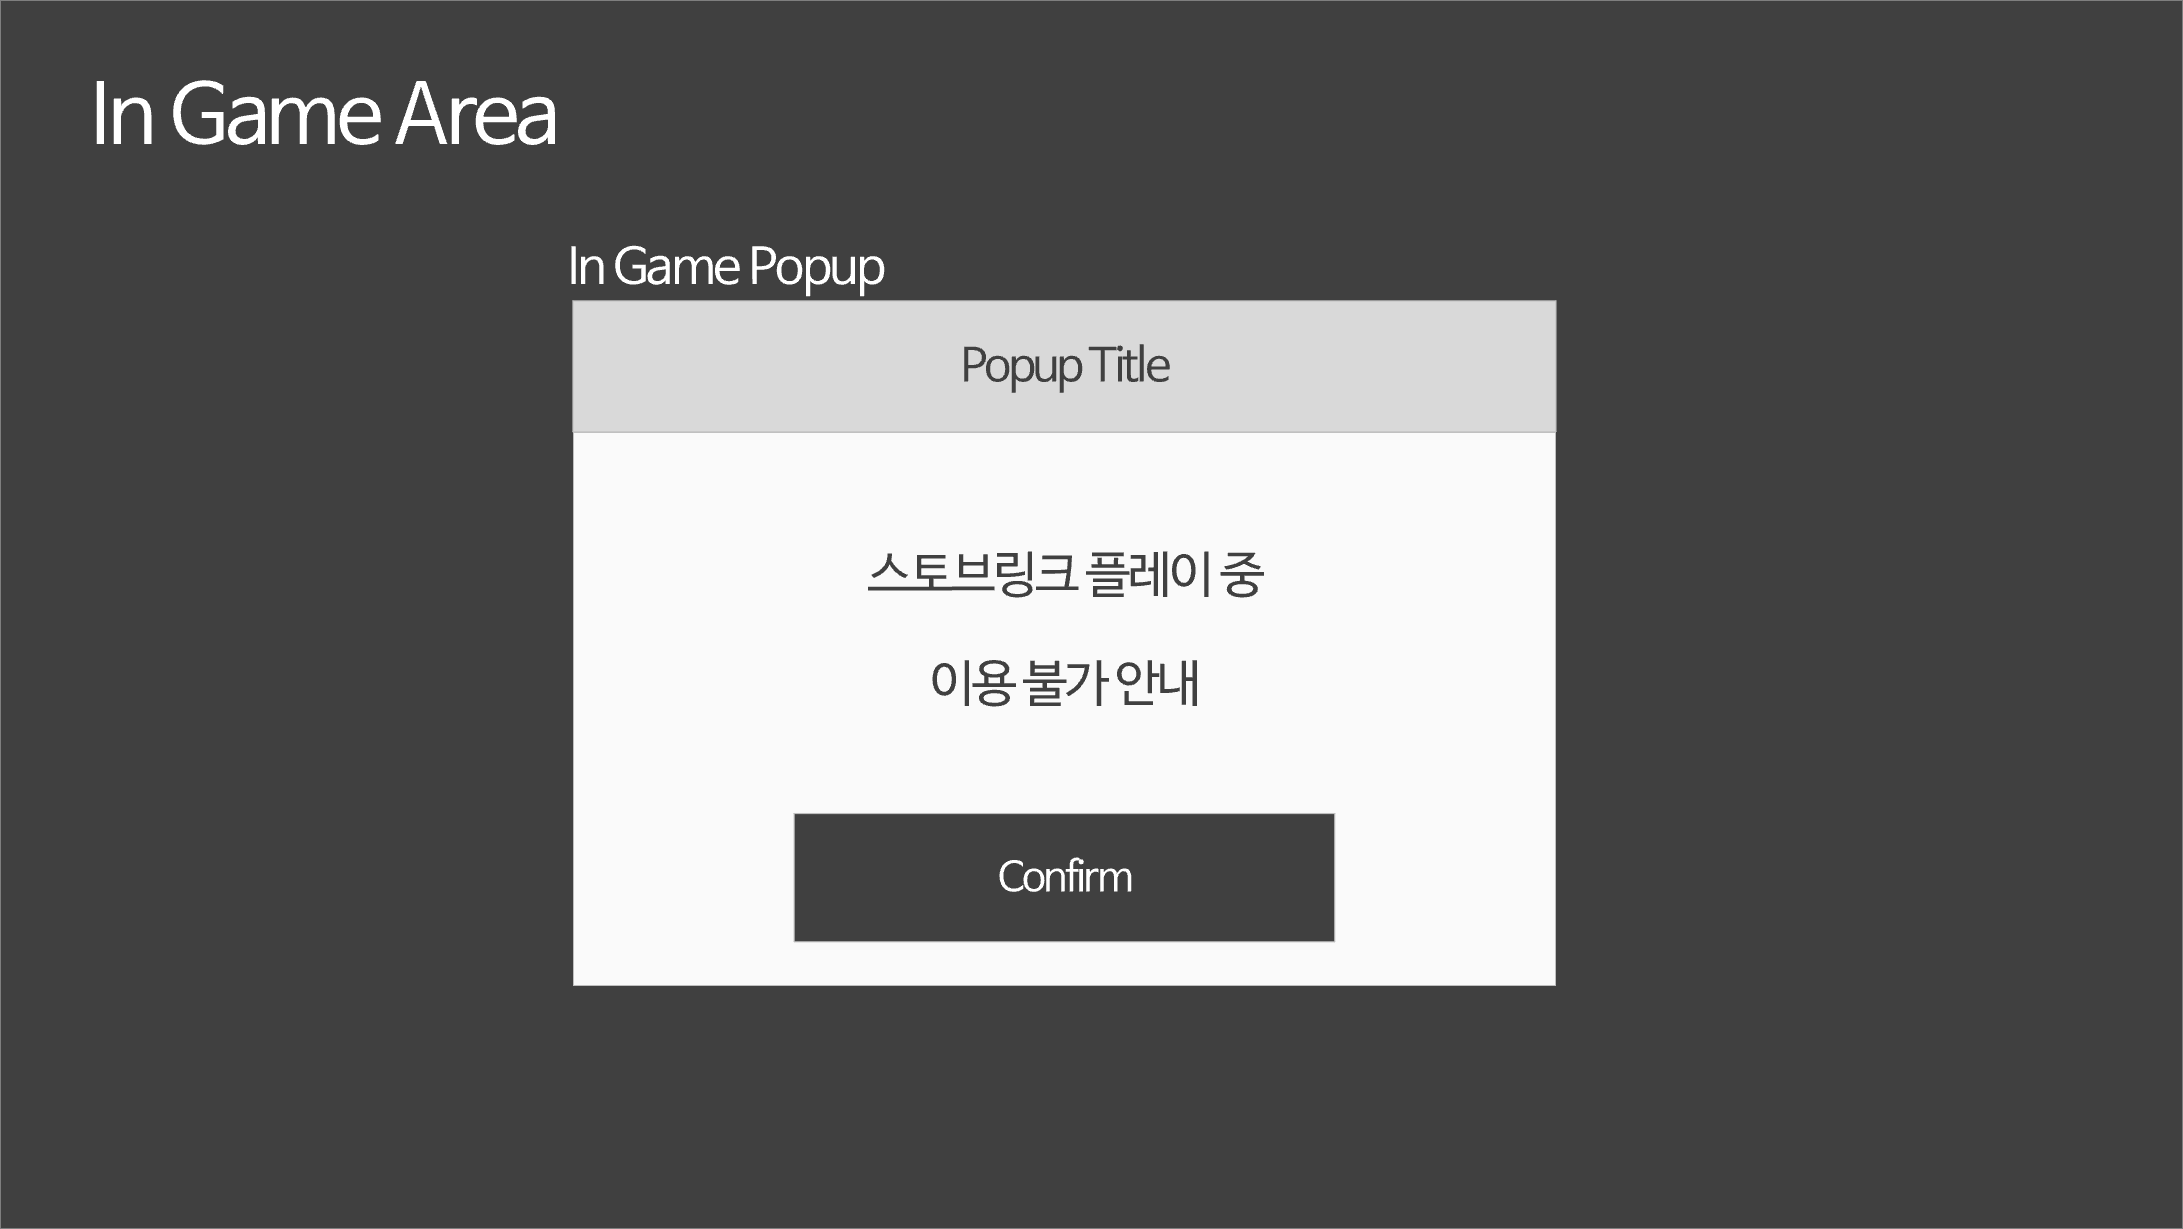
- Exception-handling examples
- Billing payment window
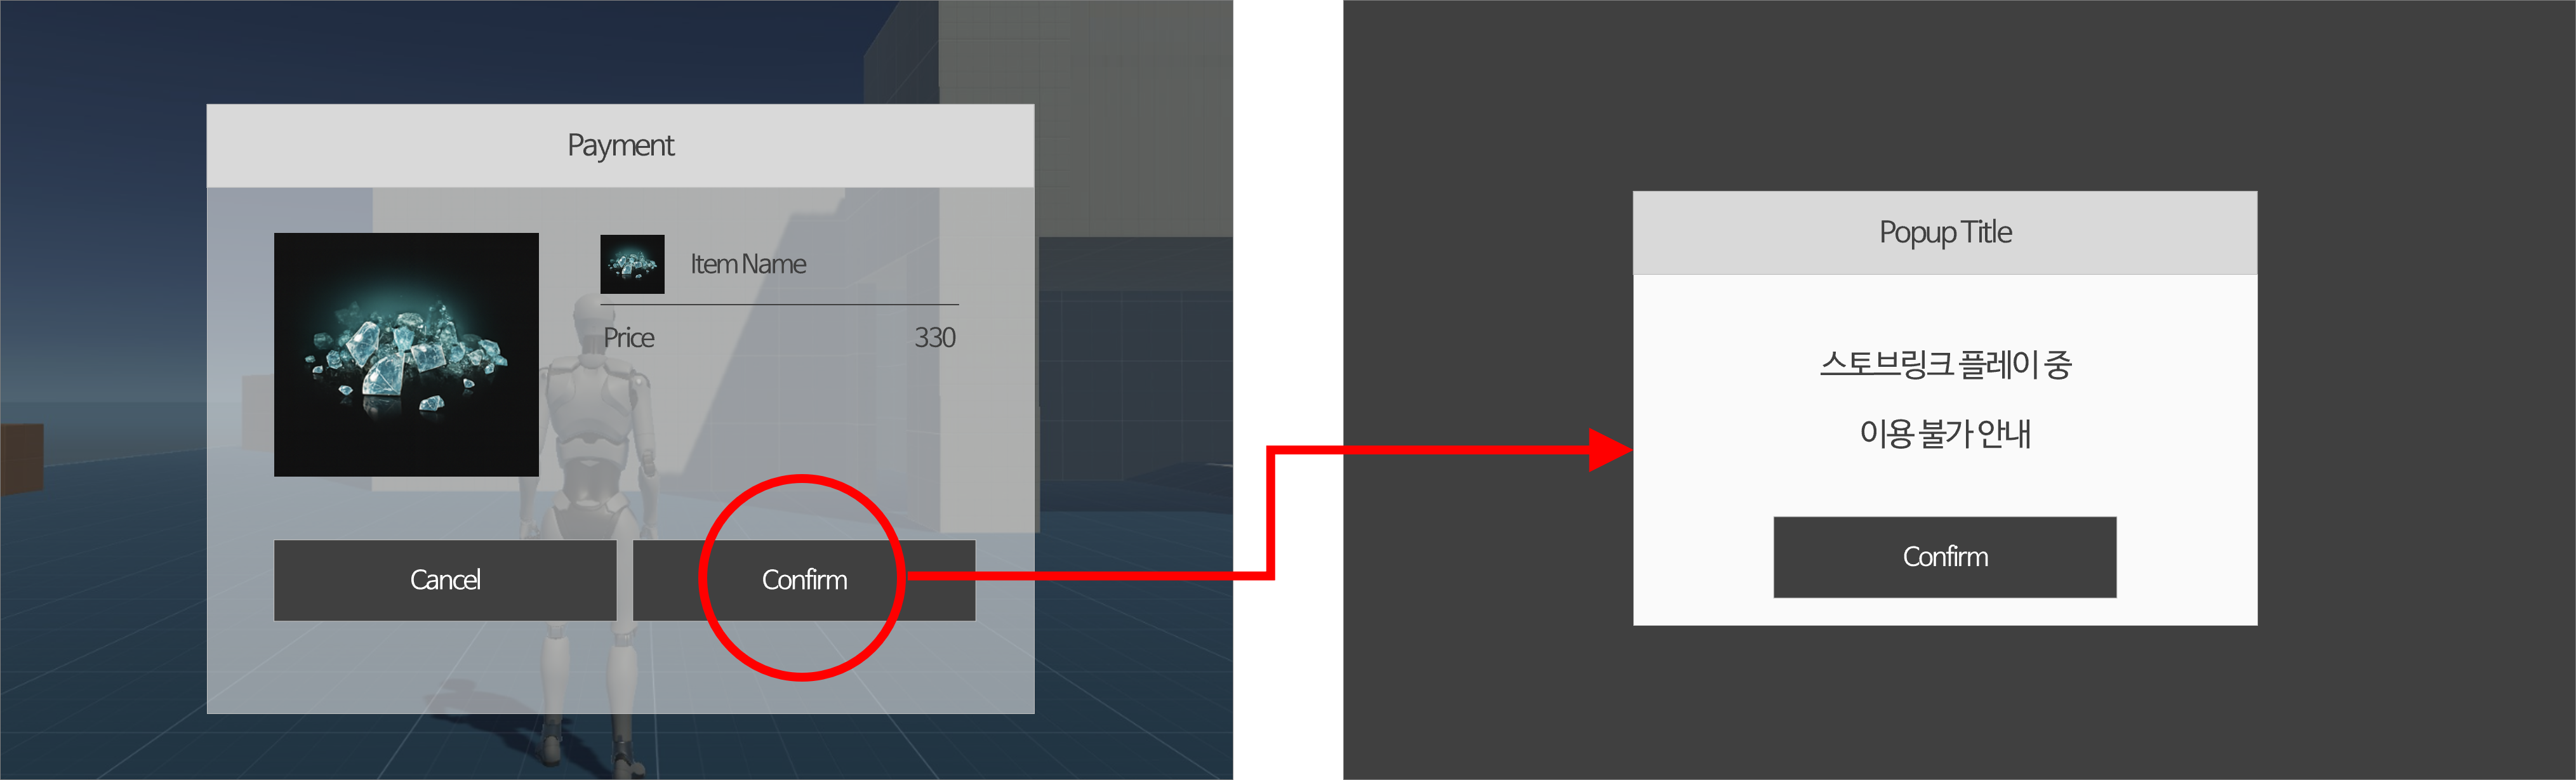
- Billing payment window
- External links (community, FAQ, privacy policy, etc.)
- In-game WebView (probability info, game notices, coupon entry, etc.)
Recommended notice text
Provide text that lets the user recognize both the current state and the resolution, such as "You are in STOVE Link play. This feature is available after you end STOVE Link play."
Development
SDK Download
Start by downloading the SDK that matches your engine and version.
Clicking the file name downloads it directly, and the latest change history can be checked in the release notes.
| Engine | SDK file | Supported environment | Version |
|---|---|---|---|
| Unity | STOVELINK_Unity_1.3.6.unitypackage | Unity 2022.3 | v1.3.6 |
| Unity | STOVELINK_Unity_2.0.2.unitypackage | Unity 6 | v2.0.2 |
| Unreal | LINKSDK_v.3.0.2_UNREAL_v5.6.zip | UE 5.4 ~ 5.6 | v3.0.0 |
Order after downloading
After getting the SDK, check the environment requirements in Prerequisites and follow the per-engine steps in Development Flow.
Prerequisites
Before applying the STOVE Link SDK to your code, the Integration Guide > Integration Preparation step must be complete, and you must meet the environment requirements below depending on your engine.
- Unreal environment requirements
Item Details Unreal Engine UE 5.4 ~ 5.6 (the current LinkSDK v3.0.0 is based on UE 5.6) Development environment Visual Studio 2022, .NET Framework 4.8, DirectX Target OS Windows 10 / 11 (x64) WebRTC M96 ~ M109 compatible BaseSDK (PCSDK) v3.4 or higher Recommended specs Intel Core i5 or higher / NVIDIA GTX 1060 or higher / RAM 16GB or higher Project type Both C++ projects and Blueprint projects are supported
- Unity environment requirements
Item Details Unity version Unity 2022.3.10f1 or higher (2022.3.22f1 recommended) or Unity 6
- For Unity 2022.3:STOVELINK_Unity_1.3.6
- For Unity 6:STOVELINK_Unity_2.0.2Development environment Visual Studio 2019 or higher, C# Scripts Target OS Windows 10 / 11 (x64) Scripting Backend IL2CPP Required Unity Package Input System (1.7.0 or higher)
※ If an existing Input System package is installed, we recommend removing it once and reinstalling to use the one from the STOVELINK package.WebRTC com.unity.webrtc 3.0.0-pre8 (managed automatically inside the Unity SDK)
Development Flow
Unreal
- Step 1. Install the plugin
Item Details Plugin copy location YourProject/Plugins/STOVELINK/Run the initialization script Run RunMeFirst.batin the plugin folder once to copy dependency files.For C++ projects Right-click the .uprojectfile → run Generate Visual Studio project files to refresh the IDE project.
- Step 2. Enable the plugin Choose one of two activation methods.
- Method A. Enable in the Unreal Editor
- Launch the Editor and go to the Edit → Plugins menu
- Disable the built-in Pixel Streaming plugin
- Enable the STOVE Streaming plugin
- Restart the Editor
Pixel Streaming must be disabled.
If both plugins are enabled at once, a conflict occurs and streaming won't work correctly.
- Method B. Edit the
.uprojectfile directlyjson"Plugins": [ { "Name": "PixelStreaming", "Enabled": false }, { "Name": "STOVELINK", "Enabled": true } ]
- Step 3. Verify BaseSDK initialization
STOVE Link works only after BaseSDK initialization succeeds.
At game initialization, be sure to check that
IsSuccessful()istruein the BaseSDKBase_Initializecallback. - Step 4. Add dependencies and initialize the SDK The approach differs between C++ projects and Blueprint projects.
- C++ project
Add dependencies to
YourProject.Build.cs.csharp// 1) ThirdParty path string ThirdPartyPath = Path.Combine( PluginDirectory, "../../Plugins/STOVELINK/ThirdPartyLibrary/StovePCSDK/BaseSDK/Deploy" ); // 2) Link the BaseSDK library PublicAdditionalLibraries.Add(Path.Combine(ThirdPartyPath, "BaseSDK.lib")); RuntimeDependencies.Add(Path.Combine(ThirdPartyPath, "BaseSDK.dll")); // 3) Add the STOVELINK module dependency PublicDependencyModuleNames.AddRange(new string[] { "STOVELINK" });
Call STOVE Link initialization in theBase_Initializecallback.cppvoid AYourGameMode::HandleBaseInitialize(const FBaseInitResult& Result) { if (!Result.IsSuccessful()) return; // Initialize STOVE Link UStoveLinkSubsystem::Link_Initialize(); }
- Blueprint project
Connect the following nodes in order in the Blueprint event graph.
Event Begin Play→Link Initialize(Blueprint node)Link Set On Player Connected/Link Set On Player Disconnected(register callbacks)- Call
Link Set Bitrate,Link Toggle Mobile Virtual Keyboard,Link Send Mobile Notify, etc. as needed
For the streaming component, addUSTOVELINKStreamerComponentto the actor and bind theOnStreamStarted/OnStreamStoppedevents to use it.
- Step 5. Register callbacks and call features
Handle add-on features such as streaming-state changes, mobile input, and notification sending on a callback basis.
The available functions are as follows. (see the API reference menu for detailed specs)
Feature When to use and recommended handling Link_IsStreamingEnabledCheck whether the STOVE Link feature is enabled by game policy.
If disabled, enter the normal local-play path.Link_IsStreamingCheck whether there's a current real-time streaming connection with mobile.
Used for branching mobile-only UI.Link_SetBitrateDynamically adjust the video bitrate.
Recommended values: low 1Mbps · normal 3Mbps · high 5Mbps · ultra-high 10Mbps.Link_ToggleMobileVirtualKeyboardShow/hide the mobile virtual keyboard when an in-game text input field is focused.
Works only while streaming is connected.Link_SetOnReceiveUITextRegister the callback to handle mobile input text delivered to the game.
Depending on theenableSetReceivedTextoption, it auto-sets the last focused widget or only calls the callback.Link_SendMobileNotifySend game events (item acquisition, character death, etc.) as mobile-app notifications.
Requires the notification key and variable mapping pre-registered in Partners.Link_SetOnPlayerConnectedA callback for when the mobile client connects.
Used to enable streaming-only UI.Link_SetOnPlayerDisconnectedA callback for when the mobile client disconnects.
Used for follow-up handling such as pausing gameplay.
Link_SetOnReceiveUIText overwrites the existing callback.
Registering the same callback twice invalidates the previous registration. Register it in only one place across the game, or manage the dispatch logic yourself inside the callback.
- Step 6. Build and verify
After building, check that the following log is output.text
STOVELINK runtime initialized (Streaming Enabled = true)
It's normal for the STOVELINK module folder to be created underYourProject/Intermediate/Build/Win64/. - Step 7. v2 → v3 migration (if applicable) Projects using existing v2 code handle the following when upgrading to v3.
- What can be kept
#include "STOVELINKSdk.h"can be used as-is. (theSTOVELINKnamespace is kept as an Alias ofLINKSDK.)- Existing function-call code compiles without changes.
- Required changes
Change the module-dependency references in
.uprojectand*.Build.cs.csharp// AS-IS (v2) PublicDependencyModuleNames.AddRange(new string[] { "STOVELINK" }); // TO-BE (v3) PublicDependencyModuleNames.AddRange(new string[] { "PixelStreaming" });
Unity
- Step 1. Install the package
- Download the
.unitypackagematching your Unity version from the SDK download page - Import the package via Assets → Import Package → Custom Package in the Unity Editor
- If the Input System package is already installed at import, we advise removing the existing Input System first to avoid conflicts and using the one from the STOVELINK package
- Download the
- Step 2. Multi-platform preprocessing
The STOVE Link SDK works only on the Windows Standalone runtime.
Wrap all SDK calls with preprocessor directives so they're ignored without compile errors on other build targets such as Editor, mobile, and Linux.csharp
#if UNITY_STANDALONE_WIN && !UNITY_EDITOR_WIN // STOVE Link SDK call code #endif - Step 3. Initialize the SDK and the log
After BaseSDK initialization, initialize the STOVE Link SDK and the log feature in sequence.csharp
#if UNITY_STANDALONE_WIN && !UNITY_EDITOR_WIN // 1) Confirm BaseSDK initialization completed (PCSDK3 callback) // 2) Initialize the STOVE Link SDK SignalingManager.Initialize(); // 3) Initialize log collection (recommended for debugging in production) SignalingManager.InitializeLogger(); #endif - Step 4. Enable Remote Control
If the game already uses the Unity Input System, it's automatically compatible.
If you use the existing UI (uGUI), you need to replace the EventSystem's input module.
Input system in use Handling method Unity Input System If a Warning pop-up appears at package import, choose Yes and restart the Editor. Existing Unity UI (uGUI) On the scene's EventSystem GameObject, click Replace with InputSystemUIInputModule on the Standalone Input Module. - Step 5. Streaming connection-state callbacks and exception handling
Receive the mobile connect/disconnect points and branch the game UI.
Also, some screens during streaming (the billing payment window, external links, in-game WebViews) don't work correctly in the mobile environment, so separate exception handling is recommended.csharp
#if UNITY_STANDALONE_WIN && !UNITY_EDITOR_WIN
    SignalingManager.OnStreamingConnect += OnStreamingConnect;
    SignalingManager.OnStreamingDisconnect += OnStreamingDisconnect;
#endif

void OnStreamingConnect()
{
    // Mobile connected — enable mobile-only UI
}

void OnStreamingDisconnect()
{
    // Mobile disconnected — pausing the game is recommended
}

bool IsPlayerConnected()
{
#if UNITY_STANDALONE_WIN && !UNITY_EDITOR_WIN
    return SignalingManager.IsStreamingEnabled() != PARAM_SETTER.NONE;
#else
    return false;
#endif
}
Block the billing payment window, external links, and in-game WebViews in the mobile streaming environment.
Unlike PC, the mobile client can't render external-browser calls or payment UI correctly.
When entering such a screen, we recommend judging with IsPlayerConnected() and redirecting to a PC-environment notice message.
- Step 6. Add-on features (notifications · virtual keyboard · virtual controller)
- Send notifications to the mobile app (
SendGameNotify) Send game events as mobile-app notifications. Use the notification key and variable mapping pre-registered in Partners.csharpvar payload = "{ \"message1\": \"Holy Knight\", \"message2\": \"Legendary\", \"message3\": \"Distorted Nightmare Trajectory Heavy Gauntlet\" }"; signalingManager.SendGameNotify(integrationKey, payload, (statusCode) => { // Use the result code only for logging. Handle it so it doesn't affect gameplay. });
Even if the notification API call fails, it must not affect game progress. We recommend only logging, without showing a separate error message. See the API reference menu for error-code details.
- Using the virtual keyboard (
CommandMsg.OnReceiveText) When text input is needed during streaming, receive text entered on the mobile keyboard into the game UI and handle it.csharp#if UNITY_STANDALONE_WIN && !UNITY_EDITOR_WIN CommandMsg.OnReceiveText += CommandMsg_OnReceiveText; #endif void CommandMsg_OnReceiveText(string text) { // Reflect the text in the currently selected InputField GameObject obj = EventSystem.current.currentSelectedGameObject; if (obj.GetComponent<InputField>() != null) { obj.GetComponent<InputField>().text = text; } else if (obj.GetComponent<TMP_InputField>() != null) { obj.GetComponent<TMP_InputField>().text = text; } }
- Control virtual-controller display from the mobile app (
CommandMsg.OnShowVirtualController) When the controller is turned on/off in the mobile app's link options, the game receives a callback and toggles the on-screen virtual-controller UI. The UI-toggle logic must be implemented by the game itself.csharp#if UNITY_STANDALONE_WIN && !UNITY_EDITOR_WIN CommandMsg.OnShowVirtualController += OnShowVirtualControllerCallback; #endif void OnShowVirtualControllerCallback(bool isShow) { // Sample: toggle the virtual-controller Canvas activation var controller = GameObject.Find("UI_Canvas_StarterAssetsInputs_Joysticks"); var canvas = controller.GetComponent<Canvas>(); canvas.enabled = isShow; }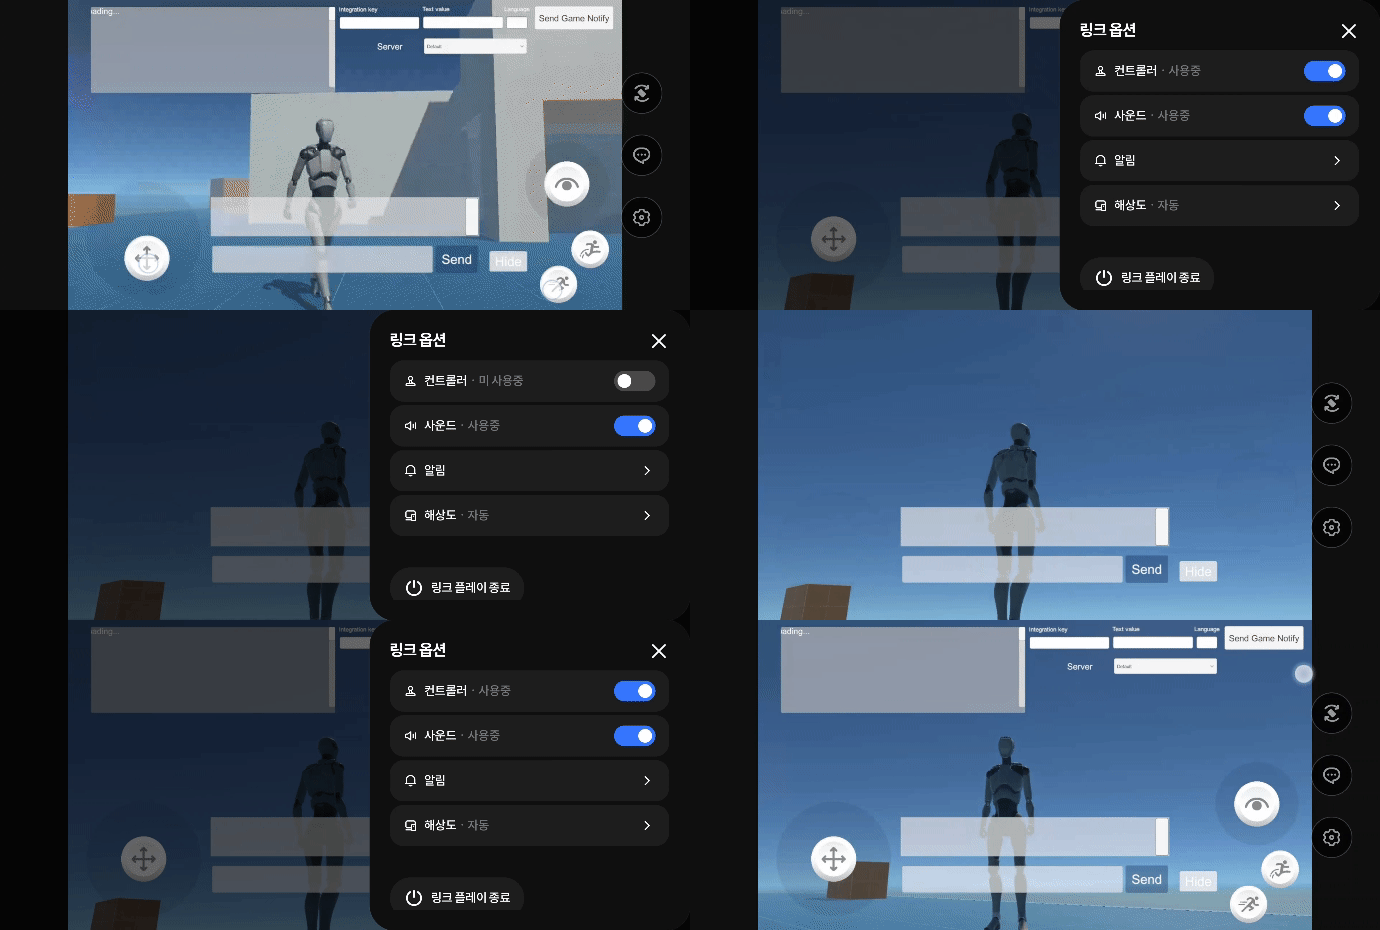
- Step 7. Remove the SDK (if needed)
There are two ways to remove the STOVE Link SDK from the project.
Method Procedure Stable removal Remove all STOVELINK-related packages in the Unity Package Manager, then manually delete the STOVELINK folder under Assets/StreamingAssets/.Quick removal Run the delete_package.batfile included in the SDK package in PowerShell. If the NEW icon appears in the package list on re-import, removal succeeded.
Testing and Verification
After integration is complete, test in the order Sandbox (SB) → Live. Whitelist registration for the test-target game is required. (request registration from the publishing technical contact)
| Step | Test content | Category |
|---|---|---|
| 1. PC client | Download and install the client for the Sandbox (SB) / Live environment. | STOVE PC Client |
| 2. Game install and build registration |
Upload the development build to Partners, then install and run the game with the PC client. (upload a new build to Partners whenever the build updates) The game must be run with STOVE Link use (ON) set. 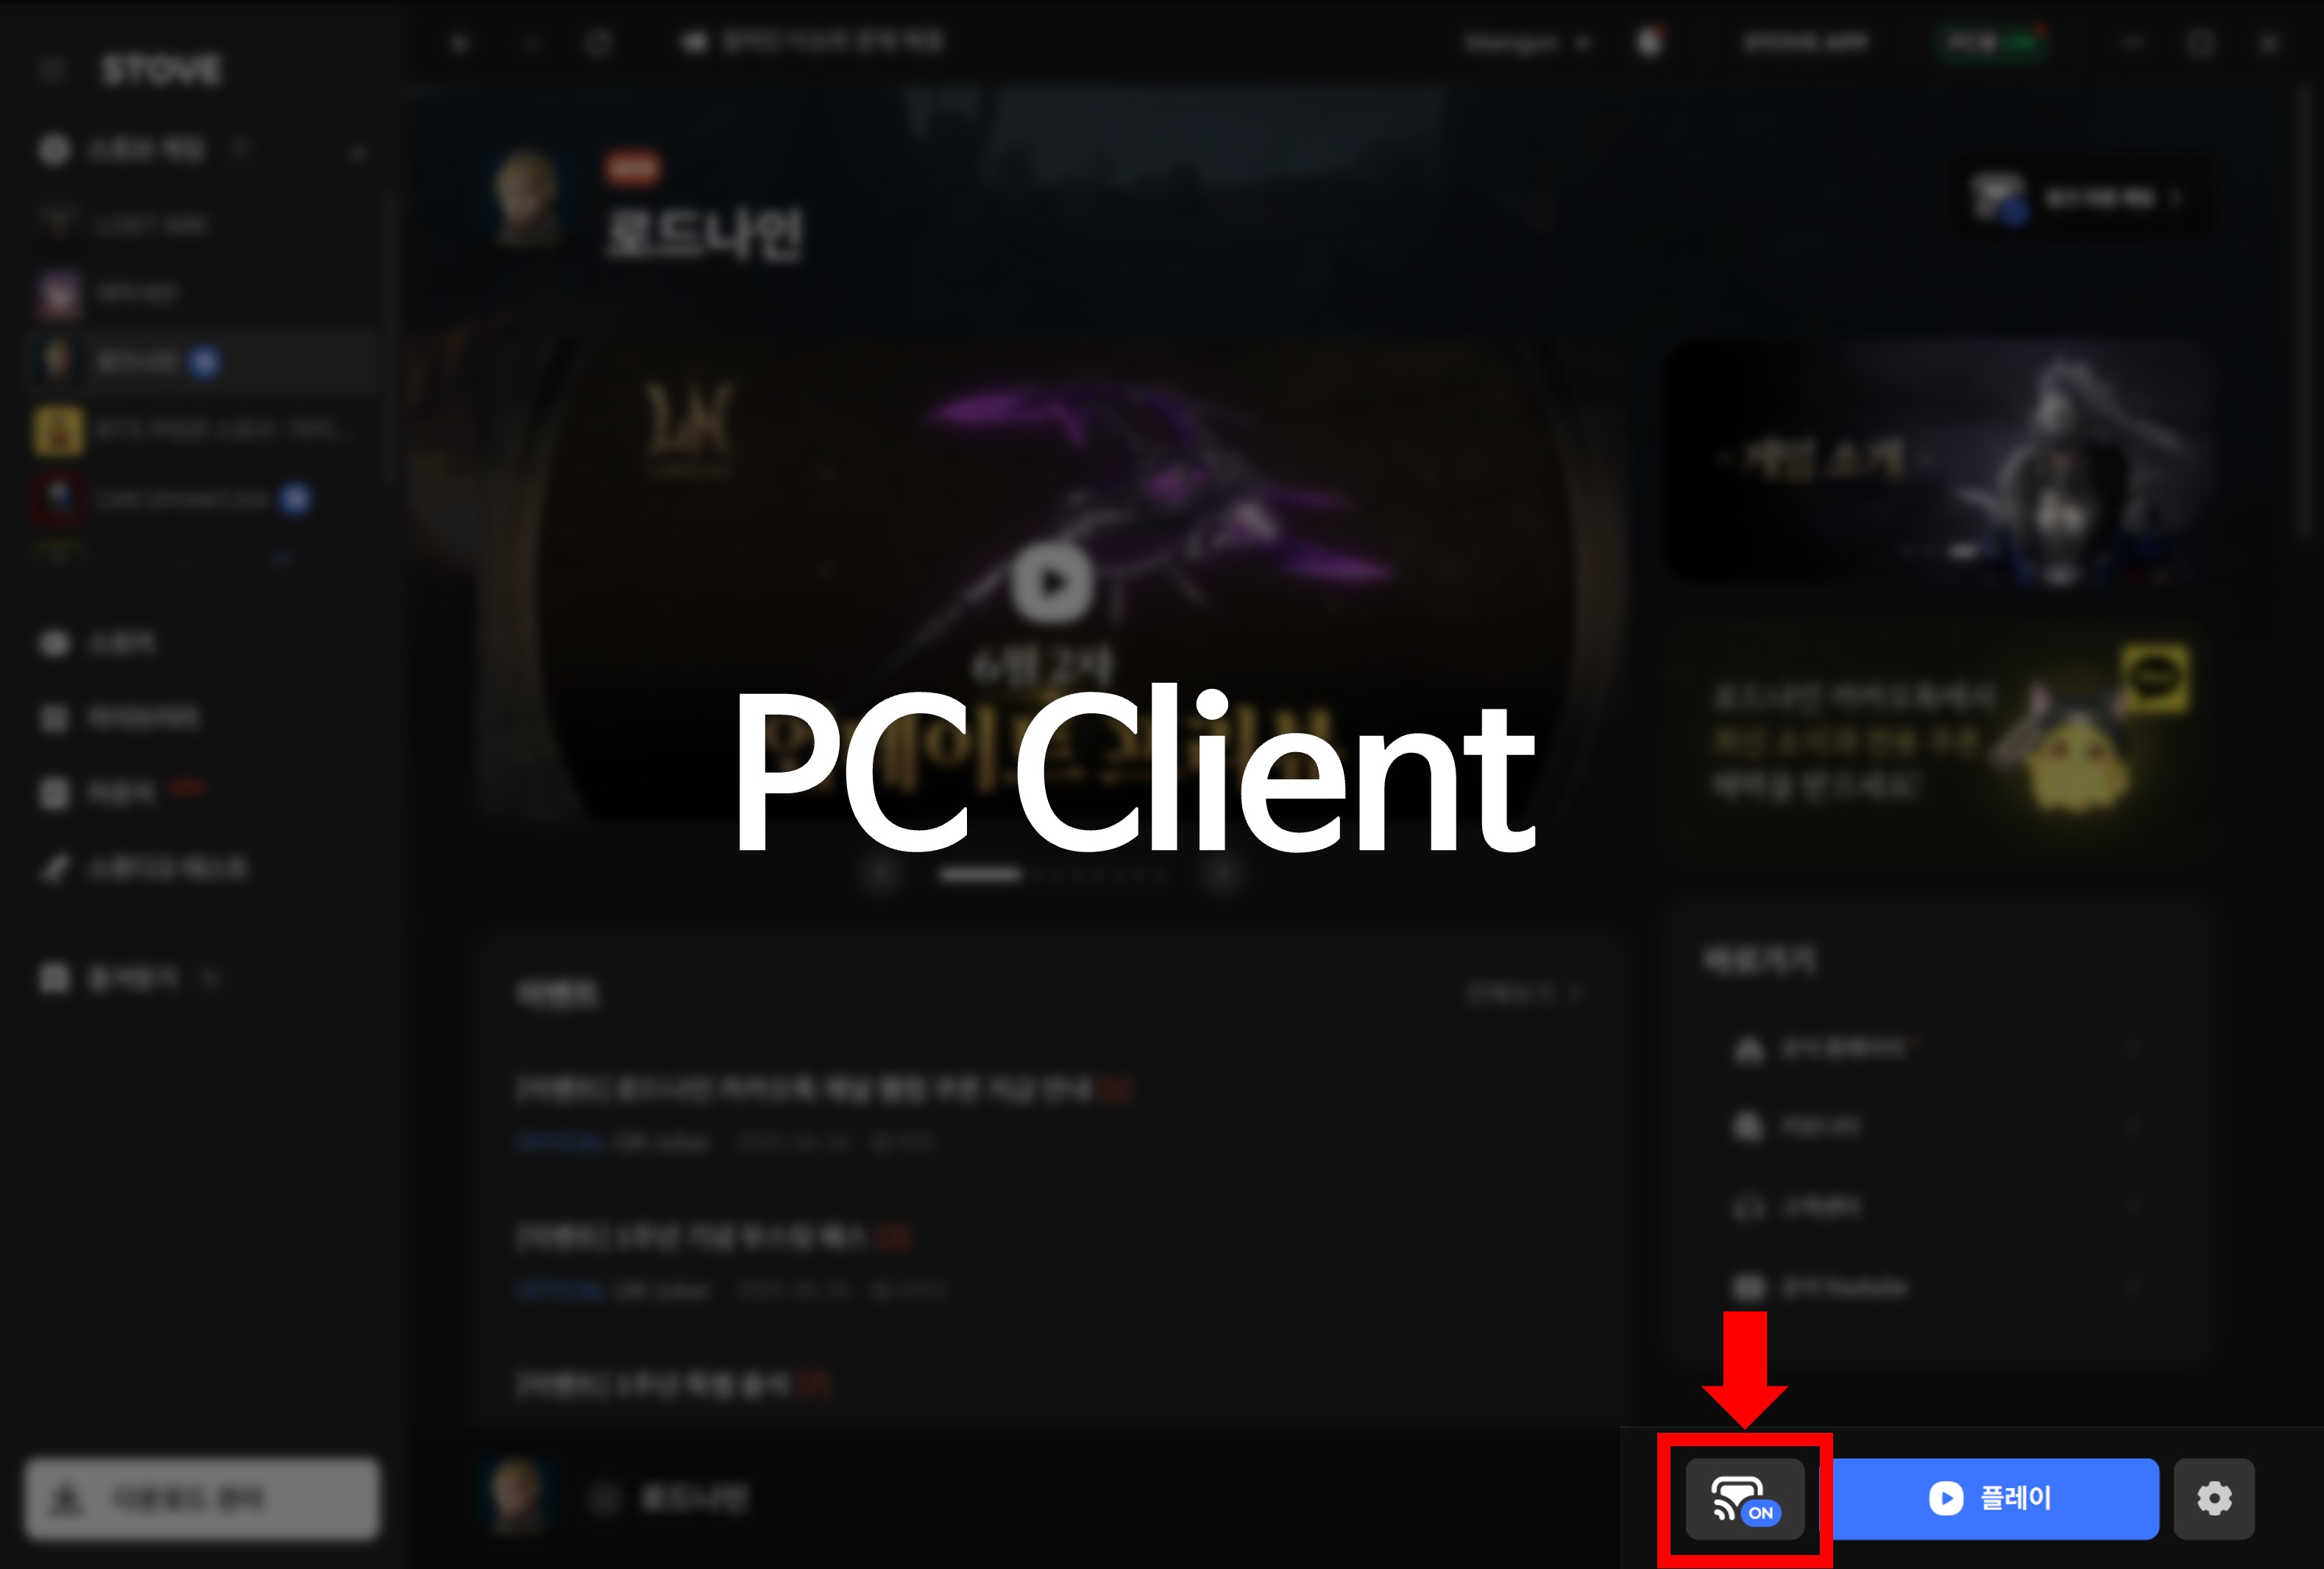 |
- |
| 3. Install the STOVE app |
After installing and running the STOVE app, log in to the STOVE app with the account logged in on the PC client |
|
Android - install the latest test app.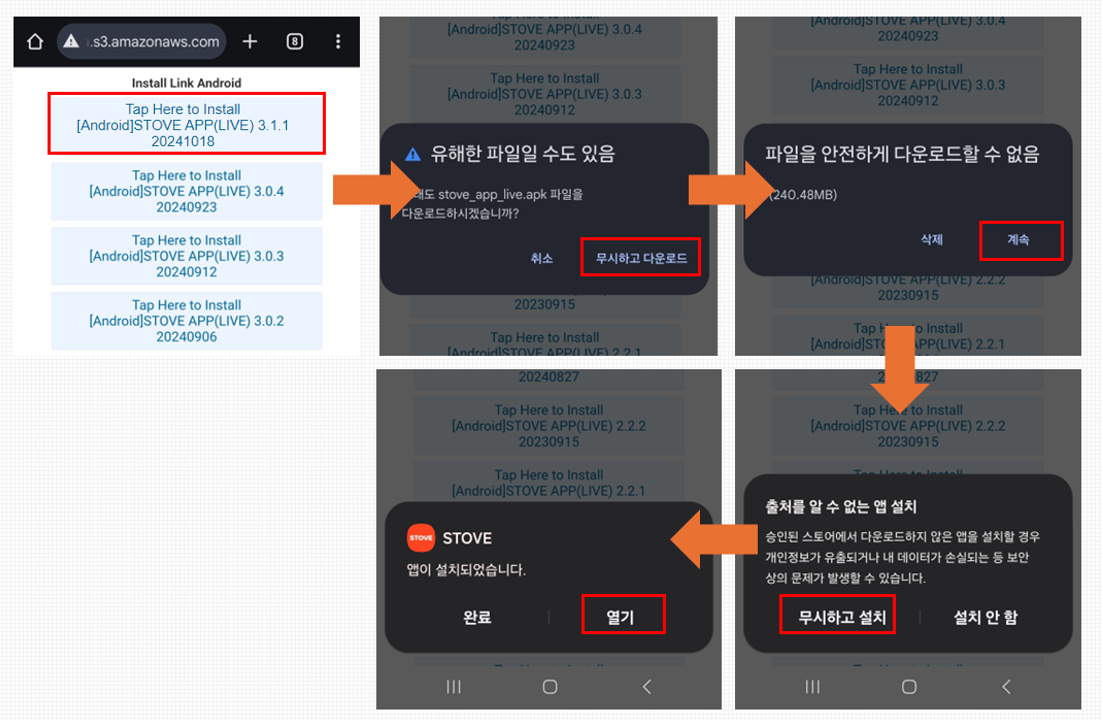 |
Download APK (SB) Download APK (Live) |
|
|
iOS - install via TestFlight or a QR code. - Live: TestFlight 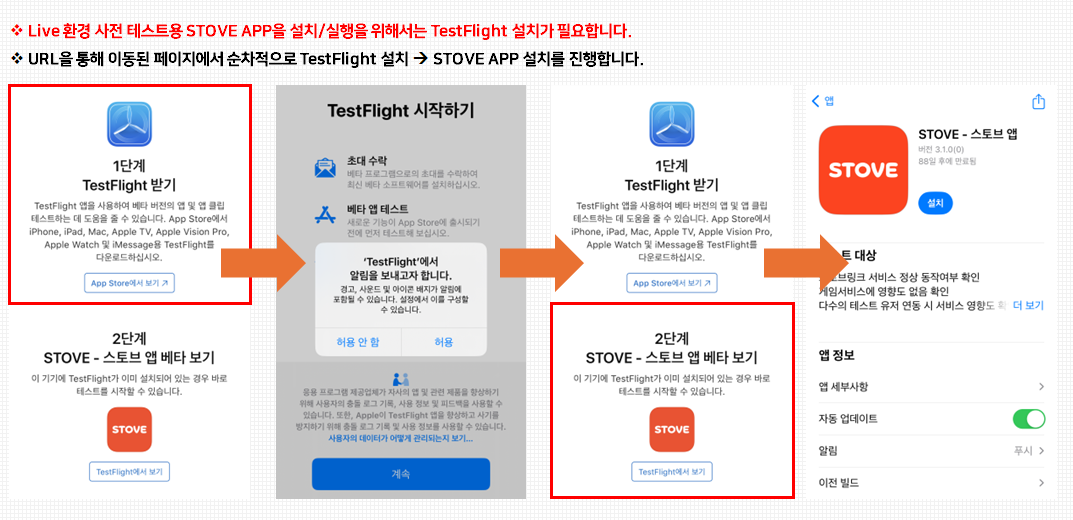 - Live: use a QR code 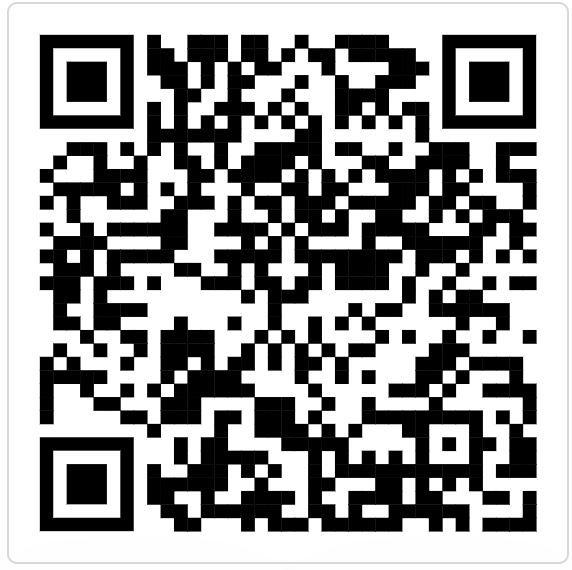
|
Download APK (SB) TestFlight(Live) |
|
| 4. Play test |
- Whether input (touch controls) responds correctly - Whether the sound, notification, controller, resolution, and virtual-keyboard toggles in the options panel work correctly - Whether the mobile app receives notifications and shows multilingual messages correctly when notifications are sent - Whether the game-side callbacks are called correctly on disconnect/reconnect |
- |
Note
The Sandbox (SB) environment is usable only on the Smilegate internal network.
Troubleshooting
- Environment / execution checks
- 1) The log file isn't created
- Check whether StoveLink-related logs are created under the
%appdata%path. - If the user-folder path contains Korean, log creation can fail. Move the user environment to an ASCII-character path or test on a separate user account.
- Check whether StoveLink-related logs are created under the
- 2) The streaming button is disabled in the STOVE launcher
Check whether the
enable_linkplayoption is enabled in the launcher policy settings file.textPath: C:\Users\{UserName}\AppData\Local\STOVE{Env}\Config\policyConfig.jsonjson{ "stove_launcher_policy_config": { "enable_linkplay": true } }
- 3) If the LinkPlay feature is disabled
If LinkPlay display is disabled for a specific game, you can temporarily bypass it by registering the game ID directly in the per-user
PersonalConfig.json. It applies only after you restart the STOVE launcher following the edit.textPath: C:\Users\<UserName>\AppData\Local\STOVEGATE8\Config\<MemberNumber>\PersonalConfig.jsonjson{ "streamingGameIds": ["<GameID>"] }
- 4) I want to check the member number
You can check the member number in the WebSocket connection log inside the log file.
In the example,
108195073is the member number. You can also check it on the STOVE profile page.text[DBG] Signaling: Connecting WS wss://stovelink-ss.gate8.com:8888/s/108195073-1
- 1) The log file isn't created
- Network checks
- 5) Check the CDN connection
Check whether the following CDN-request success message is in the log.
If that log is missing, check the firewall/network settings and whether a VPN/proxy is blocking it.text
BaseAPIRequest: https://static-resource.gate8.com/.../config_streaming.json HTTP request successfully (OK)
- 6) Check the WebSocket connection
On a normal connection, the following log is output.
If that log is missing, check the network environment, whether security software is blocking it, and the settings file.text
[DBG] Signaling: WS connected.
- 5) Check the CDN connection
Check whether the following CDN-request success message is in the log.
If that log is missing, check the firewall/network settings and whether a VPN/proxy is blocking it.
- Feature-specific issues
- 7) Audio isn't output in a specific scene A sound-related instance must be created before STOVE Link initialization. Start the audio system first at game initialization, then call STOVE Link initialization.
In Unreal, calling FApp::SetUnfocusedVolumeMultiplier(1.0f); before STOVE Link initialization keeps streaming audio even if the game loses focus. (auto-call was removed in v1.2.9)
- 8) A crash occurs on mobile-keyboard invocation when using custom UI rather than UMG
Automatic keyboard invocation has been disabled since LinkSDK v1.2.5.
On the CP (game) side, use the API that invokes the keyboard manually (
Link_ToggleMobileVirtualKeyboard).
- 9) Unreal 5.6 builds don't build in the Debug, DebugGame, or Test configuration The missing build configurations were supplemented in LinkSDK v2.0.2 (2026-01-26 build). Please update to the latest SDK.
- 10) Input System package conflicts occur in Unity If the Input System package is already installed in an existing project, it can conflict with the one from the STOVELINK package. Remove the existing Input System, reinstall the one from the STOVELINK package, and restart the Editor.
- 11) A Unity package conflict reverts the WebRTC version to 3.0.0-pre7 Resolved in Unity SDK v1.3.6 or higher. Updating the SDK to the latest version keeps 3.0.0-pre8.
See the API reference menu for the detailed meaning of response codes and error codes.
The full list of HTTP Status Codes and Error Codes returned by the notification API, streaming callbacks, etc. is managed in a separate menu.
Sample Code
- Unreal C++ — from initialization to add-on features
A sample composed as one flow:
Base_Initializecallback → STOVE Link initialization → callback registration → notification sending.
// YourGameMode.h
#include "STOVELINKSdk.h"

UCLASS()
class YOURGAME_API AYourGameMode : public AGameModeBase
{
    GENERATED_BODY()

public:
    virtual void BeginPlay() override;

private:
    void HandleBaseInitialize(const FBaseInitResult& Result);
    void OnPlayerConnected(FString StreamerId, FString PlayerId, bool bQualityController);
    void OnPlayerDisconnected(FString StreamerId, FString PlayerId, bool bQualityController);
    void OnReceiveUIText(FString TextReceived);

    void NotifyAchievementUnlocked(const FString& AchievementName);
};
// YourGameMode.cpp
void AYourGameMode::BeginPlay()
{
    Super::BeginPlay();

    // Register the BaseSDK initialization callback (PCSDK3 area)
    // For the example, assume it's registered externally as RegisterInitCallback.
    BaseSDK::SetOnInitialize([this](const FBaseInitResult& Result) {
        HandleBaseInitialize(Result);
    });
}

void AYourGameMode::HandleBaseInitialize(const FBaseInitResult& Result)
{
    if (!Result.IsSuccessful())
    {
        UE_LOG(LogTemp, Warning, TEXT("BaseSDK init failed. Skip STOVELINK init."));
        return;
    }

    // 1) Initialize the STOVE Link SDK
    UStoveLinkSubsystem::Link_Initialize();

    // 2) Check whether the streaming feature is enabled
    if (!UStoveLinkSubsystem::Link_IsStreamingEnabled())
    {
        UE_LOG(LogTemp, Log, TEXT("STOVELINK disabled by policy. Local play only."));
        return;
    }

    // 3) Register callbacks
    UStoveLinkSubsystem::Link_SetOnPlayerConnected(
        [this](FString S, FString P, bool Q) { OnPlayerConnected(S, P, Q); }
    );
    UStoveLinkSubsystem::Link_SetOnPlayerDisconnected(
        [this](FString S, FString P, bool Q) { OnPlayerDisconnected(S, P, Q); }
    );

    // 4) Virtual-keyboard input callback (includes the option to auto-reflect in the last focused widget)
    UStoveLinkSubsystem::Link_SetOnReceiveUIText(
        [this](FString Text) { OnReceiveUIText(Text); },
        /* enableSetReceivedText */ true
    );

    // 5) Set the initial bitrate (3Mbps)
    UStoveLinkSubsystem::Link_SetBitrate(3000000);
}

void AYourGameMode::OnPlayerConnected(FString StreamerId, FString PlayerId, bool bQualityController)
{
    // Mobile client connected — enable mobile-only UI
}

void AYourGameMode::OnPlayerDisconnected(FString StreamerId, FString PlayerId, bool bQualityController)
{
    // Mobile client disconnected — follow-up handling such as pausing the game
}

void AYourGameMode::OnReceiveUIText(FString TextReceived)
{
    // Use only when you want extra handling in the callback alone
    UE_LOG(LogTemp, Log, TEXT("Mobile keyboard text received: %s"), *TextReceived);
}

void AYourGameMode::NotifyAchievementUnlocked(const FString& AchievementName)
{
    const FString IntegrationKey = TEXT("game.achievement.unlocked");
    const FString Payload = FString::Printf(
        TEXT("{ \"message1\": \"%s\" }"), *AchievementName
    );
    const FString LangCode = TEXT("ko");

    UStoveLinkSubsystem::Link_SendMobileNotify(
        IntegrationKey,
        Payload,
        LangCode,
        [](int32 StatusCode) {
            // Only log so it doesn't affect game progress
            UE_LOG(LogTemp, Log, TEXT("SendMobileNotify result: %d"), StatusCode);
        }
    );
}
- Unreal Blueprint — node composition guide In a Blueprint-based project, you can compose the same flow with the following pattern.
[Event Begin Play]
   └─→ [Link Initialize]
         └─→ [Branch: Link Is Streaming Enabled]
               ├─ True  → [Link Set On Player Connected]   (bind Custom Event)
               │         → [Link Set On Player Disconnected]
               │         → [Link Set On Receive UI Text]
               │         → [Link Set Bitrate (3000000)]
               │         → [Setup Streaming UI]
               └─ False → [Show Local Play Only Message]

[Custom Event: OnAchievementUnlocked (Name: String)]
   └─→ [Make JSON: {"message1": Name}]
         └─→ [Link Send Mobile Notify]
               └─→ [Branch: Status Code == 0]
                     ├─ True  → [Log: "Notify sent"]
                     └─ False → [Log: "Notify failed (silent)"]
For the streaming component, add USTOVELINKStreamerComponent to the actor and bind the OnStreamStarted · OnStreamStopped events to handle it.
- Unity C# — from initialization to add-on features
using UnityEngine;
using UnityEngine.EventSystems;
using UnityEngine.UI;
using TMPro;
using StoveLink;

public class StoveLinkBootstrap : MonoBehaviour
{
    [SerializeField] private GameObject virtualControllerCanvas;

    private void Start()
    {
#if UNITY_STANDALONE_WIN && !UNITY_EDITOR_WIN
        // 1) Assume BaseSDK initialization is already complete in the PCSDK3 area

        // 2) Initialize the STOVE Link SDK + log
        SignalingManager.Initialize();
        SignalingManager.InitializeLogger();

        // 3) Check the activation policy
        if (SignalingManager.IsStreamingEnabled() == PARAM_SETTER.NONE)
        {
            Debug.Log("STOVELINK disabled by policy. Local play only.");
            return;
        }

        // 4) Register connection-state callbacks
        SignalingManager.OnStreamingConnect += OnStreamingConnect;
        SignalingManager.OnStreamingDisconnect += OnStreamingDisconnect;

        // 5) Virtual-keyboard input callback
        CommandMsg.OnReceiveText += OnReceiveText;

        // 6) Virtual-controller display-control callback
        CommandMsg.OnShowVirtualController += OnShowVirtualController;
#endif
    }

#if UNITY_STANDALONE_WIN && !UNITY_EDITOR_WIN
    private void OnStreamingConnect()
    {
        // Mobile connected — enable streaming-only UI
    }

    private void OnStreamingDisconnect()
    {
        // Mobile disconnected — pausing the game is recommended
    }

    private void OnReceiveText(string text)
    {
        GameObject obj = EventSystem.current.currentSelectedGameObject;
        if (obj == null) return;

        if (obj.GetComponent<InputField>() != null)
        {
            obj.GetComponent<InputField>().text = text;
        }
        else if (obj.GetComponent<TMP_InputField>() != null)
        {
            obj.GetComponent<TMP_InputField>().text = text;
        }
        Debug.Log($"Mobile keyboard text received: {text}");
    }

    private void OnShowVirtualController(bool isShow)
    {
        if (virtualControllerCanvas == null) return;
        var canvas = virtualControllerCanvas.GetComponent<Canvas>();
        canvas.enabled = isShow;
    }

    // Notification method to be called externally
    public void NotifyAchievementUnlocked(string achievementName)
    {
        string integrationKey = "game.achievement.unlocked";
        string payload = $"{{ \"message1\": \"{achievementName}\" }}";

        SignalingManager.Instance.SendGameNotify(
            integrationKey,
            payload,
            (statusCode) => {
                // Only log so it doesn't affect game progress
                Debug.Log($"SendGameNotify result: {statusCode}");
            }
        );
    }
#endif

    private void OnDestroy()
    {
#if UNITY_STANDALONE_WIN && !UNITY_EDITOR_WIN
        SignalingManager.OnStreamingConnect -= OnStreamingConnect;
        SignalingManager.OnStreamingDisconnect -= OnStreamingDisconnect;
        CommandMsg.OnReceiveText -= OnReceiveText;
        CommandMsg.OnShowVirtualController -= OnShowVirtualController;
#endif
    }
}
You can copy the sample code as-is, but adjust the callback registration and cleanup timing to fit your game structure.
In particular, callbacks must be released at OnDestroy or scene transition to prevent memory leaks and duplicate calls.